Sage Network brings businesses together through networked accounting. It's a shared platform that seamlessly automates workflows between businesses - even if they don't use Sage accounting software.
For Ireland, we've added new two-digit Nature of Transaction Codes (NOTC) for Intrastat entries. The Irish Revenue extended the codes in April 2023.
2022 R2
New features in the Sage 200 desktop
Sales orders
New features in the Web Portal
Sales orders
-
Confirm despatch of sales order goods and services.
-
Add tracking and shipping information to a despatch, such as courier details, an Incoterm, and a reason for export.
Other changes
Intrastat
You must now specify the Country of origin for Intrastat entries, otherwise they will be listed as invalid.
Businesses in the Northern Ireland and the Republic of Ireland with exports above the dispatch threshold must include certain details to their Intrastat dispatch reports from 1 January 2022. For more information, see these articles:
Watch a video: Video: New features in Sage 200 2022 R2. (opens in a new tab)
2022 R1 RM
This remastered version of Sage 200 Professional 2022 R1 was released on 12/04/2022, and resolves the following issue:
2022 R1
New features in the Sage 200 desktop
Sales orders and quotations
-
Add cross-selling items to quotations.
-
Add suggested items to quotations.
-
Add alternative items to quotations.
-
Add an expiry date to quotations, so you know how long it's valid for.
-
Set a quotation status of Lost, if a customer doesn't want to proceed with a quotation.
Changes to VAT submissions
Making Tax Digital will become mandatory for all VAT registered businesses from April 2022.
XML VAT submissions will no longer be accepted. To support this change, we've deactivated the XML VAT submission feature in the 2022 R1 update. If you previously used the XML VAT submission feature, you can either move over to MTD for VAT, or opt to use the HMRC portal to submit VAT returns manually.
For details of the HMRC changes in April 2022, see Voluntary VAT: Here's what HMRC's April 2022 mandatory Making Tax Digital requirements mean (opens in a new tab).
New features in the Web Portal
Sales orders and quotations
-
Create, amend and view sales orders.
-
Create, amend and view quotations.
-
Sales Order List.
General
-
Changes that you make to lists, such as adding columns, will be remembered for the next time you use the list.
-
Documents that you've printed can be viewed from the Spooler in PDF format.
2021 R1
Try our new Web Portal
You can now use some Sage 200 features using a web browser. It's great for when you're on the move, or away from your desktop PC. The Web Portal is designed for use on computers and tablets, and you can use it straight away without installing an app.
Note - information
To start using the Web Portal, you can open it from the desktop app using  Tools > Show Web Portal in Browser.
What can I do in the Web Portal?
We've included the following features in the Web Portal. This is just the first release, and there will be more features to come!
Sales Ledger (customers)
-
Create, amend and view customer accounts.
-
Customer List.
-
Change account status (hide or put on hold).
-
Customer transaction enquiry.
-
Enter customer payments (refunds) and receipts.
-
Enter customer invoice.
-
Enter customer credit note.
-
Customer defaults and settings (Sales Ledger Settings).
Purchase Ledger (suppliers)
-
Create, amend and view supplier accounts.
-
Supplier List.
-
Change account status (hide or put on hold).
-
Supplier transaction enquiry.
-
Enter supplier payments and receipts (refunds).
-
Enter supplier invoice.
-
Enter supplier credit note.
-
Authorise purchase invoices and credit notes.
-
Supplier defaults and settings (Purchase Ledger Settings).
Nominal Ledger
-
Create, amend, and view nominal accounts.
-
Nominal List.
-
Nominal transaction enquiry.
Cash Book
Stock Control
-
Create, amend, and view stock items.
-
Stock List.
-
Perform a stocktake.
-
Transfer stock.
-
Stock item balances.
-
Stock buying prices.
-
Stock item suppliers.
-
Stock item locations.
-
Stock item history.
-
Stock monthly trading figures.
-
Warehouses List: Create, amend, and delete warehouses.
Sales Orders
New features in the Sage 200 desktop
Excel Reporting
-
We're providing all of our Excel reports for free. These reports were previously only available with .
For the list of reports, see Excel Reporting - list of reports.
After the update, you won't see these reports until you first Restore Default Excel Reports. See Can't see these reports?
2020 R2
-
We've made some changes for businesses to use after the Brexit transition from 1 January 2021.
-
New VAT term for postponed VAT accounting, and two new default VAT rates.
-
New country codes for Northern Ireland (XI) and Great Britain (XU) for use by Republic of Ireland only.
See Brexit transition (UK and Ireland).
-
Opayo is the new name for Sage Pay. We've changed some of the feature names as follows:
-
Sage Pay Settings is now Online Card Settings.
-
Import Sage Pay Transactions is now Import Online Card Transactions.
-
Default report layout names have changed from "Sage Pay" to "Payment Service Provider", for example SOP Invoice Sage Pay (E-Mail) is now SOP Invoice Payment Service Provider (E-Mail).
2020 R1
-
We've updated the custom connector that's used for creating flows with Power Automate. To download and set up the new custom connector, see Set up Microsoft Power Automate with Sage 200.
-
For VAT submissions to HMRC using MTD, the submissions now include additional information to help troubleshoot problems and prevent fraudulent submissions.
-
For VAT submissions using the HMRC gateway (not MTD), you can now use a longer account password, as it was previously restricted to 12 characters.
-
Improvements to support updated version of Sage Bank Feeds.
-
Sage 200 Professional 2020 R1 now integrates with Sage 200 CRM 2020 R1.
Summer 2019
You can now send email notifications by using these new flows that we've provided. Microsoft Power Automate is a cloud-based service that makes it practical and simple for people to build workflows that automate business tasks and processes across applications and services.
Note - information
To use this feature, you'll need to use Microsoft Power Automate with a Microsoft 365 subscription.
-
The purchase requisitions flow automatically sends emails to people to notify them during the authorisation process.
-
Authorisers will receive email notifications when they have new purchase requisitions that require authorisation.
-
The person who submitted the purchase requisition will receive an email notification when it is authorised or rejected.
-
The supplier bank details flow automatically sends emails to people to notify them of any changes to the bank details for supplier accounts.
To set up these flows for email notifications, see Set up Microsoft Power Automate with Sage 200.
Following feedback we received from you, we are pleased to announce these improvements for bank reconciliation:
-
If you don't want to reconcile the full amount of the transaction, you can part reconcile the transaction by entering the Amount to Reconcile for the transaction, before you match it.
The remaining amount of the transaction can be reconciled the next time you do your bank reconciliation.
The transaction will be marked with a status of Part, to indicate it has been part reconciled.
-
You can now see the URN of a transaction when you reconcile or unreconcile.
See Reconcile manually using a bank statement.
See Reconcile using bank feeds.
Now you can attach files and scanned documents when you view sales invoices and credit notes, confirm receipt of goods or services received (GRNs), and view the delivery history of a purchase order or return.
-
When you use the Customer Transaction Enquiry, select a sales invoice or credit note, then select Attached Documents.
-
When you use the Nominal Transaction Enquiry, view the transaction detail for a sales invoice or credit note, then select Attached Documents.
-
When you Confirm Goods Received and Confirm Service / Text Items Received, select the Attach Documents check box before you select Save.
-
When you view the Delivery history for purchase orders and returns, select Despatches or Deliveries, then select Attached Documents.
See Scan and attach documents.
As of March 2021, those working in the UK's construction industry might have to handle and pay VAT in a different way following the introduction of the new VAT reverse charge system for the Construction Industry Scheme (CIS).
For supplies of certain specified construction services, the customer will be liable to account to HMRC for the VAT for these purchases instead of the supplier. The reverse charge will include goods, where those goods are supplied with the specified services.
Note - information
- For full compliance with the CIS, you will need to use a third-party CIS module for Sage 200.
- CIS is only applicable for companies in the UK, and not Ireland.
- The start date for this change to the CIS has been delayed to March 2021 (from October 2020).
-
You can now set your EORI number in company details. This is required by UK companies trading in the EU, and Irish companies trading outside the EU.
Open: Accounting System Manager > Settings > Company Details.
-
You can now set the Country of Origin for a stock item when using a UK company. This feature was previously only available for Irish companies.
Open: Stock Control > Stock Records > Amend Stock Item Details and select the Analysis tab.
-
If you can't open a feature because other people are using a related feature, such as changing settings, you can now see a list of who is preventing access. See Unable to access feature error message.
-
Based on your feedback, you can now show the default contact's email address on the Customers List and Suppliers List.
To add the column, right-click inside the list, then select Columns > Contact Email.
-
We've changed the calculations for the totals on invoices and orders when notional VAT rates are used. See Notional VAT effects on order and invoice totals.
Spring 2019
You can now export and update information for nominal accounts, customer and supplier accounts, and stock items.
This makes updating the information easier if you need to make a lot of changes.
The information is exported to a file in the same format used for an import. This means you can export information and make changes to it using an external tool (such as Excel), and then import your updated information back into Sage 200.
Microsoft Power BI (Business Intelligence) is a collection of software services, apps, and connectors that work together to turn your data into immersive and interactive insights. Power BI lets you easily connect to your data sources, discover what's important, and share that with anyone you want.
You can connect Power BI to Sage 200 to analyse your company data. Sage 200 includes some example reports to get you started, but you can also build your own reports to share with other people inside your organisation.
See Power BI.
You can control who can view and amend supplier bank details by setting access to the feature Bank Details. This feature allows you to show or hide the Bank tab for all supplier accounts.
See Control access to supplier bank details.
You can now open or close an accounting period for all modules at once, rather than having to open them individually.
Open: Settings > Organisation and Financial > Accounting Periods.
See Open accounting periods and Close accounting periods.
Winter 2018
Following feedback we received from you, we are pleased to announce these improvements for purchase requisitions:
-
You can choose whether supplier and nominal accounts are required for purchase requisitions.
-
The combined budget can be set for each individual line in the requisition, rather than apply to all lines in the requisition.
-
You can restrict the nominal code in a requisition to be linked to the combined budget.
-
You can now amend rejected requisitions, so you can make changes and submit them again.
-
Authorisers can amend purchase requisitions submitted by other people.
-
If you select a warehouse on a free text item in a requisition, the warehouse will be applied to the purchase order line.
-
When you make changes to a purchase order that's linked to a requisition, you can choose what happens to the requisition lines.
-
If you cancel an order or delete lines in an order, you can choose whether the linked requisition lines are cancelled or can be re-ordered.
-
If you reduce the quantity of an item in an order that's linked to multiple requisitions, you can allocate the remaining quantity to the requisition lines.
-
If you write off an order, the requisition lines are cancelled.
-
You can now set access permissions to control separately who can authorise requisitions, and who can authorise and generate orders.
See Purchase requisitions.
See Set user access to purchase requisition features.
-
You can now view customers, invoices and payments in the Invoice Payments Portal.
See Use the Invoice Payments Portal.
-
We've changed the Pay Now button so it's easier to add the button to your custom invoice layouts.
See Add a Pay Now button to custom invoices for Invoice Payments.
-
You can now customise the payment message displayed on invoice layouts.
See Change the text displayed on invoices.
-
You can record invoices as paid offline, if your customer pays the invoice using an alternative method to Invoice Payments.
See Record an invoice that has been paid offline.
-
If you cancel an invoice, it'll be removed from the Invoice Payments service, so your customer cannot pay the invoice by mistake. If your customer does click the Pay Now button on their invoice, they'll see a message to say that you have cancelled the invoice and no payment is due.
-
You can check which customers have been uploaded in the Customers List, by displaying the Invoice Payments column.
See Upload customers to Invoice Payments (GoCardless).
-
You'll be notified if payments are outside the range permitted by GoCardless of 1-5000 GBP / EUR.
-
When you enter a purchase order or return, you can select a warehouse when you add a free text item.
The warehouse address will be included on printed orders and returns, so this means that your items are delivered to (or collected from) the right location.
-
If you select a warehouse on a free text item in a purchase requisition, the warehouse will be applied to the purchase order line.
See Record a purchase order.
Now you can attach files and scanned documents when you enter nominal journals and VAT returns. You can scan images directly using a scanner connected to your PC or your network.
-
When you enter a nominal journal, select Save and Attach.
-
When you produce a VAT return, you'll be able to add attachments to the return.
The attachments can also be viewed and amended:
-
When you use the nominal transaction enquiry, or view waiting postings, select Attached Documents.
-
When you view Completed Period Totals for a VAT return, select Attached Documents.
See Scan and attach documents.
Use the audit log to check for any changes that have been made in key areas of Sage 200, such as:
See Audit log.
-
We've changed the name of Sage Payments to Supplier Payments.
-
We've added a welcome page and a new Sage 200 Home desktop home page, so it's easier to find out what's new in Sage 200.
Summer 2018 RM (2020)
Summer 2018
Sage Invoice Payments is a great way for your customers to pay you online, quickly and easily.
Use Sage Invoice Payments to request payments from your customers, using the payment providers Stripe, PayPal, and GoCardless.
You generate invoices with a Pay Now button, then email the invoices to your customers. Your customers then select the Pay Now button to pay the invoice using the payment provider that you've chosen.
After your customer pays the invoice, the transactions can be downloaded and posted in Sage 200.
Invoice Payments integrates seamlessly with Sage 200, making it easier for your customers to pay you, and easier for you to process those payments.
See Take payments using Invoice Payments.
You can use cross-selling items to help speed up entering a full sales order. Cross-selling items are complimentary items which are often sold together with another stock item. For example, if you sell a printer, you might want to show print cartridges or cables for that printer.
Set up cross-selling items if you want to display and add these items when you enter a sales order.
-
To set up cross-selling items for a stock item, amend the stock item and use the Cross-selling tab.
-
Once you've finished setting up all your cross-selling items for your stock items, enable the option to Allow users to select items for cross-selling.
-
When you enter a full sales order and add a standard stock item, click Save and Cross-sell to add a cross-selling item.
See Cross-selling stock items.
Suggested items can help you speed up entering a sales order or quotation, as you can quickly add items that the customer has previously bought from you.
When you enter a full sales order or quotation, select Suggested items to see items that are specific to the customer.
Suggested items include:
- The customer's preferred items (you can think of these as 'favourites').
- Items that the customer has recently ordered.
- Items that the customer has frequently ordered, for example you can see items they've ordered at least 3 times in the last 6 months.
See Suggested items for customers.
You can set up alerts on a customer account, to show messages whenever you deal with that customer. For example, if a customer has specific requirements, you can set up a reminder message that will be displayed whenever you enter an order for that customer.
When you set up an alert on the customer account, you can choose to show the alert for particular activities.
You can choose to show alerts when entering invoices or credit notes, sales orders and returns, quotations and pro forma invoices, and for customer price enquiries.
Alerts are specific to an individual customer, and you can have multiple alerts for each customer.
See Customer alerts.
Now you can attach files and scanned documents when you enter purchase invoices and credit notes. You can scan images directly using a scanner connected to your PC or your network.
The attachments can also be viewed and amended when you authorise transactions, and when you view transactions in the supplier and nominal transaction enquiries.
See Scan and attach documents.
Now you can view a customer or supplier address using Google Maps.
When you're viewing a customer or supplier account, just click the  Google Maps icon next to the address.
Reducing balance depreciation for fixed assets
If you set up depreciation for a fixed asset using the reducing period balance method, it could be difficult to calculate the period depreciation rate to use. Now you can click the % button to calculate the percentage rate to use, when you want to depreciate an asset by a total percentage over a set number of periods.
See Create fixed assets.
Spooler list filters
You can now use filters on the print  Spooler list, to only show the reports you're interested in. You can filter the spooler list by report name, the user who produced the document, the company, the date of the report, or the status of the report.
See Spooler.
Improvements that you've suggested
Following feedback we received from you on the  Ideas Portal, we are pleased to announce these improvements:
Purchase requisitions
When you enter a purchase requisition, you can now search for nominal codes with a particular cost centre or department. To do this, enter a slash / between the code, cost centre and department (nominal code / cost centre / department).
For example:
Import remembers last file location
When you import information, Sage 200 will now remember the last folder that you used for an import.
Sort columns on bank reconciliation
Now when you use bank reconciliation, you can sort the lists of matched and unmatched transactions. Just click on a column heading to sort a list.
Spring 2018
Following feedback we received from you on the Ideas Portal, we are pleased to announce these improvements to quotes and pro formas.
-
Enter pro forma invoices for prospect customers. Using a prospect account means you don't have to create new customer accounts that you might never use.
Open: Sales Order Processing > Pro Forma Invoices > Enter New Pro Forma for Prospect.
-
Convert quotations to pro forma invoices. This is useful if a customer wants an invoice following receipt of a quotation. The pro forma can then be converted to a sales order, and processed in the usual way.
Open: Sales Order Processing > Quotations > Convert Quotation to Pro Forma.
-
Check the progress of quotations with new quotation reports. You can see quotations that have converted to sales orders, and quotations that have been converted to pro formas, but have not yet been completed.
Open: Sales Order Processing > Reports > Status > Converted Quotations.
Open: Sales Order Processing > Reports > Status > Quotations with Outstanding Pro Formas.
See Create a pro forma invoice for a prospect.
See Convert quotations to pro formas.
Do you have nominal accounts, bank accounts, or combined budgets that you're no longer using, or don't want to use just yet?
You can hide the account or budget from lists, so it can't be selected by mistake.
Just edit the account or budget, and set the Active Status to Hidden.
See Hide or show a nominal account.
See Hide or show a bank account.
See Hide or show a combined nominal budget.
This feature was added following feedback we received from you on the Ideas Portal.
Restrict nominal account selection
You can now restrict how you select nominal accounts, to ensure that you can only select accounts with a valid nominal account code, cost centre, and department.
Note - information
This setting is enabled by default, which means that wherever you can select a nominal account list, you must select an account before you can continue. You can change this setting in Nominal Ledger Settings.
See Restrict account selection to existing and active accounts.
Budget v Actuals standard reports
Use these reports to see how much you've spent from your budgets and how much remains, so you can check if you're under or over budget.
Open: Nominal Ledger > Reports > Budget Comparisons.
-
Budget v Actuals By Cost Centre, to group by cost centre.
-
Budget v Actuals By Cost Department, to group by department.
-
Budget v Actuals By Nominal Type, to group by nominal account type (expense, income, asset, liability).
See How to report on your budgets.
The EU's General Data Protection Regulation (GDPR) will come into force on 25 May 2018, and this will affect how you should collect and process data that you collect about an individual.
To help you get ready for the GDPR, we've added some new reports that will help you find information in Sage 200.
-
Find contact details for an individual.
Open: Accounting System Manager > System Utilities > General Data Protection Regulation > GDPR Contact Check.
-
Find old customer or supplier accounts.
Open: Sales Ledger > Reports > Account Analysis > Customers With No Transactions From.
Open: Purchase Ledger > Reports > Account Analysis > Suppliers With No Transactions From.
See Managing your contact information (GDPR).
As part of their plans to modernise the tax system, the Government is changing the way VAT registered businesses create and submit VAT Returns.
From April 2018, HMRC are running a pilot scheme, giving businesses the opportunity to submit VAT returns via the new system and help shape the new digital process.
Note: Available to UK customers only.
The following lists will now refresh automatically when you add or edit an item in the list:
-
Sales Order List.
-
Invoicing List.
-
Purchase Order List.
-
Stock List.
-
Price Book List.
This feature is based on feedback we received from you on the Ideas Portal.
Winter 2017
Bank feeds rules help make data entry and bank reconciliation even easier.
You can use bank feeds rules to automatically create transactions in Sage 200 for your bank transactions that you download from Sage bank feeds. This saves you time entering transactions, and helps you reconcile your bank accounts more efficiently and reduce errors.
Bank feeds rules can be set up to create customer receipts and payments, supplier payments and receipts, and nominal transactions.
See Bank feeds rules.
Watch Bank Feeds Rules (video).
Note - information
The Sage Contact app for Sage 200 has now been withdrawn.
Check budgets
If you use purchase authorisation, you can check that purchase orders you are about to authorise will not exceed the budgets set on your nominal accounts.
If you enable Check budgets when authorising purchase orders, Sage 200 will check your nominal account budgets each time you authorise a purchase order. A warning is displayed when you try to authorise the order if the value of any item on the purchase order will exceed the nominal budget linked to that item, or any item on the purchase order contains a blank or invalid nominal account code.
See Order processing (POP settings).
Original budget values
When you enter your nominal account budgets, or import budgets, you can now set an Original Budget figure. This is useful if you want to keep a record of the initial budget amount so that you can compare it against any changes to the budget.
See Set up nominal budgets.
Budget vs Actuals Excel report
Use this report to see how much you've spent from your budgets and how much remains, so you can check if you're under or over budget.
You can compare your nominal account budget figures against your actual and committed expenditure, and view figures for selected periods or an annual budget. Use the slicers to view details by cost centre, department, report category, individual nominal accounts or a combined nominal budget.
Note: This report is available if you subscribe to .
Open: Excel Reporting > Excel Reports.
See How to report on your budgets.
Period Budgets report
Use this report to check the budget figures per period that you have set for your nominal accounts. For example, you might want to compare past, current and future budget figures for a selection of nominal accounts.
Open: Nominal Ledger > Reports > Budget Comparisons > Period Budgets.
Summer 2017 RM (2020)
Summer 2017
Following feedback received from you, we are pleased to announce our new Invoicing module is available with this version. This is the most requested feature on our Ideas Portal.
Invoicing introduces a new, easy and quick way for you to create invoices to send to your customers. This is great for creating invoices and credit notes with no despatch process.
This is ideal if:
-
You're a service business and don't want to keep records of stock.
-
You don't have a despatch process.
-
You don't have any lead time between orders placed and invoices sent out.
-
Your despatch process has already occurred and you don't want to record it in Sage 200.
Why use Invoicing?
-
Use our new grid entry form for easy and rapid data entry.
-
Add stock items or free text (plus charges and comments) depending on your organisation's processes.
-
As there's no despatch process, you can print or email your invoices straight away.
-
See all your invoices and credit notes together in one list for easy management.
-
You can also report on the profitability and use analysis codes for more in depth reporting.
Just open the Invoicing section from the menu and choose the Invoicing List.
Already using Sales Orders?
That's no problem. If you want to use Invoicing in preference to Sales Orders, just start creating invoices and credit notes in the Invoicing module. All your invoices and credit notes, from both Invoicing and Sales Orders, are shown on the Invoicing list, so you can easily manage both together. All your settings are shared between both modules, so there's no need to make any changes.
Other changes
-
System Settings.
-
SOP Settings: These have been renamed to Invoice and Order Settings. The settings apply to both the SOP and new Invoicing module. They can be access from both sections of the menu.
-
New email layouts and email option.
-
Invoicing List: All your invoices from both from the Invoicing and SOP modules can be seen on a single list.
Read more about Invoicing.
Watch a video.
Want a new, faster way to enter your supplier invoices?
You can now enter these on a single screen using a grid entry form. We've also added function keys so invoice entry can be totally driven from the keyboard for even faster data entry.
Read more about Rapid Invoice Entry
Watch a video
You can now make corrections to customer and supplier transactions from a single screen. Correcting and reversing transactions has been combined into a single option on the menu.
You can now:
-
Change all the information on a transaction including the date, nominal account and amount.
-
Correct foreign currency invoices and credit notes.
Read more about correcting posted customer transactions and correcting posted supplier transactions.
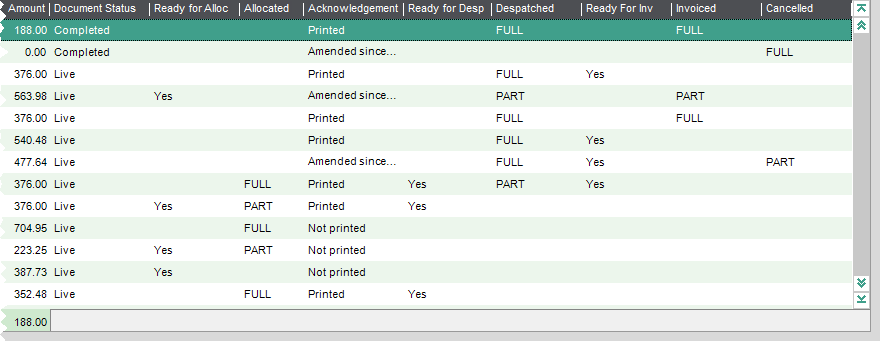
You can now track the progress of orders in the Sales Order List to see when an order is:
-
Ready for allocation, and allocated.
-
Ready for printing order acknowledgement, and printed or amended.
-
Ready for despatch, and part or fully despatched.
-
Ready for invoice printing, and part or fully invoiced.
-
Part or fully cancelled.
Watch a video
Read more about Check the progress of sales orders.
Budget reporting has been enhanced and improved:
-
Business managers can now track the budget for the whole organisation, using the new Budget Overview excel report.
-
Budget holders can see their budgets in real time using the My Budget Overview workspace. This can be accessed via a browser so budget holders don't have to be full Sage 200 users.
-
Managers and finance officers can report on and distribute budgets by cost centre and department using the new Budget Statement Breakdown reports. You can now add contact details against a cost centre and department and email directly to the relevant contact.
Read more about reporting on budgets.
The new purchase requisitions feature provides an easy way to enter requisitions, authorise them, and generate orders.
You can enter and authorise requisitions when you're on the move using the Self Service web app. This means that you only need a web user licence, and don't need access to the full desktop app.
Authorisation rules let you control who can authorise the requisitions, for example a budget owner can authorise any requisitions made against their budget. Budget owners can be set against a Combined Nominal Budget.
You generate purchase orders from authorised requisitions in the both the desktop app and Self Service web app. Orders are generated efficiently, so multiple requisitions for an item from the same supplier can combined into a single order.
Read more about purchase requisitions.
Watch a video
Sage bank feeds is a free secure service that you can use to download your bank transactions to Sage 200, to help you reconcile your bank account.
This reduces the time that you spend reconciling your bank transactions, and ensures your accounts are up to date and accurate.
Once you download your bank transactions, you can match them to the existing transactions in Sage 200, or create new transactions if something is missing. This means that transactions in your live bank account are reflected in Sage 200. Sage 200 will remember which transactions you have matched, ready for your next bank reconciliation.
Read more about Sage Bank Feeds.
Got a list of supplier or customer accounts that you're no longer trading with? Have to add 'Do Not Use' as the customer or supplier name?
Now you can hide these accounts so they're not displayed on the Customers or Suppliers list and not shown on lookup lists.
This helps to prevent transactions being entered for these accounts in error and makes your lookup smaller and more efficient.
Just choose the new Hidden status from the Amend status form.
Following feedback from you, we have extended analysis codes to include your nominal accounts.
Analysis codes allow you to add information unique to your business to your accounts for more in depth reporting.
Analysis codes have always been available to add to your customers, suppliers, stock items, sales and purchase orders. You can now set them up and add them to your nominal accounts as well.
-
Maintain analysis codes: New form to add analysis codes to nominal accounts.
-
Nominal accounts: New tab on Create and Amend nominal accounts.
-
Reports and Enquiries.
Analysis codes have been added as criteria to the following reports:
Analysis code columns have been added to:
-
Import nominal accounts: You can import analysis codes with new nominal accounts.
See Import and export nominal account information.
Read more about nominal analysis codes.
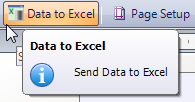
You can now send any Sage 200 report data to Excel. This allows you to analyse data from your reports in a table format in Excel. You can then work with the data in Excel, such as filtering the information, or using pivot tables.
This is different to the existing functionality to Export data to Excel.
For more information, see Send report data to Excel with Report Designer.
These features are based on feedback we received from you on the Ideas Portal.
-
Improved access to reports from the Self Service web app.
Web users can now access reports from a separate tab in the Self Service web app.
-
2nd Reference on Transaction Enquiry forms.
A 2nd ref field has been added to customer and supplier transaction enquiry forms, allowing you to sort and find transactions using the 2nd ref.
-
Additional new transaction types on Bank Reconciliation.
You can now enter the following transactions whilst reconciling your bank account:
-
Transfers between bank accounts.
-
Customer refunds (customer payments).
-
Supplier refunds (supplier receipts).
-
Direct debits and standing orders due report.
Use this new report to find the outstanding value of SO and DD (Cash Book > Reports). Useful for working out your committed costs.
-
Portrait versions of the aged debtors and aged creditors reports.
Want to see your debtors or creditors reports printed portrait rather than landscape?
Open: Sales Ledger > Reports > Credit Control > Aged Debtors Report (Detailed) Portrait or Aged Debtors Report (Summary) Portrait.
Open: Purchase Ledger > Reports > Payments Control > Aged Creditors Report (Detailed) Portrait or Aged Creditors Report (Summary) Portrait.