Import and export customer accounts
Find this screen
Open: Sales Ledger > Utilities > Import and Export > Import Accounts
Open: Sales Ledger > Utilities > Import and Export > Export Accounts
How to
Create an import file for customer accounts
You can import customer accounts using either a CSV Comma Separated Value (CSV) file format. Sage 200 can import and export data in the CSV file format. or XML Extensible Markup Language (XML) file format. Sage 200 can import and export data in the XML file format. file.
-
Download the import information and example files:
- Customer Accounts import format (XLS): Details of the information you need to include in the file.
- Customer Accounts example CSV file: Use this to import from CSV format.
- Customer Accounts example XML file (opens in a new tab): Use this to import from XML format.
- Create your import file in the format of the CSV or XML example file.
-
Read the information in the import format file (XLS), and make sure your information is correct and all mandatory fields are included.
- The required mandatory fields will depend on whether you are creating a new account or updating an existing account.
- Some fields can only be set when you create a new account, and can't be updated.
- Save your import file.
Validate your import file
Open: Sales Ledger > Utilities > Import and Export > Import Accounts
You can validate the file to make sure all the records are in the correct format and have the required mandatory fields. No records are imported
-
Select Validate records only and click OK.
-
Browse to your import file, select it and then click Open.
The file is checked and two reports are generated:
- The Update Report: Shows the valid records that would be successfully imported into Sage 200.
- The Update Report (Invalid): Shows the invalid records that would not be imported into Sage 200. The reason for the failure is shown in the report, and there may be more than one reason for the failure.
Note: The reports are displayed as a preview, printed, or sent to the spooler. This depends on the Output mode you have set.
Note: If you get a message that the process cannot access the file, make sure your import file is closed and isn't open in any other applications.
-
Check both reports to ensure that your records are complete and correct.
- Make any required corrections to the records in your import file.
- To revalidate your import file, repeat this process.
Import customer accounts
Open: Sales Ledger > Utilities > Import and Export > Import Accounts
-
Select Validate and import records.
-
Choose whether you want to update existing accounts:
- If your import file contains existing accounts that you want to update, select Update account if it exists.
- If you don't want to update existing accounts, don't select Update account if it exists.
-
Choose the defaults to apply when the following are not specified in the import file.
Note: If you leave these values blank in the import file, the specified defaults you now specify are automatically applied to the imported account records for you. This can save you time when preparing the import file.
Choose from:
- The nominal account to which transactions will be posted.
- The payment terms days and their starting point.
- How long to keep transactions in the account history (Keep transactions for).
- The country code that represents the country in which your
-
Choose what to do if accounts have new analysis codes or values that don't currently exist in Sage 200.
-
To import accounts with new analysis codes or values, select Ignore Invalid Analysis Codes.
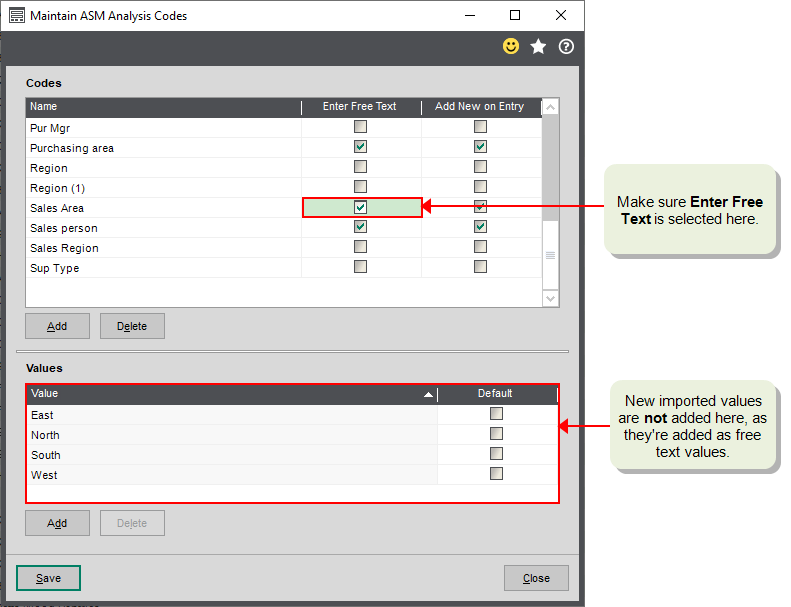
This imports new values for any analysis codes set to Enter free text on the Analysis Codes screen.
Note: Make sure the relevant analysis codes are set to Enter Free text before you import.
- If you don't select Ignore Invalid Analysis Codes and the analysis code or value doesn't exist in Sage 200, the account isn't imported.
-
-
Click OK.
-
Browse to your import file, select it and click Open.
Sage 200 validates the contents of your import file, imports valid records and generates two reports:
- A list of the valid records that were successfully imported.
- A list of records that failed the validation checks so were not imported.
Note: The reports are displayed as a preview, printed, or sent to the spooler. This depends on the Output mode you have set.
Note: If you get a message that the process cannot access the file, make sure your import file is closed and isn't open in any other applications.
-
Check both reports to ensure that your records have been successfully imported.
-
Make required corrections to the records in your import file.
As well as updating the records that were not imported we advise you to also remove those records that were successfully imported. Imported records will be reported as existing in subsequent imports and will clutter your Update Report (Invalid) report.
- Repeat this process to import your
Export customer accounts
Use this to export customer accounts to a file. You can then make changes to your accounts using an external tool (such as Excel), and then import your updated information back into Sage 200.
Open: Sales Ledger > Utilities > Import and Export > Export Accounts
- Select the
- All
- Single
Analysis code: Export all
- To export accounts that match an analysis code, select both the name and value; e.g. accounts where Region has the value North.
- To export all accounts that have a blank value for an analysis code, select the analysis code name but leave the value blank. This is useful if you want to find
- All
- If you also want to include
- Click OK, then click Yes to proceed.
-
Choose the filename and location, then click Save.
If you have a large number of accounts, it might take a short while to export all the information.
Useful info
Mandatory information
Mandatory information when creating new accounts (not updating existing accounts):
AccountNumber: This is the code for the accountAccountNameCurrencyISOCode: The currency must already exist in Sage 200. Enter the ISO symbol, e.g. GBP not £.- The
EuroAccountNumberCopiedFromTois mandatory if you are creating a euro duplicate account for the
Other identifiers can be mandatory if other identifier values are set:
-
These fields must all have values for Sage 200 to create accounts:
CountryCode,MonthsToKeepTransactionsFor,DefaultNominalAccountNumber,PaymentTermsInDays,SYSPaymentTermsBasis.You have the option to enter values individually for these in the import file, but you can also enter or select default values to fill in this information when you run the Import Accounts options. This can save some time when preparing import files.
Analysis codes
Import new analysis codes
When you import accounts, you can include analysis code values for each customer.
You can import new values for existing analysis codes. To do this:
-
Make sure the relevant analysis codes are set to Enter Free text.
This is required because when the customer account is created, the analysis code value is added to account as a free text value. The new value is not added to the list of defined Values on the Maintain Analysis Codes screen.
-
Enter the new values in the import file.
Tip: Be careful, if you mistype a value in the import file, that mistyped value will added to the record.
- Choose Ignore Invalid analysis codes when you import the file.
Invalid Analysis Codes
Select Ignore Invalid Analysis Code to import analysis codes and values that do not exist in Sage 200. The codes will be imported in one of the following ways:
- If the value does not exist in Sage 200, and the analysis code allows free text, then the value is imported.
- If the value does not exist in Sage 200, the analysis code does not allow free text and the code is mandatory, the default value is used on the account.
- If the value does not exist in Sage 200, the analysis code does not allow free text and the code is not mandatory, a blank value is used on the account.
Clear this option to report invalid analysis codes and values on the error log. The analysis codes and values will be imported in one of the following ways:
- If the analysis code does not exist in Sage 200, it is not imported.
- If the value does not exist in Sage 200, the value will be imported if the code allows free text.
- If the value does not exist in Sage 200 and the code does not allow free text, the value will not be imported.
Exporting and updating information
Some information can be exported to a CSV file, which can make updating the information easier if you need to make a lot of changes.
The information is exported to a CSV file in the same format used for an import. This means you can export information and make changes to it using an external tool (such as Excel), and then import your updated information back into Sage 200.
For details of which records you can export and update, see What can I import, export and update?
Updating information
-
An import file can include information for both new records and existing records that you want to update. You can choose whether or not to update existing records when you import.
- Check the import format spreadsheet (XLS/XSLX file) for details about each import format.
-
Not all fields need to be included in the import file. You only need to include the mandatory fields.
- If you do not want to include a field for a particular record, just leave that field blank.
- If you do not want to include a field for any of the records in your import file, then you can remove the field altogether (including the heading).
Questions
I have invalid records when I import
What happens when
What happens when I validate the file?
When you validate an import file, Sage 200 checks for the following:
-
Whether an item already exists.
-
All items contain the required mandatory fields.
-
All fields are correctly formatted.
The result of the validation is provided by reports.
-
A report lists the items that are valid and can be imported.
-
A separate report is produced to list any items that are invalid and can't be imported. The report will tell you why individual items are invalid.
Note: Depending on your selected output mode, the reports are displayed as a preview, sent to the spooler, or sent to the printer.
What happens when I import the file?
- The import file is validated.
-
The import file is processed.
All valid items are imported, and any invalid items are ignored.
-
The result of the import is provided by reports.
-
A report lists the valid items that were successfully imported.
-
A separate report is produced to list any items that were invalid and could not be imported.
Note: Depending on your selected output mode, the reports are displayed as a preview, sent to the spooler, or sent to the printer.
-