Despatch stock (non traceable item)
Stock items must be allocated to the order lines you want to despatch. It is the allocated quantity that is despatched, not the order quantity. You can allocate stock automatically when entering the order, or separately using the Allocate stock options.
You can specify a Despatch date.
If you have selected to Update the stock quantities when the order despatch is confirmed in the SOP settings Processing tab, this date is used to:
- Record any stock transactions generated when despatching the order.
- Update the allocated quantities and stock history.
- Record the cost of sales posting if you have chosen to Generate cost of sales posting for SOP in the stock control settings Options tab.
Note: If you have selected to Update the stock quantities when the invoice is posted and use the invoice date on stock history in the SOP settings Processing tab, the despatch date is used on the order and the printed despatch note only. The invoice date is used to record the stock and nominal postings.
If you part despatch goods that are stored in more than one bin in a warehouse, you must confirm the amount you want to despatch from each bin. This makes sure that accurate stock levels are maintained for each bin. If you do not change the quantities here, you must amend the picking list or amend the stock allocations to keep an accurate record of your stock levels.
-
The despatched quantities are updated on the order lines and the order lines' despatch histories are updated.
-
If you have chosen to Update stock quantities when order despatch is confirmed in the SOP settings Processing tab:
-
The allocated quantities and history for the item are updated.
-
The balances for stock items are reduced.
-
The stock movement history is updated if you have selected Keep movement history in the stock item product group Details tab.
-
The cost of sales postings are added to the nominal ledger using the Despatch date, if you have chosen to Generate cost of sales posting for SOP.
-
-
If you have integrated with Project Accounting:
-
If you have chosen to Generate cost of sales postings for SOP in the Stock Settings Options tab, committed project costs become actual.
-
If you are using Work In Progress (which is selected in the Project Accounting Settings | Posting tab) and you have chosen to Update stock quantities when order despatch is confirmed in the SOP Settings Processing tab:
-
Costs, including uplift costs, are posted to the WIP account and not to the Expense account.
-
The WIP value is updated with the full cost, including uplift.
See how the WIP account is derived- If Use Specified is selected on the cost item linked to the project item in the posting, the WIP account is the WIP code with the specified cost centre and department.
- If not, then if Split postings between cost centres for balance sheet accounts is selected on the company's System Settings | Operational tab in Accounting System Manager, the WIP account is the project item WIP code and the cost centre and department from the parent project.
- If Split postings is not selected, the WIP account comes from the project item WIP account and the cost centre and department are blank.
-
-
-
Despatch notes are printed if you have selected to Print despatch notes in the SOP settings Document Printing tab.
If you have set up cloud document storage, printed despatch notes can also be saved to cloud document storage.
-
If you have chosen to record tracking and shipping information when you despatch order items, you can you can enter these details immediately when you confirm the despatch.
-
You must have allocated stock to the order.
To despatch stock (non traceable item)
Open: Sales Order Processing > Order Processing > Goods Despatched and Received > Confirm Goods Despatched.
-
Select the orders that are ready for despatch using the Select items to despatch options.
Click Find to locate a specific order.
-
To despatch items from a single warehouse, select the Warehouse.
-
Click Display. The orders ready for despatch, according to the selection criteria, are displayed.
If there is more than one order matching the criteria, select the relevant orders and click OK.
Each order line shows the Order No, Requested Date, Order Date, Confirmed Date, AC Ref, Item, Warehouse, Qty Required, Qty to Despatch and selling Unit.
Note: The Alerts column will show you when stock item alerts have been set up for this activity and
 icon in the Alerts column. See Stock item alerts.
 -
Enter the Despatch date. This defaults to the system date. Depending what you select for Update stock quantities when in the SOP settings Processing tab, the despatch date is used to:
-
Record any stock transactions generated from despatching the order.
-
Update the allocated quantities and stock history.
-
Record the cost of sales posting if you have chosen to Generate cost of sales posting for SOP.
-
-
Select an order line.
-
Enter the amount to despatch in the Qty to Despatch column (this must be a value greater than or equal to zero but not exceeding the Qty Required). The Qty Required is the allocated quantity.
Note: The amount to despatch must be a multiple of the item's selling unit.
-
Multiple locations only: If you are part despatching from more than one bin, enter the quantity to despatch from each bin, then click OK.
Note: You can only do this if you do not use the SOP setting Allocate stock on order entry, and have manually allocated stock for this order.
-
Click Save to confirm that you have finished amending the despatch quantities and want to despatch the goods.
If you record tracking and shipping information with the despatch, you'll be prompted to add this now. See Add tracking and shipping information.
Add tracking and shipping information
This feature is only available from Sage 200 Professional 2022 R2 version onwards.
To record tracking information when you despatch order items, or amend the tracking information, you must first enable Record tracking on despatch in SOP Settings - Processing. See Record tracking information for despatches.
When you despatch an order, you will be prompted to add tracking and shipping information.
-
Enter the information that's relevant for this despatch:
-
Courier: The courier who will deliver the items.
If you have chosen a default courier, this will be selected automatically, but you can still change it.
To set up couriers, see Couriers for sales orders.
-
Consignment no: The consignment number for the despatch.
-
Incoterm: The Incoterm for the despatch.
If you have chosen a default Incoterm, this will be selected automatically, but you can still change it.
Incoterms are rules issued by the International Chamber of Commerce (ICC) that can be used for the international sale of goods. If you produce a commercial invoice when you export goods, you will need to enter the Incoterm on the invoice.
To set up Incoterms, see Incoterms for sales orders.
-
Reason for export: The reason for export for the despatch.
If you have chosen a default reason for export, this will be selected automatically, but you can still change it.
If you produce a commercial invoice when you export goods, you will need to enter a reason for export on the invoice. For example, the reason for export might be a sale, a gift, or an item for repair.
To set up reasons for export, see Reasons for export for sales orders.
-
Weight: The shipment weight in kg. Your courier might require you to enter this as the net weight (excluding packaging) or the gross weight (including packaging).
-
Pieces / No of pieces: The number of packages in the shipment.
-
Notes: Any additional information about the despatch. These notes are for your internal use, and they are not included on despatch notes.
-
-
Select Save to record tracking information and confirm the despatch.
Not ready to enter tracking information?
-
If you don't want to record tracking information immediately, select Skip Tracking.
-
If you want to return to the despatch details, select Cancel.
-
If you want to add or change the tracking information later, use Amend Tracking Information. See Tracking and shipping information for a despatch.
Check which orders need to be despatched
Once items in the order have been allocated, the allocated quantity will be ready to despatch. If you use order acknowledgement, you need to print the acknowledgement before you can despatch.
You can see when orders are ready to despatch from the Sales Orders List.
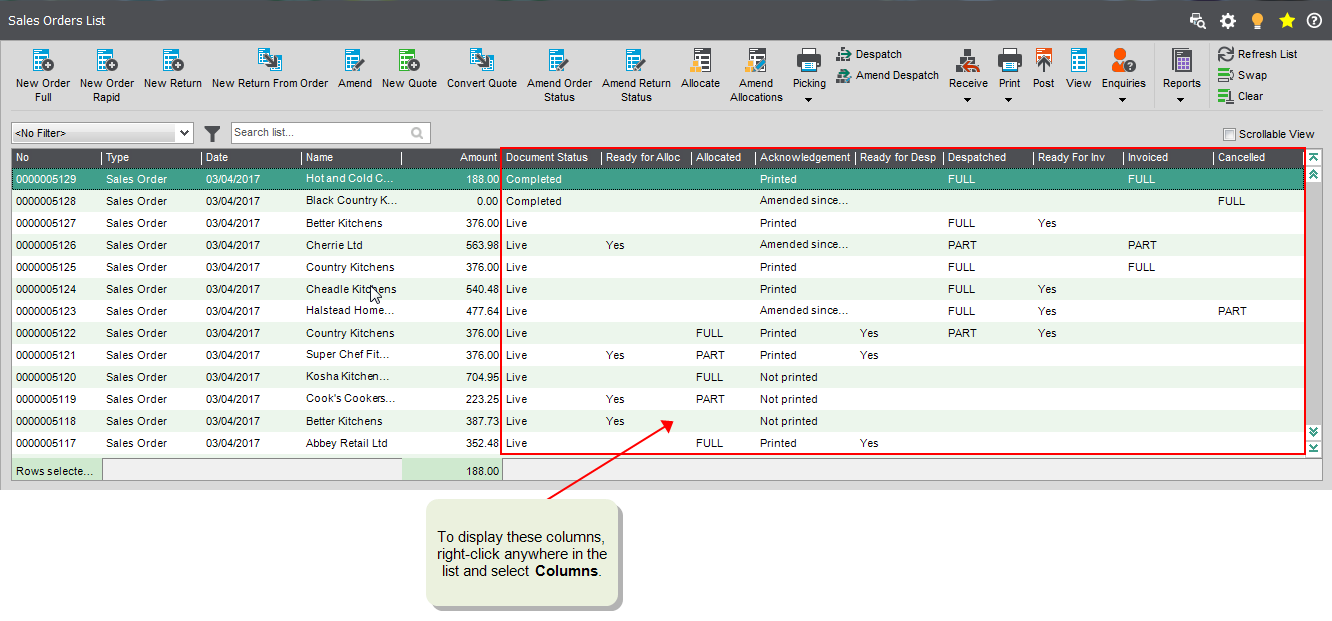
Open: Sales Order Processing > Sales Orders List.
-
The Ready for Desp column shows Yes where some items in the order have been allocated, but not yet despatched.
If none of the items in the order require despatch this will be blank.
-
The Despatched column shows:
- Part: Only some of the items have been despatched, but some items still need to be despatched.
- Full: All items in the order have been despatched.
- If none of the items in the order require despatch this will be blank.
Once an order is partly or fully despatched, you can print invoices for the items that have been despatched.
Open: Sales Order Processing > Sales Orders List.
- Right-click anywhere in the list.
-
Select Columns > Delivery > Ready For Desp.
Select Columns > Despatched.
Save despatch notes to cloud document storage
You can set up Sage 200 to save despatch notes to cloud document storage when you print them, so that they can be viewed by everyone.
Despatch notes that have been saved to cloud document storage can be viewed in PDF format.
Open: Sales Ledger > Customers List, then select the customer and click View in Document Storage.
-
The customer's folder is displayed in cloud document storage. The Despatch Note folder contains despatch notes for the customer.
See Save printed documents to cloud document storage.
Other tasks
Amend goods despatch (traceable item)
Set up despatch notes to send via email
Tracking and shipping information for a despatch
Check the progress of sales orders
Reference
Printing options (SOP settings / Invoice and order settings)
Processing options (SOP settings / Invoice and order settings)