Import and export nominal account information
Find this screen
Open: Import Records > Nominal > Import Account File
Open: Export Records > Nominal > Export Nominal Accounts
How to
Create an import file for nominal accounts
To help you with the import, we have provided files which you can download.
You can import Nominal accounts using either a CSV Comma Separated Value (CSV) file format. Sage 200 can import and export data in the CSV file format. or XML Extensible Markup Language (XML) file format. Sage 200 can import and export data in the XML file format. file.
-
Download the import information and example files:
- Nominal Accounts import format (XLSX): Details of the information you need to include in the file.
- Nominal Accounts example CSV file: Use this to import from CSV format.
- Nominal Accounts example XML file: Use this to import from XML format.
- Nominal Accounts import format (XLSX): Details of the information you need to include in the file.
- Example CSV file: Use this to import from CSV format.
- Create your import file in the format of the CSV or XML example file.
-
Read the information in the import format file (XLSX), and make sure your information is correct and all mandatory fields are included.
- The required mandatory fields will depend on whether you are creating a new account or updating an existing account.
- Some fields can only be set when you create a new account, and can't be updated.
- Save your import file.
Create an import file for nominal transactions
To help you with the import, we have provided files which you can download.
You can import Nominal transactions using either a CSV Comma Separated Value (CSV) file format. Sage 200 can import and export data in the CSV file format. or XML Extensible Markup Language (XML) file format. Sage 200 can import and export data in the XML file format. file.
-
Download the import information and example files:
- Nominal Transactions import format (XLS): Details of the information you need to include in the file.
- Nominal Transactions example CSV file: Example import file in CSV format.
- Nominal Transactions example XML file: Example import file in XML format.
- Create your import file in the format of the CSV or XML example file.
-
Read the information in the import format file (XLS), and make sure your information is correct including all mandatory fields.
-
Transactions will be posted to the Suspense Account if they use an invalid combination of nominal account code, cost centre, or department.
- If a value is not entered for the
User NumberorSource, these are given the number 9 (nine) when imported. -
To indicate transactions originating from a
Sourceother than Sage 200, enter any value between 16 and 90. - If the
TransactionDatefield is included in the import file, you must enter a transaction date for each transaction. -
You can group any matching transactions by entering the same
UniqueReferenceNumbervalue for each transaction in the group. Transactions that have the sameUniqueReferenceNumbervalue in the import file will be assigned to the same new generated transaction URN during the import. TheUniqueReferenceNumbervalue in the import file will not be used as the actual transaction URN (as that is generated automatically), it is just used to indicate which transactions should be assigned to the same generated URN. If you don't specify aUniqueReferenceNumber, transactions will be assigned individual URNs, so they will not be grouped with any other transactions when you view them. -
The selected
VATCodemust have terms of Not Applicable.To set a
VATCodefor the transaction, you must also set aVATTypethat is notN/Aor blank.
-
- Save your import file.
Create an import file for nominal budgets
To help you with the import, we have provided files which you can download.
You can import Nominal budgets using a CSV Comma Separated Value (CSV) file format. Sage 200 can import and export data in the CSV file format. file.
Note: This will update the budget this year value, and you can choose if you also want to update the original budget value (to make the amounts the same).
-
Download the import information and example file:
- Nominal Budgets import format (XLS): Details of the information you need to include in the file.
- Nominal Budgets example CSV file: Use this to import from CSV format.
- Create your import file in the format of the CSV example file.
-
Read the information in the import format file (XLS), and make sure your information is correct and all mandatory fields are included.
Note: You must enter budgets as a negative amount for all accounts where you're expecting the account balance to be a Credit. This normally applies to all Income type accounts on the Profit and Loss and Liability accounts on the Balance Sheet.
- Save your import file.
Validate your import file
Open: Import records > Nominal > Import Account File
You can validate the file to make sure all the records are in the correct format and have the required mandatory fields. No records are imported
-
Select Validate records only and click OK.
-
Browse to your import file, select it and then click Open.
The file is checked and two reports are generated:
- The Update Report: Shows the valid records that would be successfully imported into Sage 200.
- The Update Report (Invalid): Shows the invalid records that would not be imported into Sage 200. The reason for the failure is shown in the report, and there may be more than one reason for the failure.
Note: The reports are displayed as a preview, printed, or sent to the spooler. This depends on the Output mode you have set.
Note: If you get a message that the process cannot access the file, make sure your import file is closed and isn't open in any other applications.
-
Check both reports to ensure that your records are complete and correct.
- Make any required corrections to the records in your import file.
- To revalidate your import file, repeat this process.
Import nominal accounts
Open: Import records > Nominal > Import Account File
-
Go to the Data to import list and select Nominal accounts.
-
Select Validate and import records.
-
Choose whether you want to update existing accounts:
-
If your import file contains existing accounts that you want to update, select Update account if it exists.
-
If you don't want to update existing accounts, don't select Update account if it exists.
-
-
Specify any defaults you want to apply to all accounts being imported, which saves you having to specify them in the import file.
-
You can select a default Cost centre and Department to be applied to any nominal accounts with invalid codes in either of those fields.
-
-
Choose what to do if accounts have new analysis codes or values that don't currently exist in Sage 200.
-
To import accounts with new analysis codes or values, select Ignore Invalid Analysis Codes.
This imports new values for any analysis codes set to Enter free text on the Analysis Codes screen.
-
If you don't select Ignore Invalid Analysis Codes and the analysis code or value doesn't exist in Sage 200, the account isn't imported.
-
-
Click OK.
-
Browse to your import file, select it and click Open.
The validation checks are repeated and reports are produced showing the records have been imported and second report (if required) showing those that can't.
Note: The reports are displayed as a preview, printed, or sent to the spooler. This depends on the Output mode you have set.
Note: If you get a message that the process cannot access the file, make sure your import file is closed and isn't open in any other applications.
-
Check both reports to ensure that your records are complete and correct.
-
Make any required corrections to the records in your import file.
As part of this update, remove the details of records that were successfully imported.
-
Repeat this process to import the corrected records.
Import nominal transactions
Open: Import records > Nominal > Import Account File
- Go to the Data to import list and select Nominal transactions.
- Select Validate and import records.
-
To ensure that the imported transactions balance, select the Transactions must balance setting.
Note: This is selected by default. In normal circumstances you would always select this option. However, you might clear this if you were importing transactions for correction purposes, for example following a system crash.
-
Click OK.
-
Browse to your import file, select it and click Open.
The validation checks are repeated and reports are produced showing the records have been imported and second report (if required) showing those that can't.
Note: The reports are displayed as a preview, printed, or sent to the spooler. This depends on the Output mode you have set.
Note: If you get a message that the process cannot access the file, make sure your import file is closed and isn't open in any other applications.
-
Check both reports to ensure that your records are complete and correct.
-
Make any required corrections to the records in your import file.
As part of this update remove the details of records that were successfully imported.
- Repeat this process to import those corrected records.
Note: The import may take a long time to complete if you have a large number of items in the import file. For example, it might take 1 minute per 1,000 items in the import file. Therefore, it's a good idea to remove any unnecessary items from the import file. So if you're only updating 10 items in a file that has 10,000 items, then edit the import file so it only contains those 10 items.
Import nominal budgets
Open: Import records > Nominal > Import Account File
- In the Data to import list, select Budget values.
- Select Validate and import records.
-
Choose whether you want to Update original budgets.
- If you only want to update the Budget this year values and not the Original budget values, don't select Update original budgets.
- To update both the Original budget values and Budget this year values (to be the same), select Update original budgets.
-
Click OK.
-
Browse to your import file, select it and click Open.
The validation checks are repeated and reports are produced showing the records that have been imported and second report (if required) showing those that can't.
Note: The reports are displayed as a preview, printed, or sent to the spooler. This depends on the Output mode you have set.
Note: If you get a message that the process cannot access the file, make sure your import file is closed and isn't open in any other applications.
-
Check both reports to ensure that your records are complete and correct.
-
Make any required corrections to the records in your import file.
As part of this update remove the details of records that were successfully imported.
- Repeat this process to import those corrected records.
Export nominal accounts
Use this to export nominal accounts to a file. You can then make changes to your accounts using an external tool (such as Excel), and then import your updated information back into Sage 200.
Open: Export Records > Nominal > Export Nominal Accounts
- Select the nominal accounts that you want to export.
- All nominal accounts: Export all nominal accounts.
- Single nominal account: Select the nominal account to export.
Multiple nominal accounts: Export all nominal accounts that contain a particular account Code, Cost centre
- To export all nominal accounts that have a particular cost centre
- To export accounts for a particular nominal code with any cost centre and departments, select the nominal Code only.
- To export all nominal accounts that have a particular cost centre
Analysis code: Export all nominal accounts that contain a particular analysis code name and/or value. For example:
- To export accounts that match an analysis code, select both the name and value; e.g. accounts where Region has the value North.
- To export all accounts that have a blank value for an analysis code, select the analysis code name but leave the value blank. This is useful if you want to find nominal accounts with missing analysis codes.
- If you also want to include nominal accounts that have a hidden status, select Include hidden nominal accounts.
- Click OK, then click Yes to proceed.
-
Choose the filename and location, then click Save.
If you have a large number of accounts, it might take a short while to export all the information.
Useful info
Importing nominal accounts
Before you import your nominal accounts, you must have created (or imported) your:
- Report categories, if you're not using the standard set we have provided.
- Cost centres and departments, if you're using them.
Before you import your nominal accounts, you must have created or imported, your
- Report categories - if you're not using the standard set we have provided.
- Cost centres and/or departments - if you're not using the standard set we have provided.
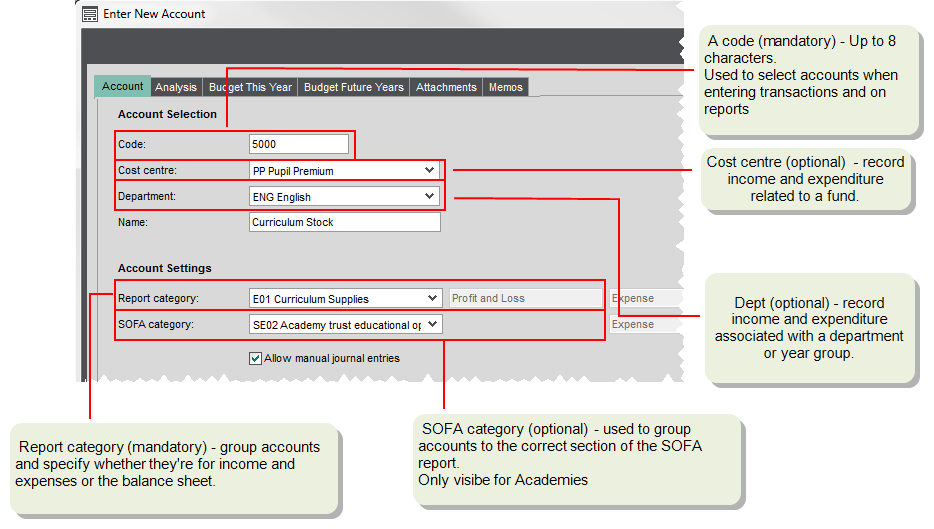
- SOFA category - if you're an academy and not using the standard set we have provided.
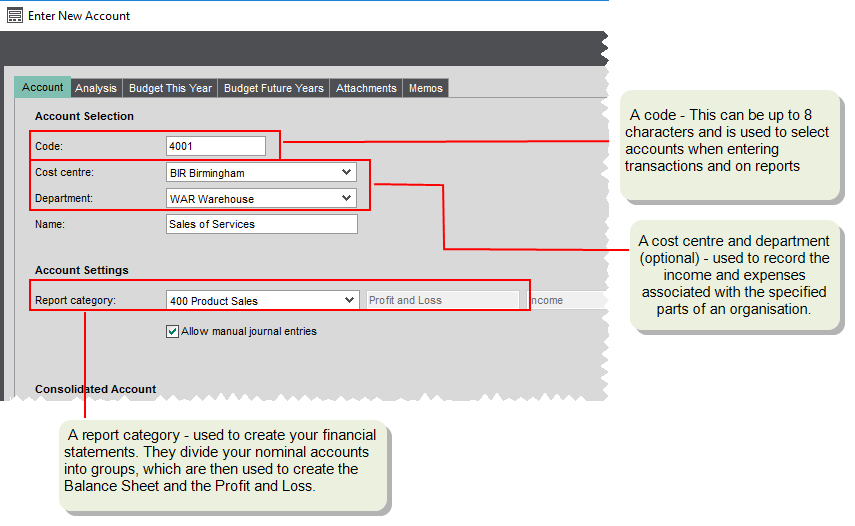
Nominal accounts are fundamental to the successful management of your finances. The value of every transaction entered into Sage 200 is posted to a nominal account. and this is where the revenue and expenditure of your business is recorded.
Every nominal account must have a Code and a Report Category. You can also specify:
- A name.
- A cost centre
- A department (optional). If you're using your own departments, you must import or create them before importing the accounts.
-
A SOFA Category. Only required if you're an Academy.
- An indication of whether journals can be posted to the account (optional).
- Analysis codes (optional). If you're using analysis codes you can add new values when importing nominal accounts. You can use analysis codes to capture additional information or add custom fields so you can report and examine specific areas of your organisation.
Importing nominal budgets
Note: Before you import nominal budgets you must have imported or created your nominal accounts.
You can import budgets set at nominal account level, but not combined nominal budgets. This is useful if you want to maintain your budgets in an Excel spreadsheet and makes the process of entering and updating your budgets much quicker.
You specify a single budget amount and Sage 200 divides it equally across your accounting periods. Any odd amounts that are left over are added to the last period's budget.
You specify a separate budget amount for each accounting period in the year.
These are templates where you specify a percentage budget per period.
Example Budget Profile
| Period | Budget (%) | Amount (£) |
|---|---|---|
| 1 | 2 | 4 |
| 2 | 3 | 6 |
| 3 | 4 | 8 |
| 4 | 5 | 10 |
| 5 | 5 | 10 |
| 6 | 10 | 20 |
| 7 | 20 | 40 |
| 8 | 25 | 50 |
| 9 | 15 | 30 |
| 10 | 6 | 12 |
| 11 | 3 | 6 |
| 12 | 2 | 4 |
| Total | 100% | £200 |
Note: As you are providing a percentage of the complete budget for each period, the total for the year must equal 100.
You need to set up your budget profiles first. You can have a maximum of three in which you specify the percentage of the budget that is to be applied to each period. Then, when you specify your budget amounts, you choose the profile and enter the annual budget amount. Sage 200 calculates the appropriate budget for each period.
Importing Nominal transactions
Note: Before you import nominal transactions, you must have imported or created your nominal accounts.
You can only import new transactions. You cannot import information to add to existing transactions.
To make sure that you only import transactions, make sure the Transactions must balance option is selected.
Note: This is selected by default. In normal circumstances you would always select this option. However, you might clear this if you were importing transactions for correction purposes, for example following a system crash.
For each nominal transaction you need to provide:
- The nominal account number (mandatory).
- Cost centre and /or department (optional). These must already exist in Sage 200.
- The transaction date, posted date, and value (mandatory).
- A reference number, user number, source and transaction analysis code (optional).
Exporting and updating information
Some information can be exported to a CSV file, which can make updating the information easier if you need to make a lot of changes.
The information is exported to a CSV file in the same format used for an import. This means you can export information and make changes to it using an external tool (such as Excel), and then import your updated information back into Sage 200.
For details of which records you can export and update, see What can I import, export and update?
Updating information
-
An import file can include information for both new records and existing records that you want to update. You can choose whether or not to update existing records when you import.
-
Check the import format spreadsheet (XLS/XSLX file) for details about each import format.
-
Not all fields need to be included in the import file. You only need to include the mandatory fields.
- If you do not want to include a field for a particular record, just leave that field blank.
- If you do not want to include a field for any of the records in your import file, then you can remove the field altogether (including the heading).
Fix it
I have invalid records when I import
What happens
What happens when I validate the file?
When you validate an import file, Sage 200 checks for the following:
-
Whether an item already exists.
-
All items contain the required mandatory fields.
-
All fields are correctly formatted.
The result of the validation is provided by reports.
-
A report lists the items that are valid and can be imported.
-
A separate report is produced to list any items that are invalid and can't be imported. The report will tell you why individual items are invalid.
Note: Depending on your selected output mode, the reports are displayed as a preview, sent to the spooler, or sent to the printer.
What happens when I import the file?
- The import file is validated.
-
The import file is processed.
All valid items are imported, and any invalid items are ignored.
-
The result of the import is provided by reports.
-
A report lists the valid items that were successfully imported.
-
A separate report is produced to list any items that were invalid and could not be imported.
Note: Depending on your selected output mode, the reports are displayed as a preview, sent to the spooler, or sent to the printer.
-
Import, export and update information
Import nominal report categories
Other useful information
Creating your chart of accounts