When you have recorded orders, your next steps involve allocating stock to orders, printing picking lists to collect goods for despatch, recording the despatch of goods, printing and then posting invoices.
Allocating stock
Stock fulfilment methods are set within Stock Control Settings. Allocation is dealt with differently depending on the fulfilment method selected.
-
From Stock
This is the default method.
Free stock is allocated automatically when items are entered on an order. If there isn't enough free stock available, then you need to allocate it manually when you get more in stock. If you need to, you can also change the allocated stock.
When allocating stock, the system monitors stock levels at the warehouse specified for the item, and compares these to the quantities you allocate. Quantities allocated at the appropriate locations are updated. Allocations are added to the stock movement history. Allocated quantities on order lines are also updated automatically.
-
From supplier via stock
This is a back-to-back fulfilment method which allows you to generate a purchase order for a supplier when the item is added to the sales order. No stock allocations are performed until the goods are received in Purchase Orders and at that point the are automatically allocated to the sales order ready for despatch.
Use the Sales Order List to see when stock can be allocated to an order, or has been allocated to an order.
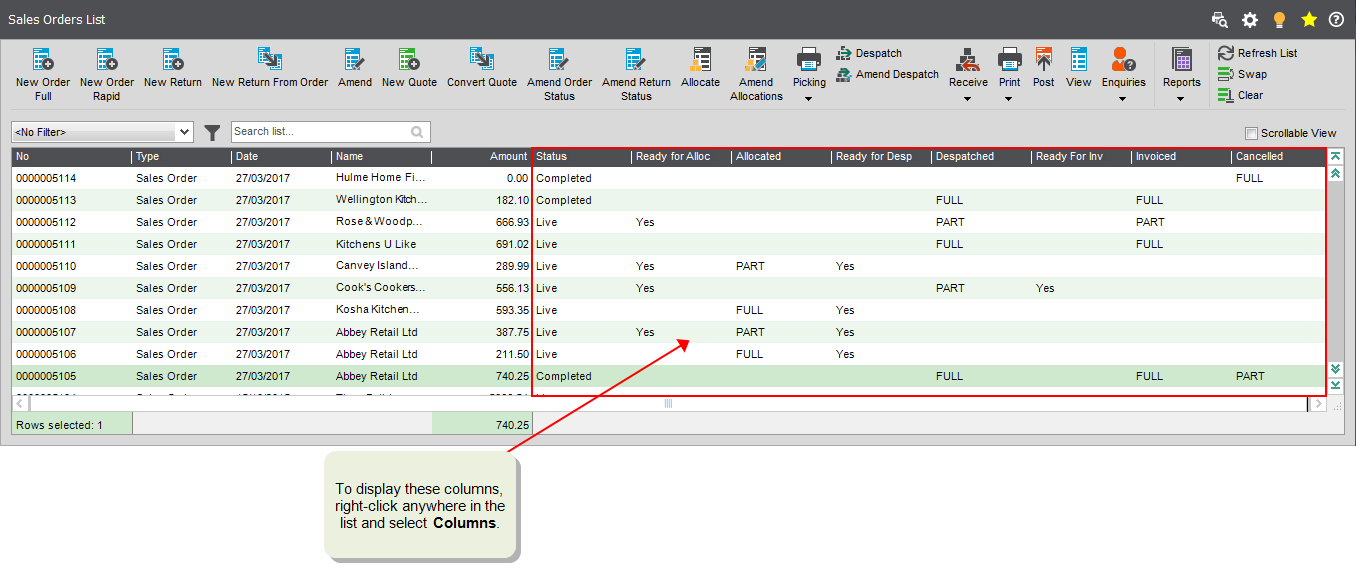
Open: Sales Orders > Sales Order List.
- The Ready For Alloc column shows Yes where some items in the order have not yet been allocated.
-
The Allocated column shows:
-
Part: Only some of the items are allocated, but some items still need to be allocated. The items have not yet been despatched.
Stock is allocated automatically when items are entered on an order, so it is useful to check for Part allocation to see when items were out of stock when the order was entered.
- Full: All items in the order have been allocated. The items have not yet been despatched.
Once an item is partly or fully allocated, it will also be set as ready for despatch. The Allocated status returns to being blank once all the allocated items have been despatched.
-
Open: Sales Orders > Sales Order List.
- Right-click anywhere in the list.
-
Select Columns > Delivery > Ready For Alloc.
Select Columns > Allocated.
Amending stock allocations
There may be occasions when you need to free up stock which is assigned to a different order, an internal customer or a customer where the item is free of charge. You can reduce or remove the quantity allocated using the Amend Allocation option and this increases the amount of free stock available.
Printing orders and picking lists
If you want to print orders to send to your customers as a confirmation, you can do this by selecting Print > Order from the sales order list.
Picking lists are used to assemble customer orders ready for despatch. The picking list shows the location (warehouse and bin) that a stock item is stored and can be used by your staff to collect stock for despatch.
Two types of picking list are produced: standard and summary. The standard list provides the customer, items requested and quantity required. The summary list shows multiple orders in terms of the items and quantities required. These are printed together.
If you need to amend the picking list, you can change the bin number the goods are despatched from.
You can also reprint picking lists.
Despatching orders
You must confirm despatch of the goods and services provided in your sales orders before you can print invoices for your customers.
You confirm despatch of all goods and services, which are stock and miscellaneous items, free text items, and service/labour items.
Only the allocated quantity of the order is despatched. If you part despatch goods that are stored in more than one bin in a warehouse, you must confirm the amount you want to despatch from each bin. This makes sure that accurate stock levels are maintained for each bin. (If you don't change the quantities here, you must amend the picking list or amend the stock allocations to keep stock levels accurate).
You can't print invoices for any items until you confirm they have been despatched.
When you confirm despatch:
-
The allocated quantities and history for the item are updated.
-
The balances for stock items are reduced.
-
The stock movement history is updated.
-
Despatch notes are printed automatically.
Once items in the order have been allocated, the allocated quantity will be ready to despatch.
You can see when orders are ready to despatch from the Sales Order List.
Open: Sales Orders > Sales Order List.
-
The Ready for Desp column shows Yes where some items in the order have been allocated, but not yet despatched.
If none of the items in the order require despatch this will be blank.
-
The Despatched column shows:
- Part: Only some of the items have been despatched, but some items still need to be despatched.
- Full: All items in the order have been despatched.
- If none of the items in the order require despatch this will be blank.
Once an order is partly or fully despatched, you can print invoices for the items that have been despatched.
Open: Sales Orders > Sales Order List.
- Right-click anywhere in the list.
-
Select Columns > Delivery > Ready For Desp.
Select Columns > Despatched.
Add tracking and shipping information
You can add tracking and shipping details for the despatch, such as the courier and consignment details, the Incoterm, or the reason for export.
To record tracking information when you despatch order items, or amend the tracking information, you must first enable Record tracking on despatch in Invoice and Order Settings - Printing and Tracking.
-
When you despatch an order, you will be prompted to add tracking and shipping information. For example, you can enter the courier, consignment number, Incoterm, reason for export, weight, number of pieces, and any notes for the shipment.
You can skip this step if there is no tracking information to add, or you are not ready to enter it during despatch.
-
If you want to add or amend tracking and shipping information after you have despatched the order item, use Amend Tracking Information.
Printing and posting invoices
You can't print invoices for your customers until you have confirmed the goods are despatched and you can't post invoices until you have printed them.
Printing invoices
When printing invoices you can choose to:
-
Change the exchange rate for foreign currency invoices.
-
Choose the invoice layout you want to use.
This is specified by default in the customer account Documents tab. You can override this when you print the invoices.
You can print invoices for individual orders or customers, or for a range of orders or for all orders.
When you click Print or Print All:
-
An invoice number is applied to each invoice.
-
Invoice history entries are added for each order line appearing on the invoice.
-
For all items, the despatch history is updated to indicate that the invoice has been produced.
Copies of invoices can be produced by reprinting the invoice. You can, if necessary change the customer's address on the copy invoice.
You can see when invoices or credit notes are ready to print from the Sales Order List.
Open: Sales Orders > Sales Order List.
- The Ready For Inv column shows Yes when some items on the sales order have been despatched (or do not require despatch) and are ready to have invoices printed.
-
The Invoiced column shows:
- Part: Only some of the items have been included in a printed invoice, but some items have not yet been invoiced.
- Full: All items in the order have printed invoices.
Once an item is partly or fully invoiced, it can be posted. If an order is not fully posted, its Status will still be Live.
Open: Sales Orders > Sales Order List.
- Right-click anywhere in the list.
-
Select Columns > Delivery > Ready For Inv.
Select Columns > Invoiced.
Posting invoices
You can post invoices for a single or all customers, or a range of order or invoice dates.
When you click Post:
-
The invoice is added to the customer's account, adjusting the balance and the turnover value for the customer.
-
If payment was entered with the order, this is posted to the customer's account and allocated to the invoice.
-
Your nominal accounts are updated with the invoice values.
Once invoices or credit notes have been printed for items in the order or return, they are ready to be posted.
You can see when invoices or credit notes for an order or return are ready to post from the Sales Order List.
Open: Sales Orders > Sales Order List.
-
For sales orders, the Invoiced column shows Full when all items in the order have printed invoices, or Part if there are items that do not have printed invoices.
For sales returns, the Invoiced column shows Full when all items in the return have printed credit notes, or Part if there are items that do not have printed credit notes.
-
The Status column shows:
-
Live: Some invoices or credit notes still need to be posted for the order or return.
-
Completed: Invoices and credit notes have been posted for the sales order or return, and the customer and nominal account balances have been updated.
-
Open: Sales Orders > Sales Order List.
-
Right-click anywhere in the list.
-
Select Columns > Invoiced.
Select Columns > Document Status.
Producing VAT only invoices
You can produce invoices that contain only VAT. Details are added as lines which contain a description, value and VAT rate. Once you save the invoice, an associated sales order is automatically created and marked as completed.
You can't enter a VAT only invoice for the cash account or for customers whose accounts are on hold.
When you click Save:
-
The customer's account is updated.
-
The values are posted to the VAT records and the Nominal Ledger (VAT and debtors accounts).
Cancelling invoices
You can cancel invoices that haven't yet been posted, make amendments to the order or despatch as required and then print the invoice again. The invoice is given the next available invoice number.
Cancelling an invoice does not amend the despatched quantities on the order. If you want to amend despatched quantities, you must use the Amend Despatch option on the Sales Orders > Processing > Goods Despatched and Received menu.
You can see when orders have been cancelled from the Sales Order List.
Open: Sales Orders > Sales Order List.
-
The Cancelled column shows:
- Part: Only some of the items in the order have been cancelled, but not all of the items. For example, an order may only be Part cancelled if some items have already been despatched, or if you have deleted items but haven't yet cancelled the order.
- Full: All items in the order have been cancelled.
Open: Sales Orders > Sales Order List.
- Right-click anywhere in the list.
-
Select Columns > Cancelled.
What do you want to do?
Learn more about locations and bin priority
Print, Amend or Reprint picking lists