Set up debtor (chase) letter templates
How to
Create your own letters
We recommend that you customise the debtor letter layouts that we've provided. You can change the text, add your company logo and make other changes to suit your business.
Open: ![]() Tools > Run Sage Report Designer.
Tools > Run Sage Report Designer.
-
When Report Designer opens, you'll need to log in using your Sage 200 email address and password.
-
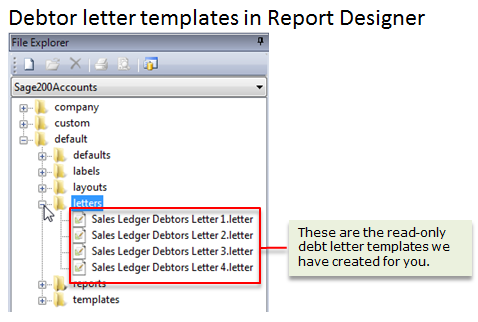
Go to the File Explorer and browse to the folder: default > letters.
You'll see the four debtor letter templates we have set up for you.
-
Double-click on the letter template you want to use for your own letter.
The letter template is displayed.
-
Make your amendments / additions to the template.
Use the Dynamic Help and User Assistance supplied with Report Designer to help you construct your letter.
-
When your letter is complete go to the File menu and select Save As.
The Save As window is displayed.
-
Name your debtor letter template file and click Save.
Notice that Report Designer wants you to save your letter template to the custom > letter folder. Although you could save it to any folder, we'd advise you to use the suggested folder.
-
Close Report Designer.
Link a debtor letter to a due date period
Open: ![]() Tools > Choose Layouts.
Tools > Choose Layouts.
-
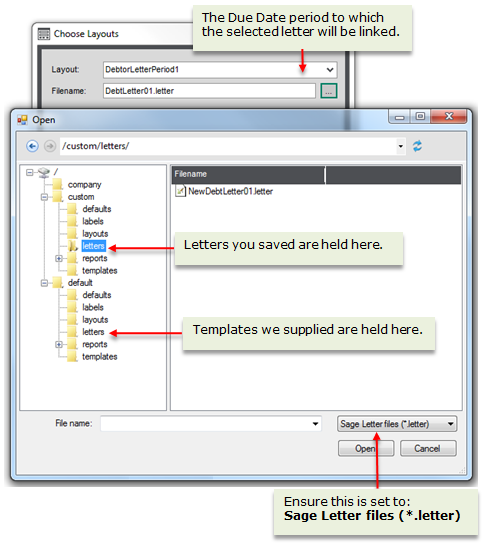
From the Layout list select the Due Date period to be linked to a letter.
The Due Date period codes are listed sequentially and called DebtorLetterPeriod1 - DebtorLetterPeriod8.
-
Click the ... button (
 ) beside the Filename field.
The Open document window is displayed.
-
Ensure the list beside the File name field contains Sage Letter files (*.letter).
Browse through the navigation tree to the folder in which your debtor letter templates are held.
If you saved your templates to the suggested folder you will find them in custom > letters.
If you want to use one of the templates we provided for you, go to default > letters.
-
Select the required letter template and click Open.
The Open document window closes and the template you selected is displayed in the Filename field.
- Repeat steps two to five to link your remaining debtor letters to Due Date periods.
- When you have linked all your debtor letter templates to Due Date periods click OK.
Use a Pay Now button on debtor letters
Opayo is the new name for Sage Pay.
Pay Now with Opayo is a great way for your customers to pay you online, quickly and easily. A Pay Now button is included on the your debtor letters. When your customer receives letter, they can pay you straight away by clicking Pay Now.
We have provided some default letters that have the Pay Now button already included. To use these letters just make sure that you select one of these letters with Pay Now button and link them to the relevant due date periods. The Pay Now button is included on the following letters:
| Sales Ledger Debtors Letter 1 Payment Service Provider (E-Mail) |
| Sales Ledger Debtors Letter 2 Payment Service Provider (E-Mail) |
| Sales Ledger Debtors Letter 3 Payment Service Provider (E-Mail) |
| Sales Ledger Debtors Letter 4 Payment Service Provider (E-Mail) |
If you want to use your own letters, we recommend that your copy and edit one of these default letters that already contain the Pay Now button. You save the edited letters in the custom > letters or company > letters folder. See Create your own letters above.
Choose the Pay Now layout
Open: ![]() Tools > Choose layouts.
Tools > Choose layouts.
- Choose the relevant letter for each of your aged debt periods from the Layout drop-down list, e.g. Debtor Letter Period 1
- Click the ... button () and choose the relevant letter from default > letters folder, such as Sales Ledger Debtors Letter 1 Payment Service Provider (E-Mail).letter, then select Open.
- Click OK.
Configure letters to send via email
If you want to email letters to the contact email address set on your customer's account, you need to set the email options on the letter in Report Designer.
These email options have already been set on the Sales Ledger Debtors Letter x Payment Service Provider (E-Mail) letters.
Open: ![]() Tools > Run Sage Report Designer.
Tools > Run Sage Report Designer.
- Choose the letter you want to add the email options to. If you're amending a default letter, open the default > letters folder.
- Select Report > Email Settings.
-
Enter your email options:
Email message should contain
Choose Group 2 - SL Customer Accounts.Customer Account Number
You should always select the group with the highest number from the drop-down list. This makes sure that everything in the document is emailed to each customer.
To Click To and add this expression: SLCustomerAccounts.ContactEmailAddress
How to add this expression-
In the Expressions section, click Add.
-
Drag the following from the Fields pane to the Expression Editor section:
SL Customer Accounts > ContactEmailAddress.
- Click OK.
Subject Add text for the relevant subject line.
Send the Report as an attachment Select this to add letter as an attachment.
- Enter the required message text.
- Select the required Attachment Format.
Sending optionsSend emails immediately Choose how to send the emails:
- Send emails immediately - Select this to send the email directly to the email recipients entered above when the report is run.
- Save emails to mailbox - Select this to send the email messages to your Outbox when the report is run. You can then check the email messages are correct before sending to the recipients entered above.
Mail Provider
Select the email account that you want to use for this report or document.
-
Microsoft Outlook: Select this if you are using Microsoft Outlook (32 bit only).
-
SMTP: Select this if you send email using an SMTP provider such as Hotmail, or Yahoo Mail.
-
MAPI: Select this if your email application uses a MAPI (Outlook / Exchange) mail server.
Note: To set a default email provider, or configure the email provider settings, see Set your default email provider.
-
- Click OK.
Print and email the letters
- Make sure your customer accounts have valid email address.
-
Make sure you've set you output mode to Preview or Spooler (otherwise your letters will go directly to the printer).
Open:
 Tools > Choose Output Mode.
- Choose Preview or Spooler.
- Open Customer List, select the customer and select Reports > Debtor Letters.
- Choose the customer to send letters to.
- Click OK.
- Preview the letters on screen and click Email.
Save letters to cloud document storage
You can set up Sage 200 to save customer debtor letters to cloud document storage when you print them, so that they can be viewed by everyone.
Customer debtor letters that have been saved to cloud document storage can be viewed in PDF format.
Open: Customers > Customer List, then select the customer and click View in Document Storage.
- The customer's folder is displayed in cloud document storage. The Letter folder contains debtor letters for the customer.
See Save printed documents to cloud document storage.
Useful info
About debtor letters
Debtor letters are linked to the age of the customer's oldest outstanding transaction. You set up debtor letter templates of increasing severity and link them to the due date periods you have defined. That way, debtor letters are only produced for actual outstanding debts and the severity of the letter generated is aligned to the age of the oldest debt of the customer.
Your payment period is 30 days.
| Due Date Period | Debtor letter | Severity |
|---|---|---|
|
1 - 1 day after due date |
1 |
Initial reminder |
|
2 - 31 days after due date |
2 |
Demand for payment linked to reduction of their credit limit. |
|
3 - 91 days after due date |
3 |
Final demand with account put on hold. |
Let's say a customer has three outstanding invoices:
- Unpaid 92 days after due date - £100.
- Unpaid 35 days after due date - £50.
- Recent invoice, within payment term - £250.
If you generated a debtor letter for this customer, Sage 200 would select debtor letter 3, based on the age of the oldest outstanding transaction. The letter would contain the details of the first and second transactions listed above - those outstanding. The other transaction, still within its payment term, would not be detailed on the debtor letter.
If you produced a statement instead, all three transactions would be detailed on it.
Debtor letter layouts
The number of debtor letters you need usually depends on the number of ageing periods you use. You can have up to eight ageing periods and therefore up to 8 different debtor letters.
We have created four default debtor letter layouts for you. These are automatically linked to your first four Due Date periods. These templates are read-only so although you can make changes, you must always save your custom debtor letter templates into the custom / letters folder in Report Designer.
The default debtor letter layouts available are:
| Layout Name |
|---|
| Sales Ledger Debtors Letter 1 |
| Sales Ledger Debtors Letter 2 |
| Sales Ledger Debtors Letter 3 |
| Sales Ledger Debtors Letter 4 |
| Sales Ledger Debtors Letter 1 Payment Service Provider (E-Mail) |
| Sales Ledger Debtors Letter 2 Payment Service Provider (E-Mail) |
| Sales Ledger Debtors Letter 3 Payment Service Provider (E-Mail) |
| Sales Ledger Debtors Letter 4 Payment Service Provider (E-Mail) |
About using the Pay Now button
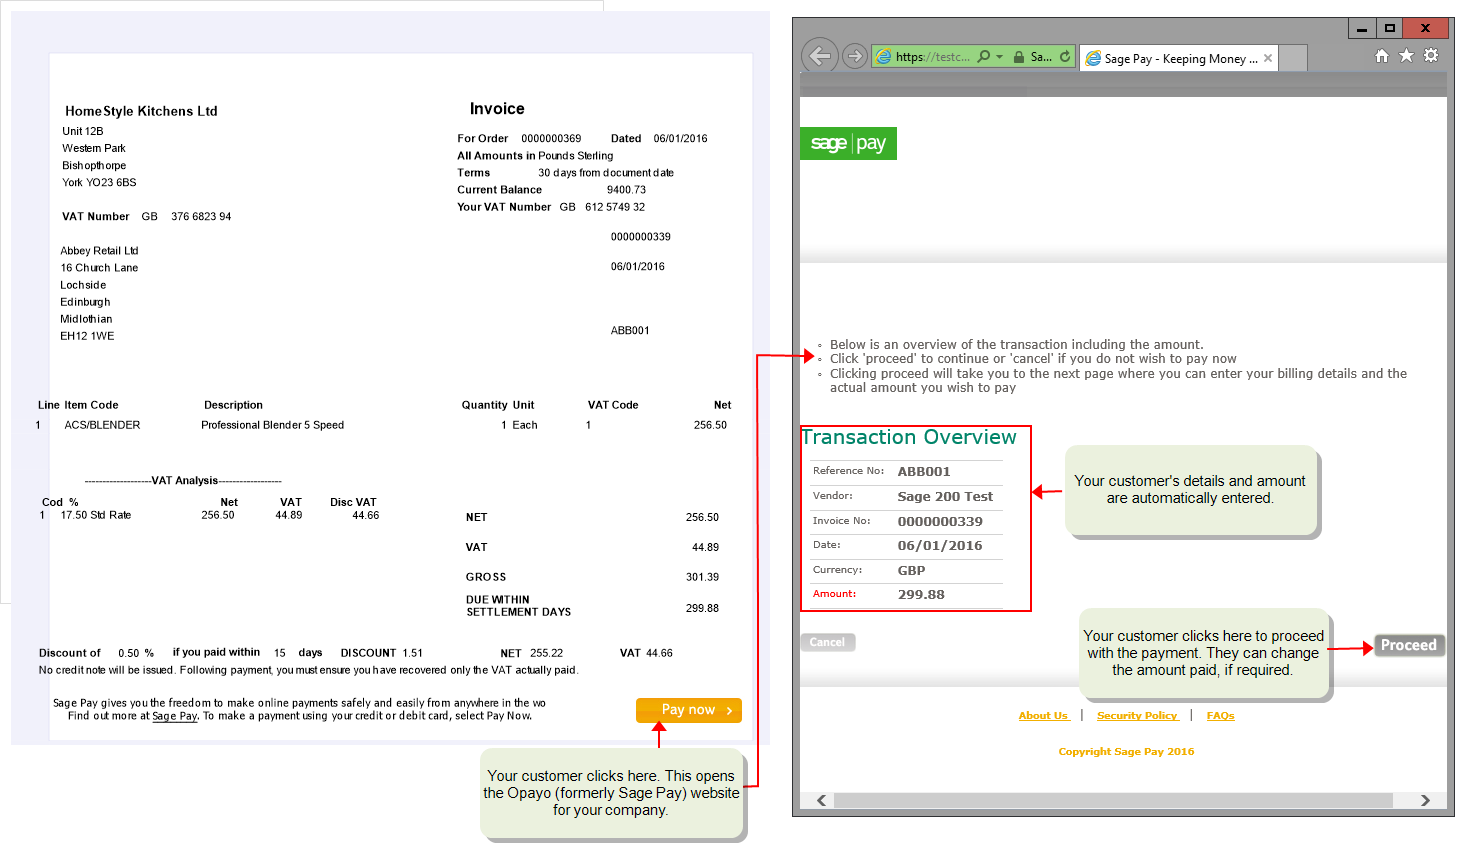
When you send letters to your customers via email, you can included a Pay Now button. When your customer clicks the Pay Now button, they can pay you by entering their card details via Opayo.
In addition you can import the payments made using the Pay Now button directly into Sage 200. This creates a receipt in Sage 200 for each imported transaction, using the date the payment was made in Opayo. Importing the transactions from Opayo is easy, and quick way for you to find out when customers have paid you in this way and update their accounts accordingly.
About Opayo
Opayo (formerly Sage Pay) is an online card service provider similar to PayPal. Opayo integrates seamlessly with Sage 200 making it easier for your customers to pay you and easier for you to process those payments.
Once you've subscribed and integrated Opayo with Sage 200, you can:
- Take card payments from your customers and input them directly into Sage 200. This is useful when a customer pays you over the phone.
- Add Pay Now buttons to invoices, statements and debtor letters, so your customers can pay you immediately. Your customer just clicks the button and enters their card details.
- Import payments made using the Pay Now option, directly into Sage 200.
What happens when
I save a debtor letter template?
It is available for use but may not yet be generated. It all depends on whether you used the same name as the standard letter on which yours is based:
- If you used the same file name and saved your template into the custom letter folder, then your custom letter will be generated when the debtor letter feature is run.
- If you used a different file name, then you must link your debtor letter template to the appropriate Due Date period.
I link a debtor letter to a Due Date period?
It will automatically be used when the oldest outstanding invoice on the customer's account falls within the Due Date period to which the letter is linked.