Create or amend customer accounts
Find this screen
Open: Customers > Create & Amend Accounts > Create Customer
Open: Customers > Create & Amend Accounts > Amend Customer Details
Watch a video
How to
Create or amend a customer account
Enter your
|
Company |
The The account Code can be up to eight characters long, and use letters, numbers or both. |
|
Contacts |
Add contact details for different people for this See Customer contacts. |
|
Trading |
Your |
|
Payment |
The settlement discount details payment terms. These are taken from the You can also upload the customer details to the Invoice Payments service. |
|
Credit |
The credit reference information about the |
|
Communications |
Record communications with your |
|
Documents |
The statement, sales invoice and credit note document templates to be used when these documents are printed from Sage 200. These stationery formats and discounts only apply to invoices that are printed from Sage 200. |
|
Attachments |
Files and documents about the The file name can't have more than 150 characters. If a file extension is more than 150 characters, the file can't be saved. |
|
Memo |
Comments about the |
|
Pricing |
The pricing and discount details for this customer. You can change the discount and price bands the customer belongs to from here and set Invoice and line discounts. |
|
Alerts |
Set up alerts to show messages when you deal with a |
You must enter a code and name before you can save a new account.
Make changes to an account
Any changes you make to an account will only affect transactions that you enter after you've made the changes. For example, if you change the settlement discount details, this doesn't affect the discount details already entered on transactions.
- You can't change the account Code once the account has been saved. If you've entered a code incorrectly and haven't entered any transactions for it, delete the account and recreate it.
Once transactions have been entered for an account:
- You can't change the currency.
- You can't delete the account.
Duplicate a customer account
You can create a new
Duplicating an account can be useful if your
Note: Transactions associated with the original account are not copied to the new account.
Tip: To check if an account was created as a duplicate, use
Open: Customers > Create & Amend Accounts > Create Customer
- Enter a Code for the new account you want to create.
- Click Duplicate.
-
Select the
-
To check the account you've selected, select View Detail.
-
If you can't see an account, you might have set its Active Status to Hidden.
-
-
Select which information should be copied to the new
- Make a euro duplicate will set the new account's currency to use the euro.
- You can choose to duplicate memos, attachments, credit information, contact information, and alerts.
- Click OK to create the new account.
- Edit the new account if required.
Import, export and update accounts
If you need to add or update a large number of
You can also export accounts to a file in the same format used for an import. This means you can export information and make changes to it using an external tool (such as Excel), and then import your updated information back into Sage 200.
See Import and export customer accounts.
Delete an account
If you've entered an account in error, you can delete it as long as transactions have not been posted to the account.
To delete an account:
Open: Customers > Create & Amend Accounts > Amend Customer Details
- Select the account.
- Click Delete.
If you have posted transactions to the account, the Delete button will not be available, but you can hide the account instead.
Hide an account
Hiding an account will remove the account from the
Open: Customers > Credit Control > Amend Customer Status
-
To hide an account, select the account and set the Active Status to Hidden.
Useful info
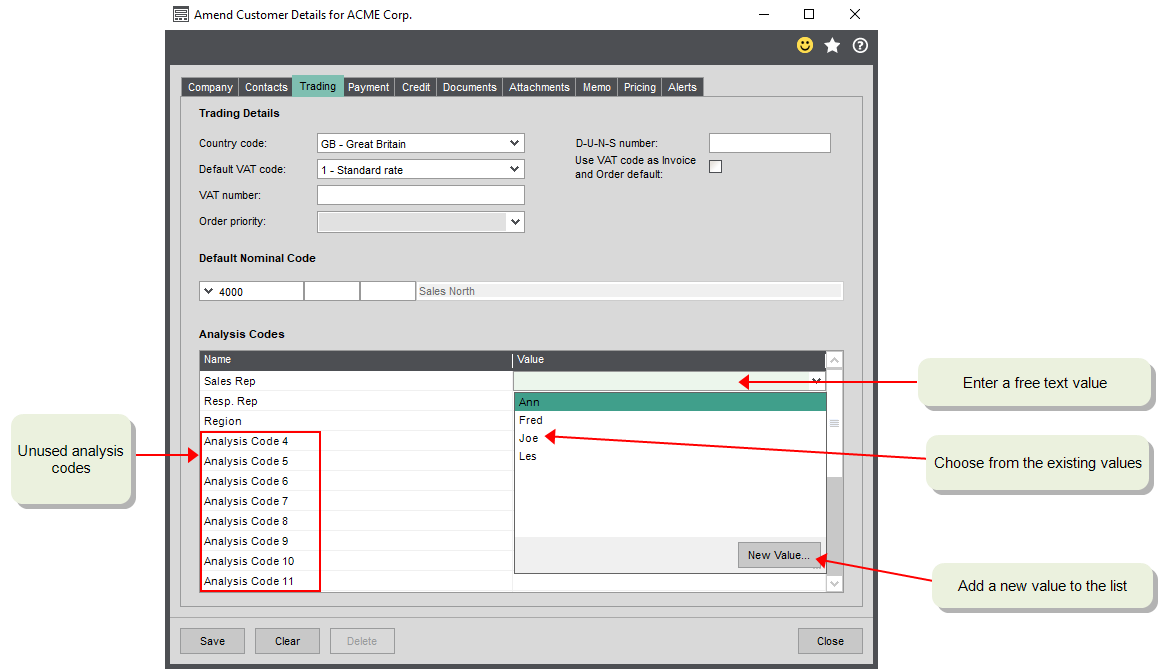
About analysis codes
Analysis codes are extra pieces of information that you can use as custom fields, to improve your reporting and to compare different areas of your business.
You can have 20 analysis codes for each area.
An analysis code has two parts:
-
Code or Name - this a label and represents how you want to group your data.
-
Value - this can be a set of predefined values or free text. This is how you want to break down the data for each group.
You create the analysis codes and their associated values on the Analysis Codes screen.
On each
For example, if you want to group accounts by location, for a
-
Select the Trading tab. You'll see the codes listed in the Analysis Code section.
If you have set a default value, this will already be selected.
-
For each code, select the required value from the drop-down list in the Value column.
If you don't want to use an analysis code for a particular customer, leave the value blank.
- To add a new value:
- Click New Value from the drop-down list.
Enter the name of the new value and click OK.
You can only do this if you have chosen to Add New on Entry when setting up your analysis codes.
-
To enter a one-off free text value, enter the required text in the Value column.
You can only do this, if you have chosen to Enter Free Text values when setting up your analysis codes.
Setting credit limits
You can set a credit limit on a customer's account to help you control the customer's debt.
Once the customer's account balance is more than their credit limit, any invoices and orders that are entered for the customer are automatically put on hold. You can take them off hold as required, even if the customer's account is still over the credit limit.
You can allow certain users to override this. This is set in the Invoice and Order User Permissions. Once set, the user will see a warning when entering the order or invoice, and they can choose to continue to save it without it being put on hold.
Using the default VAT rate for sales invoices
When you add a stock item to a sales or order or invoice in Sage 200, the VAT rate used is the one that is set on the stock item. This is to make sure that the correct VAT rate is applied for the item that you're selling.
However there may be occasions where your customer uses a different VAT rate, for example, if they are a charity and don't pay VAT. In this case, you generally need to use the VAT rate set on the customer account. To do this:
- Select Use VAT code as invoice and Order default on the customer account. This makes sure that the VAT rate (Default VAT code) on the customer account overrides the VAT rate set on the stock item.
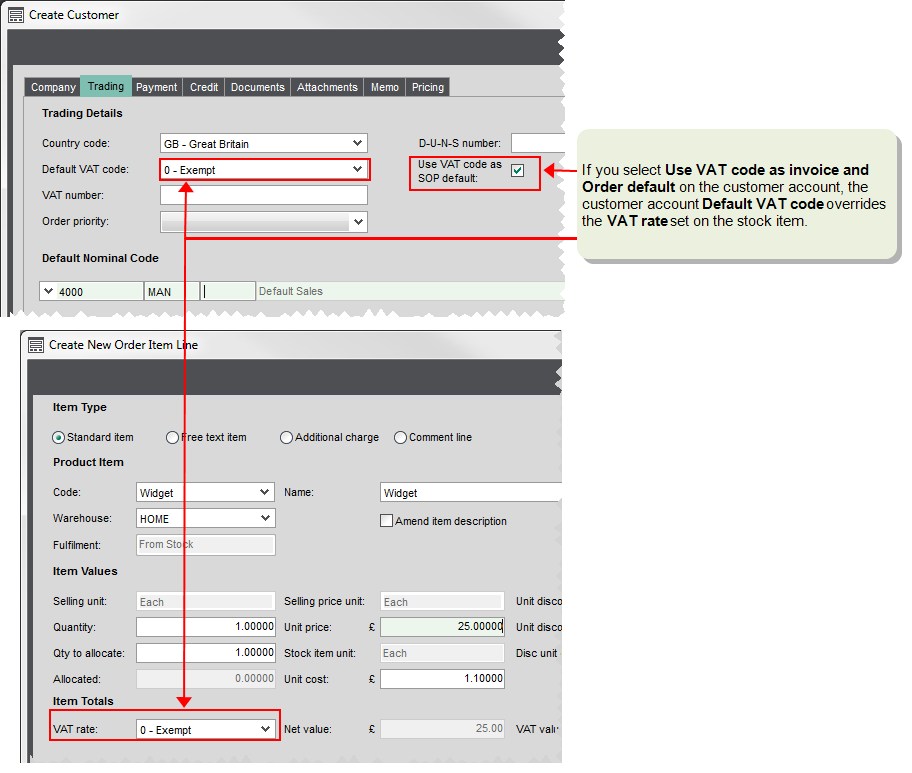
For foreign currency customer accounts, this is automatically selected when the customer's Country Code is set to anything other than GB.
You have a stock item for widgets which uses the standard VAT rate by default.
You sell the item to a customer who is a registered charity, so they don't pat VAT. To make sure that VAT is not added to orders for this customer, you set the customer account to reflect this.
Order priority
You only need this if you're using Sales Orders. This sets a ranking for your customers when manually allocating stock to outstanding orders.
The order priority code is used to display orders in order of priority, so you can see which are the most urgent. A is the highest priority and Z is the lowest.
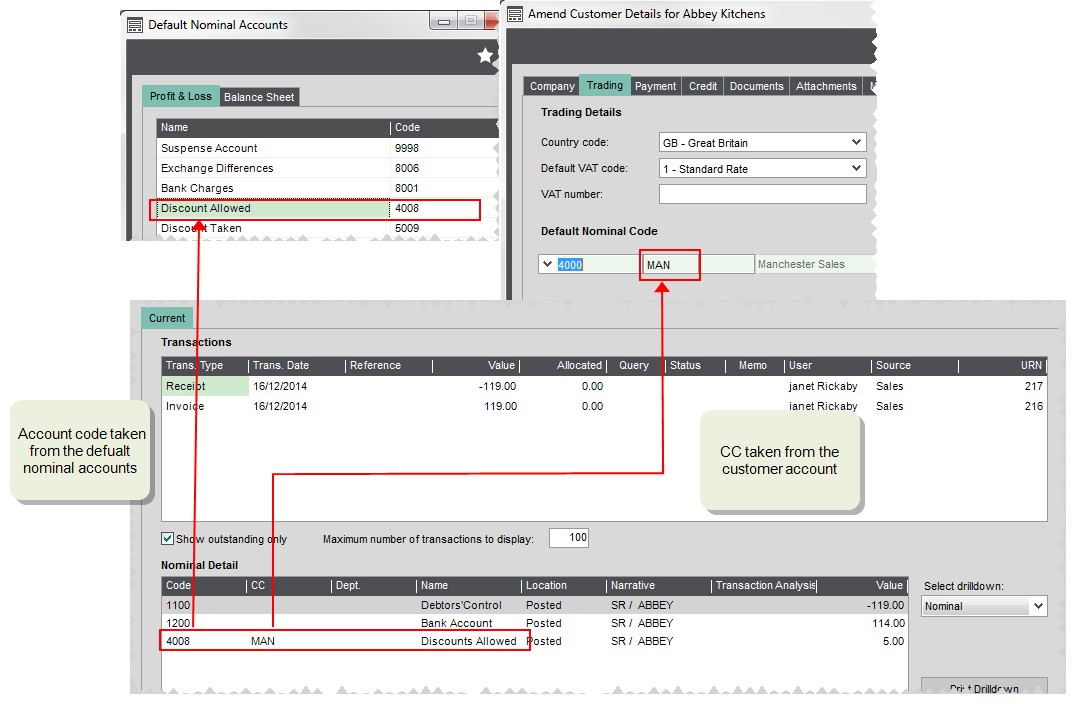
Setting the default nominal account
This is the default
If this is selected here, this account nominal account will already be entered in the Nominal Analysis section, when entering transactions.
This account is usually a
You have customers in the UK and in Europe. On your profit and loss, you want to show your UK sales separately to your European sales. To achieve this you have Sales UK and Sales Europe nominal accounts.
As most of your customers are based in the UK, you set the Sales UK as your default Sales account on the Default Nominal Accounts screen.
For your European customers, you change this on each customer account to the Sales Europe nominal account.
When transactions are entered for your European customers, the correct nominal account is always selected, by default.
If you are using cost centres departments with your nominal accounts, you can select a nominal account with a CC or CC / Dept combination as the default account here. For example, a
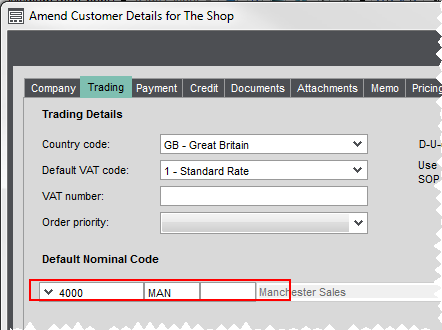
Once you have set this, Sage 200 uses CC / Dept combination when posting transactions automatically. When Sage 200 posts a transaction to a Profit and Loss nominal account, it posts to the account code associated with the default nominal account and the CC/ Dept associated with the
Settlement discounts
This is where you enter the settlement discount details for this customer. The percentage and the number of days is taken from your customer defaults. You can change or keep these.
These discount details set here are then automatically applied when you create an invoice for this customer. This helps to reduce errors when entering transactions.
If you don't want to set default settlement discount details, leave these options blank.
-
Enter the invoice. Include the settlement discount details on the invoice. The full invoice value is posted to the
-
Enter the
The discount is added to the amount
The amount
For example, for an invoice of £119 with a £5 settlement discount, enter the payment amount as £114 and discount amount as £5.
You offer a settlement discount of 5%:
- You record the details of an invoice for £100. VAT is calculated at £20. You enter the discount percentage and amount which is £5.
- You receive payment for the invoice within the specified period and the customer has taken the discount, so they pay you £114. This is the gross amount (£120) minus the net discount (£5) and the discounted VAT (5% x 20 = £1).
- You record the receipt and enter the cheque value as £114 and add the discount value as £5. This creates a transaction value of £119.
- You allocate the invoice (£120) to the receipt (£119). The VAT discount of £1 is still outstanding
- You create a credit note for the VAT discount of £1.
- You allocate this to the remaining balance on the invoice.
| Transaction | Nominal Account | Debit | Credit |
|---|---|---|---|
| Invoice | Debtors Control | 120 | |
| Net | 100 | ||
| VAT | 20 | ||
| Receipt | Discounts Allowed | 5 | |
| Bank Account | 114 | ||
| Debtors Control | 119 | ||
| Credit Note | Debtors Control | 1 | |
| VAT | 1 |
Payment and credit terms
You can record the payment and credit terms that you have agreed with your
Recording payment terms
You record the payment terms that you have agreed with your
You enter the number of days credit that each
Invoices are due the specified number of days after the invoice date.
For example, if the Number of days is set to 15 and you enter an invoice with an invoice date of 03/10, the due date for the invoice will be 18/10.
Invoices are due the specified number of days after the start of the month in which an invoice is dated.
For example. if the Number of days is set to 30 and you enter an invoice with an invoice date of 03/10, the due date for the invoice will be 31/10.
Invoices are due the specified number of days after the end of the month in which the invoice was dated.
For example, if the Number of days is set to 15, and you enter an invoice with an invoice date of 03/10, the due date for the invoice will be 15/11.
Invoices are due on the same day the following month. The Number of days is automatically set to 0.
For example, if you enter an invoice with an invoice date of 03/10, the due date will be 03/11.
Due date calculations are only made for invoice transactions. Credit notes always retain the same due date as the entered transaction date.
To confirm that you have agreed these terms with your
Recording credit risk
If you regularly use a credit agency to check a customer's credit risk, you can store a link to the credit checking page of the bureau's website and then use this to check the credit status of individual customers. To do this:
- Enter the credit agencies details and link to their website in the Credit Information section of Sales settings.
- Enter the credit review details on the Credit tab of the customer account.
- Enter the credit control agency's reference in the Credit reference box and click on the button. This opens the credit agency's website.
Prices and discounts
Invoice and line discounts
This sets the default discounts that this customer will receive by default, on all invoices and sales orders.
-
Invoice discount
This is deducted from the net value of the whole invoice or sales order.
If you want this customer to get the same discount on all sales orders and invoices, enter a default percentage on their account. The discount percentage will automatically be entered each time an invoice or order is entered for the customer.
The order discount is set on the Delivery and Invoicing tab of the sales order or invoice.

-
Line discount
This is deducted from the net value of an item line (stock or free text).
If you want this customer to get the same discount on each line of sales orders and invoices, then set a default on their account. This discount is then automatically entered on every stock and freer text line on an order or invoice.
If you're only going to add a line discount occasionally, then leave this blank and enter the discount as required. Remember, line discounts can only be changed by users who have the correct permissions.

Stock item discounts
You can also set the discounts on the selling prices of your stock items and the choose which customers receive these discounts.
The Pricing tab shows you which Order Value discount this customer receives. In you're using Customer Discounts Groups this is also shown here.
You can see the stock item discounts this customer receives on the Customer Discounts workspace.
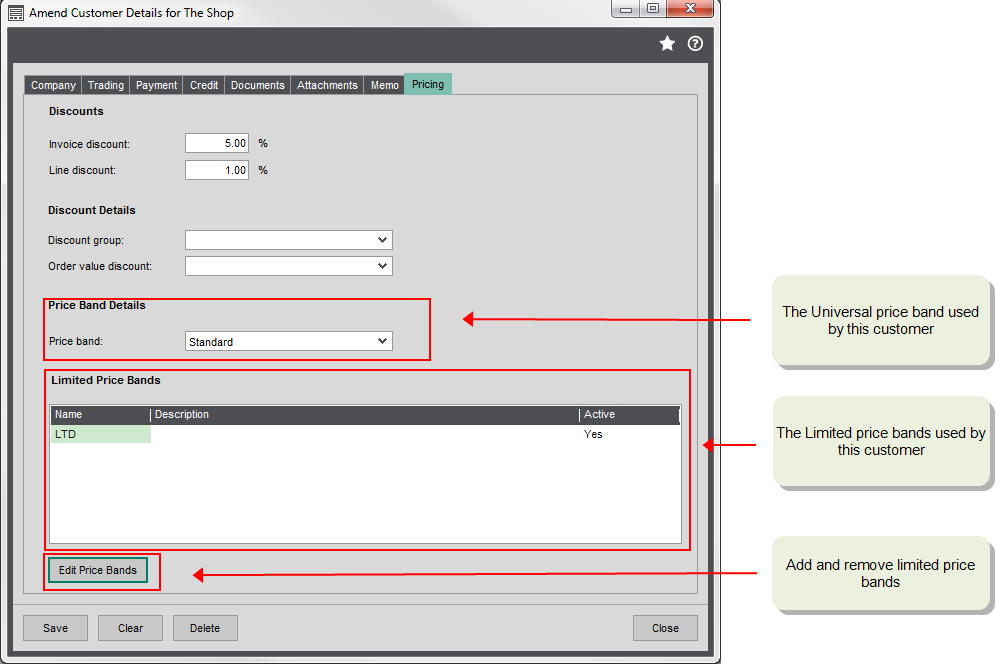
Selling prices
The price that a customer is charged for each stock item is set up in your Price bands. Each price band is essentially a price list. You can set up as many price bands as you need, you just need to decide which customers receive which prices. Once set up, this determines the price that's used when a stock item is added to an invoice or sales order.
You can see and change the price bands this customer belongs to on the Pricing tab. Every customer must belong to one Universal price band, as these contain the prices for all stock items.
There are three kinds of price band:
- Standard- All customers belong to the standard price band by default.
- Universal -These contain prices for all stock items and are always in use.
- Limited - These contain the prices for selected stock items. You can set start and end dates and times on limited price bands so they can be used for promotions and sales. A customer can use several limited price bands and you can add these here. The price set in a limited price band takes precedence over the price in a universal price band even it's higher.
How discounts are applied
Discounts are applied the following order:
-
Manually entered discounts, where you've overridden the default. This is applied even when the manual discount is less than the other discounts.
-
The best discount between the product discount, group or item discount, and line discount.
- the best discount between the order value and order or invoice discount. These are applied in addition to line discounts
See Applying prices and discounts to orders.
Document layouts
You can use different invoice and credit note layouts for different customers, or set up a layout for printed documents and another for sending documents by email.
This is where you can set up the list of the layouts you want to use for individual customer accounts. These are then used automatically when printing documents for those customers.
You can override the default selections when you print the documents.
Attachments
- If the attachment is a file, a copy of the file is stored with the account/record on the server.
-
If the attachment is a link or a folder, only the location of the file or folder is stored; e.g. it might be a file or folder on your network.
Note:
The file is tested by antivirus software before it is attached.
.quarantine - waiting to be tested by antivirus software.
.blocked - found to be potentially unsafe. The file has been deleted and a dummy file with the .blocked extension is listed so you can see that there's a problem.
Tip: You can drag-and-drop files from Windows Explorer to add files to the attachments list.
You can also see the files from workspaces and enquiry screens.
If you're a web user, you can't see files which are links, as your browser can't access these.
Alerts
You can set up alerts on a
When you set up an alert on the
You can choose to show alerts when entering invoices or credit notes, sales orders and returns, quotations and pro forma invoices, and for customer price enquiries.
Alerts are displayed for these activities in both the Sage 200 desktop and Web Portal (where available).
Alerts are specific to an individual
See Customer alerts.
Invoice Payments
If you use GoCardless for Invoice Payments, you will also need to upload your customer accounts before you send invoices to your customers.
To upload a customer to Invoice Payments, move to the Payment tab, and select Synchronise customer with Invoice Payments.
You do not need to upload customers if you only use Stripe or PayPal.
Note: If a customer was not uploaded at the time that you print an invoice, the Direct Debit payment option for GoCardless will not be available for that particular invoice. Once you upload the customer to GoCardless, all subsequent invoices for that customer will include the option to pay by Direct Debit.
See Upload customers to Invoice Payments (GoCardless).
Fix it
How can I change the customer's currency
You can only change the customer's currency if transactions haven't been entered for the account.
If the customer has been trading in one currency and then changes to another, they join the Euro for example, you must create a new account.
See When customers or suppliers change currency.
Sage is providing this article for organisations to use for general guidance. Sage works hard to ensure the information is correct at the time of publication and strives to keep all supplied information up-to-date and accurate, but makes no representations or warranties of any kind—express or implied—about the ongoing accuracy, reliability, suitability, or completeness of the information provided.
The information contained within this article is not intended to be a substitute for professional advice. Sage assumes no responsibility for any action taken on the basis of the article. Any reliance you place on the information contained within the article is at your own risk. In using the article, you agree that Sage is not liable for any loss or damage whatsoever, including without limitation, any direct, indirect, consequential or incidental loss or damage, arising out of, or in connection with, the use of this information.