Import cost centres
How to
Create an import file for cost centres (funds)
You can import cost centres
-
Download the import information and example file:
- Cost Centre import format (XLS file): Details of the information you need to include in the file.
- Example Cost Centre CSV file: Use this to import from CSV format.
- Cost Centre Fund import format (XLS file): Details of the information you need to include in the file.
- Example Cost Centre Fund CSV file: Use this to import from CSV format.
- Create your import file in the format of the CSV example file.
-
Read the information in the import format file (XLS), and make sure your information is correct and all mandatory fields are included.
- The
Codeis mandatory.
- The
- Save your import file.
Validate your import file
-
Click Validate Records.
-
Browse to your import CSV file, select it and then click Open.
The file is checked and two reports are generated:
-
The Update Report - lists the valid records that would be successfully imported into Sage 200.
-
The Update Report (Invalid) - lists the records that would not be imported into Sage 200. For each record Sage 200 prints a single reason for the failure. Remember that there could be more than one reason for the failure.
Note: The reports are displayed, printed, or sent to the spooler; depending on the Output mode you have set.
-
-
Check both reports to ensure that your records are complete and correct.
-
Make any required corrections to the records in your import file.
-
To revalidate your import file, repeat this process.
Import cost centres (funds)
- Click Import File.
-
Find the file you've saved, select it and then click Open.
The validation checks are repeated and reports are produced showing the records have been imported and second report (if required) showing those that can't.
-
Check both reports to ensure that your records are complete and correct.
-
Make any required corrections to the records in your import file.
Tip: Remove the details of records that were successfully imported. This prevents erroneous errors when you re-import the file.
- Repeat this process to import those corrected records.
Useful info
When to use cost centres (funds)
You can use cost centres to segment parts of your business so that you can monitor income and expenses from individual areas in your company. You append a cost centre to profit and loss nominal accounts. Each nominal account has the same Code but different cost centres. For example, if you have several branch offices and you want to be able to produce a P & L for each office as well as one for the whole business, you could create a cost centre for each branch office. You then make sure that every profit and loss nominal account also using an account with the cost centre for each branch.
When you enter transactions, these are posted to the nominal account associated with this cost centre. When you produce your P & L, it reports the total of all accounts with the same code.
Tip: As all these nominal accounts are reporting the same thing, they should also have the same Report Category.
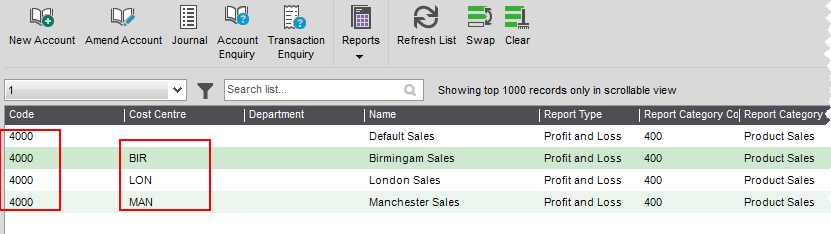
John is setting up Sage 200 within his company. His company is comprised of three branches. He wants to produce a P & L for each branch, as well as his the company as a whole, so he creates three cost centres to represent this. These are:
- London - LON
- Manchester - MAN
- Birmingham - BIR
To make sure the value of each transaction is recorded correctly, John creates a set of profit and loss nominal accounts for each cost centre.
His nominal accounts for his sales are as follows:
| Nominal Account Code | Cost Centre |
|---|---|
| 4000 | LON |
| 4000 | MAN |
| 4000 | BIR |
| 4001 | LON |
| 4001 | MAN |
| 4001 | BIR |
Cost centres are used to represent your funds. You'll need to select a cost centre (fund) for any nominal accounts that will be used to record the income and expenditure of your funds. This is likely to be the majority of your income and expense ( P & L) accounts. Most of your balance sheet nominal accounts will not need to be related to a fund, so these accounts don't need to have cost centres.
If you're an Academy, any nominal accounts linked to a cost centre with a fund type, and a SOFA category are included on the SOFA report.

-
Create a cost centre for each of your funds.
A standard set of cost centres has been created for you representing the main funds used by most schools, such as Pupil Premium etc. You can change or add to these as required.
For each cost centre you specify the type of fund, Restricted, Unrestricted etc. This determines the column fund balances are reported on the SOFA report.
-
If you're an academy, check your SOFA categories.
You'll have SOFA categories if you were set to be an Academy when Sage 200 was first set up. These represent the SOFA categories specified in SORP 2015. You won't need to do anything else.
Each SOFA category determines the section and row that fund balances are reported on the SOFA report.
If you weren't set to be an academy, then SOFA categories aren't created. You can change this now on the Company Details screen. Once you're set as an academy, the SOFA categories are created for you.
Set your school to be an Academy.Open: Settings > Organisational and Financial > Company Details.
- Select Academy.
-
Create your nominal accounts.
Create an account plus cost centre for each nominal account code used to record income and expenses for each fund. If you're also using departments, you'll need a nominal account plus cost centre for each department as well.
If you're an academy, don't forget to choose a SOFA category for each account.
Your accounts might look like this:
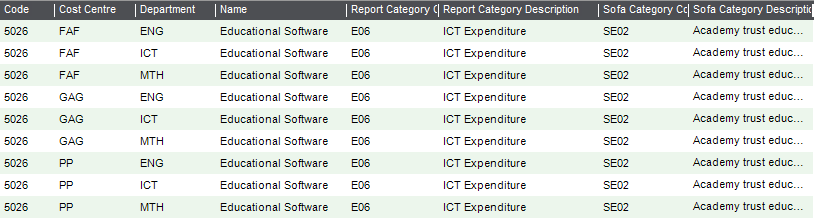
- When you record transactions, you choose the nominal account with required cost centre and department.
- When you run the SOFA report, your funds will be reported in the correct section.
About importing cost centres (funds)
If you want to use cost centres with your nominal accounts, you can import them from here. You won't be able to import a nominal account, if an associated cost centre
You can create or import additional cost centres
You must provide the following information for each cost centre
- The cost centre code. The code is mandatory, and must be unique and a maximum of three characters.
- A description.
Fix it
I have invalid records when I import
What are the contact details used for?
You may see one of the following errors when importing cost centres. You then need to make the required changes to the import file.
The field is too long
The cost centre code cannot be blank
The specified cost centre is already in use
What happens when
What happens when I validate the file?
When you validate an import file, Sage 200 checks for the following:
-
Whether an item already exists.
-
All items contain the required mandatory fields.
-
All fields are correctly formatted.
The result of the validation is provided by reports.
-
A report lists the items that are valid and can be imported.
-
A separate report is produced to list any items that are invalid and can't be imported. The report will tell you why individual items are invalid.
Note: Depending on your selected output mode, the reports are displayed as a preview, sent to the spooler, or sent to the printer.
What happens when I import the file?
- The import file is validated.
-
The import file is processed.
All valid items are imported, and any invalid items are ignored.
-
The result of the import is provided by reports.
-
A report lists the valid items that were successfully imported.
-
A separate report is produced to list any items that were invalid and could not be imported.
Note: Depending on your selected output mode, the reports are displayed as a preview, sent to the spooler, or sent to the printer.
-
Import, export and update information
Other useful information