How to use workspaces
The workspaces in Sage 200 provide an overview of the primary information stored in Sage 200 for each module. Use workspaces to find and analyse important information and perform related tasks (Actions).
Each workspace usually has a master list which is connected to other panels containing details or linked information about a selected item in the master list. When a item is highlighted in yellow, information about this item is displayed on other panels. This can be further details about the selected item, information about linked items in another list such transactions for a customer account, or information displayed as a chart.
Workspace components

Data is displayed on a workspace in sections or panels. This data can be displayed in the following ways:
Information displayed in lists can be filtered and sorted to display just the information you require.
Each list also has a toolbar allowing you to filter the list, run reports, print the list, export the list to an Excel spreadsheet, open related Sage 200 windows (desktop application only) and other workspaces.
Lists can be connected to other panels. When you highlight an item on a list, more information about that item is displayed in another panel.
Selecting items on a list
- You select an item using the checkbox to the left of the item.
-
You can select multiple items that are on the same page.
Note: You can export all items to an Excel spreadsheet.
- The top checkbox selects all items on that page.
This displays detailed information about an item selected in a list.
This displays information in a bar chart format. A chart can display details about a specific item selected from a list, or you can select an item from a chart and view further details on another panel.
Use the  icon to expand the chart to full screen size.
Using workspaces
Workspaces can be accessed in the desktop or using the Self Service web app.
-
Desktop
Open: Workspaces in the Menu View and select the workspace that you require.
-
Self Service web app
Open:
 Tools > Show Workspaces in Browser.
-
Log in using your Sage account.
-
Select the Company.
-
When accessed from the Self Service web app, the workspaces have slightly different functionality:
-
Actions
You can open related workspaces from the Actions menu for all workspaces.
For most workspaces, you can only perform limited other actions such as creating a new memo or adding a query flag to a transaction. You can also authorise purchase orders and authorise and enter timesheet and expense claims from the relevant workspaces in the Self Service web app. You cannot open Sage 200 windows.
-
Action Selector
The Action Selector is not available from the Self Service web app.
-
Attachments
You can only view attachments from the Self Service web app when the attachments have been added to the account or when linked to a folder or file on your network.
You cannot view attachments that are links to folders or files on your desktop as your browser does not have access to these files.
You cannot view attachments to projects or BOM records from workspaces.
Related workspaces can be opened from the Actions menu. You can also open a related workspace with content filtered for a selected item. For example:
-
Select the check box for a customer from the Customer Account Enquiry.
-
Right-click and select a related workspace from the list of actions, such as the Customer Current Transaction Enquiry. The Customer Current Transaction Enquiry opens with the list of transactions automatically filtered for the selected customer.
Use the filters to find specific items in a list and create reusable filters to reduce the information displayed in a list.
Toolbar filter
Use the toolbar filter to quickly find items in a list.

Enter the text or value that you want to find in the box above the required column.
To return to the full list clear the toolbar filter box. The toolbar filters are not saved once you navigate away from the workspace.
Note: The toolbar filter is not available if an advanced filter is applied to the list is filtered using an Or filter.
The default operators for the toolbar filters
-
Columns with text use Contains.
-
Columns with numerical values use Equals.
-
Columns with Yes or No values use a drop list.
Note: You can change these default operators for individual content parts using the Workspace Designer.
You can create filters that you can save and reuse for each workspace. The workspaces are not filtered by default.
Once you have created and saved a filter, they are available from the drop- down list to all users who can access the workspace.
To add a filter

-
Select the Filter: No filtering drop-down, then select Create New Filter.
-
Enter a unique name for the filter.
Note: If the name has not been used, it will be shown as Available.
-
Select Add condition for each condition that you want to apply to the filter.
-
Select the column you want to filter from the New Condition list and enter the match type and value.
-
Select All conditions if you want the filter to include only those items that match all conditions, or select Any condition if you want the filter to include items that match any of the conditions specified in the filter.
-
Select Save and Close to save the filter.
Once saved, the filter can be selected from the Filter drop down list.
To edit or delete a filter
-
Select the filter you want to edit or delete.
-
Select the Filter drop-down arrow.
-
Select Edit <filter name>.
-
Within the Edit Filter window, you can make changes to the filter or select Delete if you want to delete it.
See some examples
-
Filter to see customer accounts with a balance between two values:

-
Filter to see customer accounts for two different regions (set up as Analysis Codes):

You can open other Sage 200 windows or related workspaces from the Actions menu. You can:
-
Open an action from the link on the toolbar.
-
Double-click an item to perform the default action.
-
Right-click and select Actions or select Actions from the toolbar. Select the required action from the list.
Note: If you are accessing the workspace via a browser, you can perform limited actions on some workspaces such as add a memo or query flag to a transaction or open related workspaces. You can authorise purchase orders and authorise and enter timesheet and expense claims using the Self Service web app via a browser.
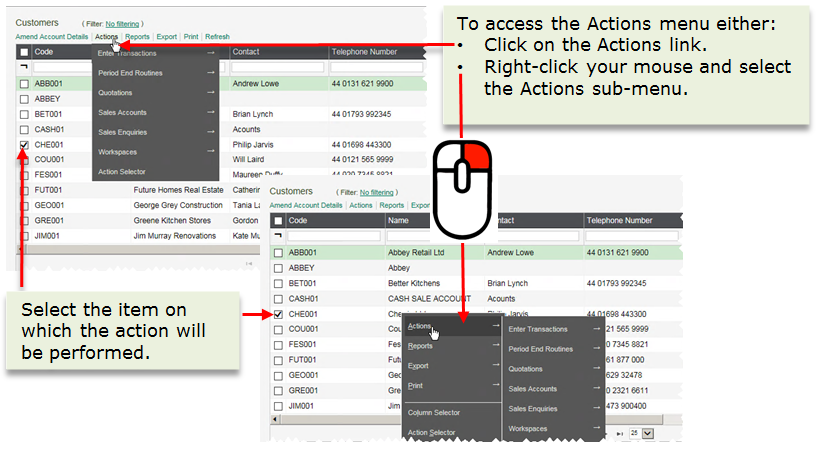
Selecting items for actions
-
If you select a single item:
-
The window is populated with the details of this item.
-
The related workspace is filtered for the selected item.
For example, if you have selected a customer and choose View Transactions, the customer current transaction list opens with the list filtered for the selected customer.
-
-
If you select multiple items:
-
Only those windows that support entering more than one record at a time can be selected from the Actions list. For example, if you choose Amend Account, you can amend the account for all the selected customers.
-
You cannot open a related workspace.
-
-
If you do not select any items:
-
A blank window or unfiltered workspace opens.
-
Note: You can use the Workspace Designer to change the default actions, add or remove actions, and change the order the actions appear in the drop-down list.
Data displayed in the lists can be exported to an Excel spreadsheet.
-
To send a selection of items from the list, first select the items to export.
Select items to export- You select an item using the checkbox to the left of the item.
-
You can select multiple items that are on the same page.
Note: You can export all items to an Excel spreadsheet.
- The top checkbox selects all items on that page.
-
Select Export from the toolbar.
-
Choose what to export.
-
Export Selected: Selected items are exported to the Excel spreadsheet.
-
Export All: All items are exported to an Excel spreadsheet. If you have filtered the list, only the filtered items are included.
-
Note: If you are using Internet Explorer as your browser, you will see an additional box at the bottom of the screen. Choose whether to Open or Save the Excel file.
Select Print from the toolbar to print selected items. This prints the visible columns in the order that they are currently displayed on the workspace. A print preview opens in a separate window.
Selecting items to print
- You select an item using the checkbox to the left of the item.
-
You can select multiple items that are on the same page.
Note: You can export all items to an Excel spreadsheet.
- The top checkbox selects all items on that page.
Use this to control the number of rows that are displayed per page for list content parts.
-
Select the required number of rows to display per page.
To run related reports, select Reports from the toolbar. Choose the required report.
Note: You can use Workspace Designer to add or remove reports.
You can resize workspaces, making the display of a content part larger or smaller by using the resize icons to expand or contract the content part to the size you want it to be.
The resize icons appear when you hover over the edges of the workspace with the mouse.
-
To resize a content part vertically, hover over the foot of the content part and when you see the resize icon
 use the mouse to drag the content part up or down to the size you want.
 -
To resize a content part horizontally, hover over the side of the content part and when you see
 use the mouse to drag the content part left or right to the size you want.
Depending on your device and browser the steps to restore default sizes will be different.
To restore the size of the content parts, you must clear the local storage in the browser where the sizes are saved.
To clear the local storage in the Chrome or Edge browsers:
-
In Chrome or Edge, press F12 to open developer tools.
-
Go to the Console tab.
-
Type in
localStorage.clear()and press Enter. -
Refresh (reload) the page in the browser (not the workspace).
Customising your workspace
You can change how the data is displayed on a workspace and these changes are saved per user when you leave the workspace.
Note: You can also use the Workspace Designer to create new workspaces and make changes to workspaces that affect all users.
From each workspace, you can:
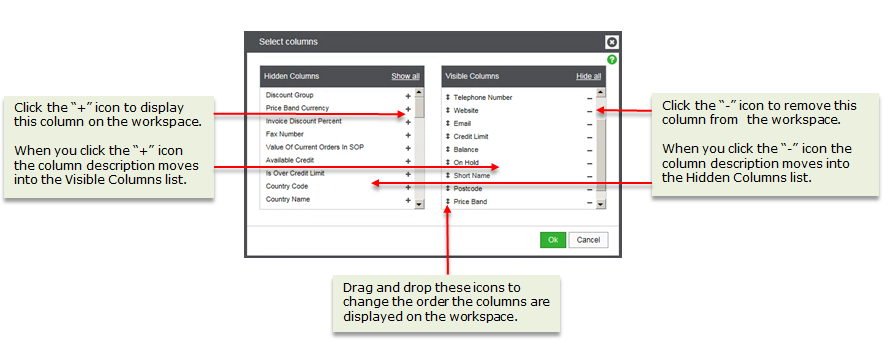
Information is displayed in columns in the lists. You can choose which columns to display on list panels and the order they are displayed.
You can sort and add or remove columns to find and display the required information.
-
Click the column heading to sort the data ascending or descending.
-
Right-click a column heading to add or hide a column.

-
Use the column selector to add multiple columns and change the order the columns are displayed.
-
Right-click on a column heading.
-
Choose Column Selector.
-
Drag and drop the column headings in the Visible list to change the order they are displayed.
-
To add a column, click the add icon + next to the required column heading in the Hidden list.
-
To hide a column, click the subtract icon - next to the required column heading in the Visible list.
-
Note: Use the Workspace Designer to change the columns for all users.
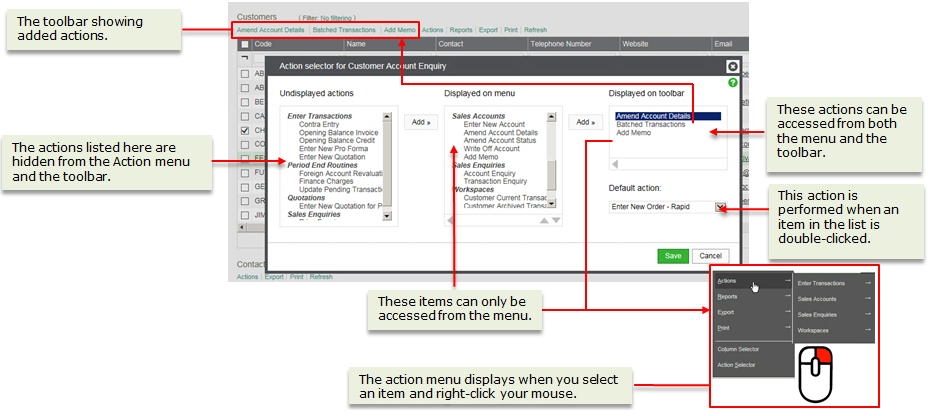
You can use the Action Selector to:
-
Show or hide actions on the Actions menu.
-
Change the order the actions appear on the Actions menu.
-
Add an action to the toolbar.
-
Change the default action.
The default action opens when you double-click an item in a list.
Note: Use the Workspace Designer to make changes to actions for all users.
To use the Action selector
-
Right-click and choose Action Selector.
-
Use the Add button add actions to the required list, and use the left arrow button to remove actions from a list.
Note: Actions that are displayed on the toolbar, are also displayed on the menu.
-
Use the up and down arrow buttons to change the order the actions appear on the menu.
-
Select the Default Action from the drop-down list.
Other tasks
Customising workspaces using the Workspace Designer
Guidelines for designing custom workspaces
Nominal workspaces and enquiries
Supplier workspaces and enquiries
Customer workspaces and enquiries
Cash Book workspaces and enquiries
Stock workspaces and enquiries
Sales document workspaces and enquiries
Purchase document workspaces and enquiries
Project workspaces and enquiries
Fixed Asset workspaces and enquiries
Planning workspaces and enquiries