Print credit notes for sales returns
Use this to print credit notes for sales returns that you entered in the Sales Order Processing module. To print credit notes that you entered in the Invoicing module, use Print Credit Notes in Invoicing. See Print or reprint invoices and credit notes (from Invoicing).
Print credit notes
Open: Sales Order Processing > Document Printing > Print Credit Notes.
-
Choose whether you want to print credit notes for All returns, Range of return nos, Range of return dates, Single customer or a Single return.
-
You can filter the credit notes by their Layout.
Select a Layout to only show credit notes that use a particular layout.
Note: The default layout is set in Maintain Credit Note Layouts. See Manage invoice and credit note layouts.
-
Click Display.
A list of credit notes is displayed. You can select a specific credit note, or click Select All to choose all displayed credit notes.
-
Enter the Print details.
Credit note date
Enter the credit note date. This is the:
- VAT point date.
- Date the transaction is posted to the customer's account and the ledgers.
- Date used to age the transaction.
Use credit note only
Select this to specify an alternative credit note layout. Choose the layout from the drop-down list.
This overrides the credit note layout specified as the default layout in the customer's account.
Credit notes layouts are created in the Credit note layouts window.
-
For foreign currency credit notes, select the Exchange Rates tab to view or amend the exchange rate used to process the credit note.
The exchange rate applied to the credit note depends on whether you can view exchange rates.
-
If the Exchange Rates tab is available, the current exchange rate is applied to the credit note. This may be different to the exchange rate when the return was entered.
You can change the exchange rate before printing the credit notes (if the exchange rate is Amendable), and the printed credit notes will use the new rate.
-
If the Exchange Rates tab is not available, the exchange rate set when the return was entered is applied to the credit note.
Note: You can only view and edit the exchange rates if you have selected the settings to Use exchange rates when printing invoices and credit notes from Sales orders (to view rates) and Edit exchange rates when printing invoices and credit notes from Sales Orders (to edit rates). Both settings are available in the SOP Settings Document Printing tab.
-
- Click Print to print any selected credit notes, or click Print All to print every credit note in the list.
- If any credit notes fail to print, a warning message appears, enabling you to view the details of the credit notes that have not been produced. These are displayed in the Print Credit Notes window. This only occurs when the system detects the VAT, goods or summary totals of the credit note will be negative.
Check which credit notes are ready to print
You can see when invoices or credit notes are ready to print from the Sales Orders List.
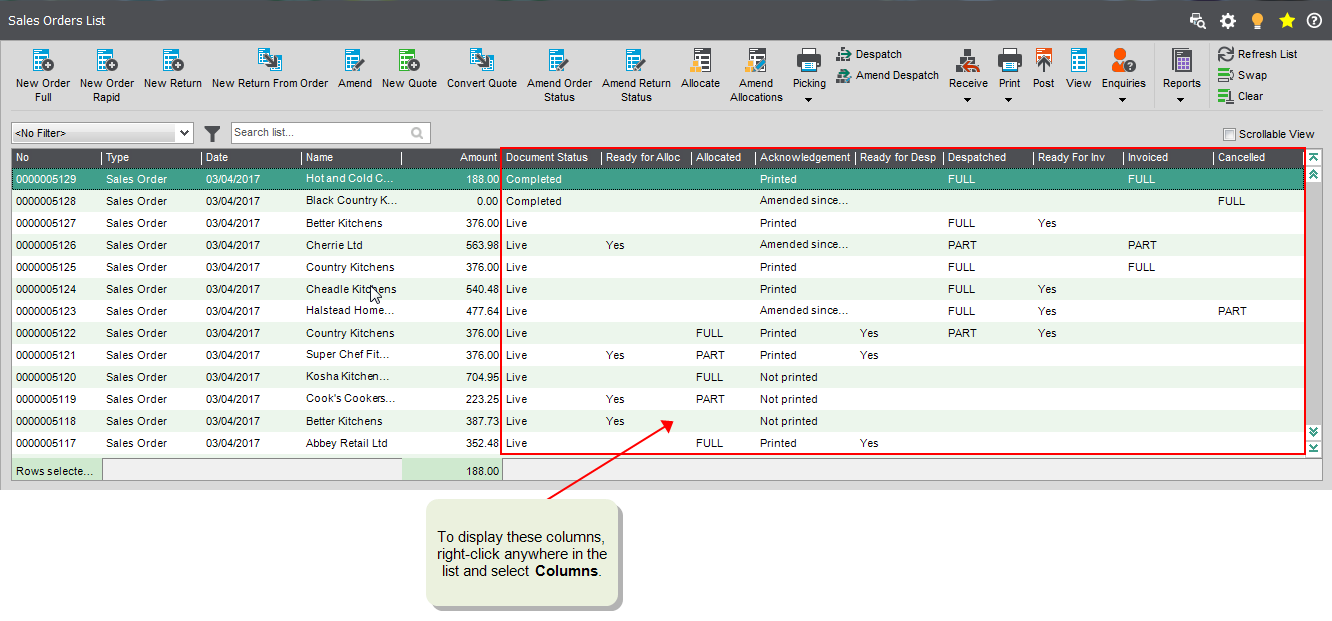
Open: Sales Order Processing > Sales Orders List.
- The Ready For Inv column shows Yes when some items on the sales order have been despatched (or do not require despatch) and are ready to have invoices printed.
-
The Invoiced column shows:
- Part: Only some of the items have been included in a printed invoice, but some items have not yet been invoiced.
- Full: All items in the order have printed invoices.
Once an item is partly or fully invoiced, it can be posted. If an order is not fully posted, its Status will still be Live.
Open: Sales Order Processing > Sales Orders List.
- Right-click anywhere in the list.
-
Select Columns > Delivery > Ready For Inv.
Select Columns > Invoiced.
Save credit notes to cloud document storage
You can set up Sage 200 to save invoices and credit notes to cloud document storage when you print (or email) them, so that they can be viewed by everyone.
If the invoice or credit note has been printed (or emailed) and saved to your cloud document storage, you can view it in PDF format.
Open: Invoicing > Invoicing List, then select a single invoice or credit note and click View in Document Storage.
Open: Sales Ledger > Customers List, then select the customer and click View in Document Storage.
-
The customer's folder is displayed in cloud document storage. The Invoice and Credit Note folders contain the appropriate documents for the customer.
See Save printed documents to cloud document storage.
Steps in this task
View or edit exchange rates on credit notes
Other tasks
Reprint credit notes for sales returns
Check the progress of sales orders
Reference