Add a Pay Now button to custom documents for Opayo (Sage Pay)
Opayo is the new name for Sage Pay. If you're using Sage 200 Professional versions up to 2020 R1, where you see references to "Sage Pay" in the app, these are referring to the Opayo payment service.
This explains how to add a Pay Now button to documents that you've already customised for your business, such as invoices or orders. This applies to Opayo.
The Pay Now button is an embedded image in the report, with these properties:
- The web address for your Opayo account. This is defined by an expression which uses the Sage200PayNow function. This expression links to the Opayo website when your customer clicks the image.
- The expression also includes details such as the amount to pay, date, invoice number, your vendor name, and the customer's account code.
If you haven't yet created a custom layout, you can customise one of the default layouts provided with Sage 200. To do this, open the layout from the defaults > layouts folder. These layouts already contain a Pay Now button.
| Sales Ledger Free Text Invoice Payment Service Provider (E-mail) |
| Sales Ledger Statement Payment Service Provider (E-mail) |
| SOP Invoice Payment Service Provider (E-mail) |
| SOP Pro Forma Payment Service Provider (E-Mail) |
| Sales Ledger Debtors Letter 1 Payment Service Provider (E-Mail) |
| Sales Ledger Debtors Letter 2 Payment Service Provider (E-Mail) |
| Sales Ledger Debtors Letter 3 Payment Service Provider (E-Mail) |
| Sales Ledger Debtors Letter 4 Payment Service Provider (E-Mail) |
| INV Invoice Payment Service Provider (E-Mail) |
If you're using Sage 200 Professional versions up to 2020 R1, the layouts will have the old "Sage Pay" name.
| Sales Ledger Free Text Invoice Sage Pay (E-mail) |
| Sales Ledger Statement Sage Pay (E-mail) |
| SOP Invoice Sage Pay (E-mail) |
| SOP Pro Forma Sage Pay (E-Mail) |
| Sales Ledger Debtors Letter 1 SagePay (E-Mail) |
| Sales Ledger Debtors Letter 2 SagePay (E-Mail) |
| Sales Ledger Debtors Letter 3 SagePay (E-Mail) |
| Sales Ledger Debtors Letter 4 SagePay (E-Mail) |
| INV Invoice Sage Pay (E-Mail) |
To use a Pay Now button on your own custom layout, you will need to:
Get the Pay Now button image
We have provided these image files for the Pay Now button. You can use one of these images, edit the image provided, or create your image file.
-
Right-click the image and choose Save image as, or the link next to an image and choose to Save link as.


- Save the image to a location on your PC.
Set email options on the layout
You must set up the email settings for the layout in Report Designer, as all documents with the Pay Now button must be sent to customers via email. Email options are not set on documents by default.
If you've already added email settings to your custom layouts, then you can skip this step.
Open: ![]() Tools > Run Sage Report Designer.
Tools > Run Sage Report Designer.
-
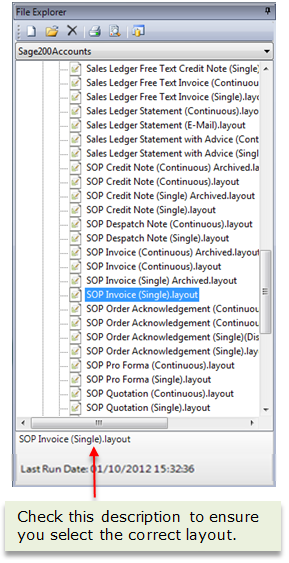
Select the SOP Invoice layout that you want to use: File Explorer > Layouts.
Custom layouts that you've already saved can be found in custom > layouts or company > layouts folder.
-
Select Report > Email settings from the toolbar, to set the report email settings.
-
Choose the header section of the layout.
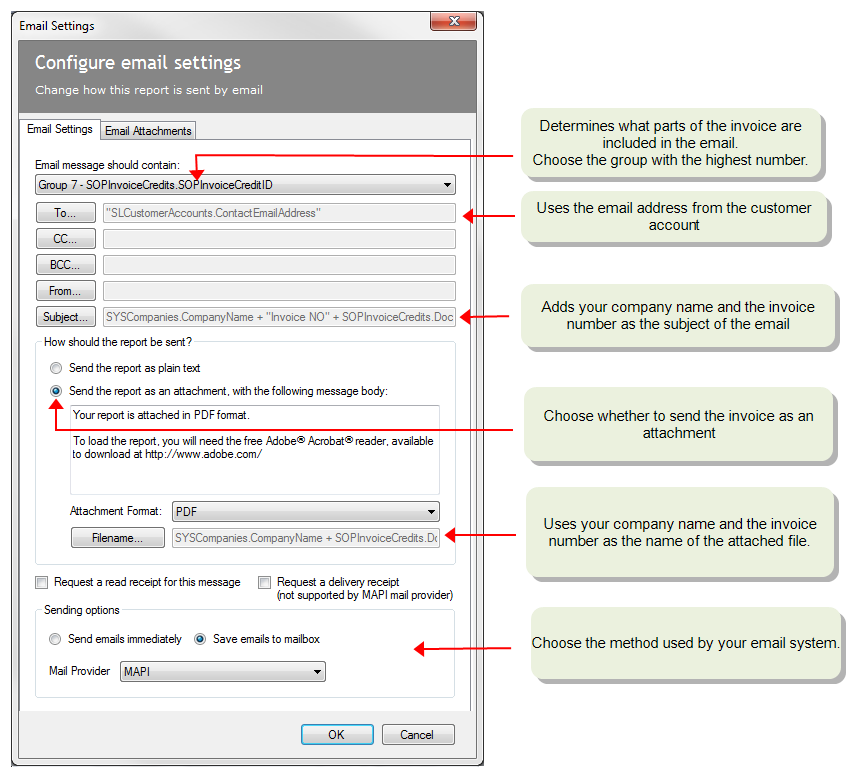
From the Email message should contain drop-down list, choose the group with the highest number (e.g. if there are 7 groups, select group 7). This makes each invoice is included on a separate email.
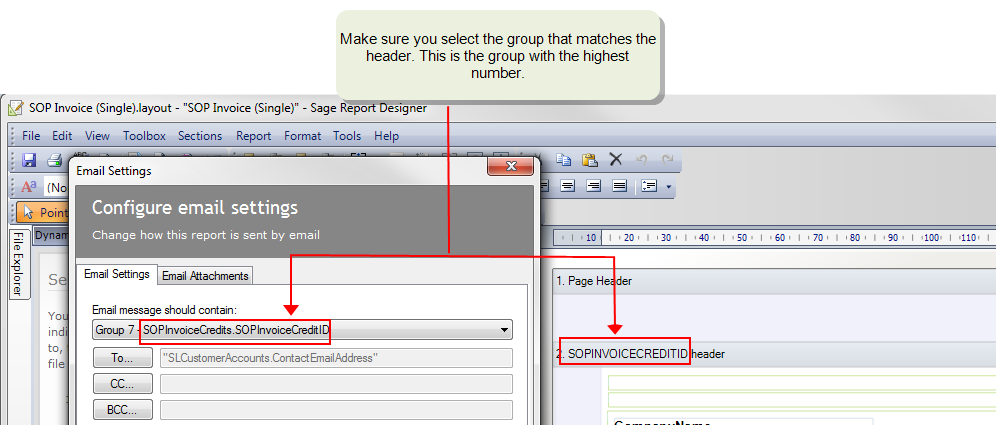
In this example, for the SOP Invoice (Single) layout, select Group 7 - SOPInvoiceCredits.SOPInvoiceCreditID.
Note: If you want to include your company logo, make sure that your logo is included the header section that you choose here.
-
Add the customer account email address. Invoices are sent to the address stored on the customer account.
Click To, then copy and paste this text in to the expression editor:
Invoices created from Invoicing or Sales Orders, or Project AccountingCopySLCustomerAccounts.ContactEmailAddressFree text invoicesCopySAL_FREE_TXT_INV_AFD_5031.PX_CONTACT_EMAIL_ADDRESS -
Click Subject and enter the subject for the email.
This can be plain text, or you can use an expression to include details from Sage 200.
The following expression includes your company name and the invoice number. You can copy and paste this text into the expression editor:
Invoices created from Invoicing or Sales OrdersCopySYSCompanies.CompanyName + " Invoice No:" + SOPInvoiceCredits.DocumentNoFree text invoicesCopySYSCompanies.CompanyName + " Invoice No - " + SAL_FREE_TXT_INV_AFD_5031.PX_INVOICE_NUMBERInvoices created from Project AccountingCopySYSCompanies.CompanyName + " Proforma Invoice No - " + INVInvoiceCredits.DocumentNo -
Choose to send the invoices as an attachment.
- Enter the required message text.
- Set the Attachment Format to PDF.
-
Click Filename and enter a filename for the attachment.
This can be plain text, or you can use an expression to include details from Sage 200.
The following expression includes your company name and the invoice number. You can copy and paste this text into the expression editor:
CopyREPORT.DESCRIPTION
-
Select Save email to mailbox.
The emails are sent to your email drafts folder, so you can check them before sending to your customers.
-
Choose your email account provider.
-
MAPI: Select this if your email application uses a MAPI (Outlook / Exchange) mail server.
-
Microsoft Outlook: Select this if you are using Microsoft Outlook.
-
-
To save the new invoice layout, select File > Save As.
Note: When you change a default layout, letter or report, you must save the new layout, letter or report in the custom or company folder.
Add the Pay Now button
- Scroll to the footer section of the layout.
- Add the Pay Now image to the layout.
- Select Toolbox > Add Image / Logo.
- Draw the a box where you'd like the image to appear.
Choose to Browse my PC for an image and select the image saved on your PC.
-
Select the image. From the Properties section, select Behaviour > Drill Down and click
 .
.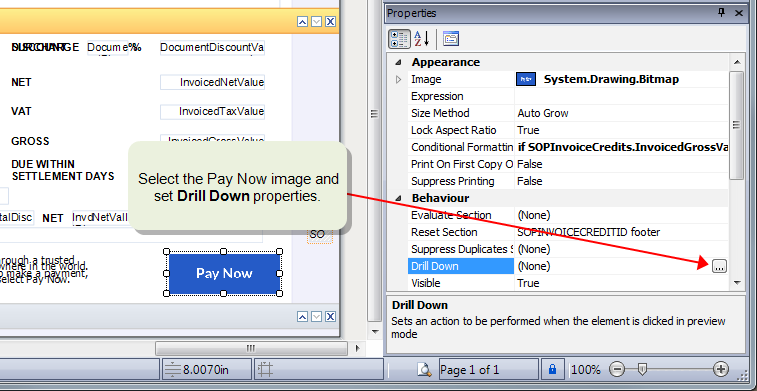
- Set When this element is clicked to Open a web page.
-
Select Go to a web address taken from the report data, and then click Edit. This opens the Expression Editor.
Use the expressions provided forOpayo.
Invoices created from Invoicing and Sales Orders - OpayoIf you're using Opayo, first decide if you want to send the customer address to the Opayo website. Then copy and paste the text in the expression editor for the appropriate function.
-
CreatePayNowButton. This function does not include the customer's address. Use this if your customer uses multiple invoice addresses. This just means that the customer address is not added automatically on the card details. Your customer just needs to manually enter their address with their card details.
CreatePayNowButton(SYSCompanies.PaymentVendorName, SLCustomerAccounts.CustomerAccountNumber, SOPInvoiceCredits.DocumentNo, (SOPInvoiceCredits.InvdGrossValInclSettDisc - SOPInvoiceCredits.PaymentValue), SOPInvoiceCredits.DocumentDate, SLCustomerAccounts.CurrencyISOCode, "invoice", SYSCompanies.TenantID, SYSCompanies.CompanyNumber, SOPInvoiceCredits.PaymentCloudPaymentID)
-
CreatePayNowButtonWithAddress. This function adds the customers address to the Opayo website. This uses the customers invoice address. When your customer makes a payment, their address is entered automatically, making their Pay now experience easier. Use this when your customers only uses a single address.
CreatePayNowButtonWithAddress(SYSCompanies.PaymentVendorName,SLCustomerAccounts.CustomerAccountNumber, SOPInvCredAddresses.AddressLine1, SOPInvCredAddresses.AddressLine2, SOPInvCredAddresses.City, SOPInvCredAddresses.County, SOPInvCredAddresses.PostCode, SOPInvCredAddresses.Country, SOPInvoiceCredits.DocumentNo, (SOPInvoiceCredits.InvdGrossValInclSettDisc - SOPInvoiceCredits.PaymentValue), SOPInvoiceCredits.DocumentDate, SLCustomerAccounts.CurrencyISOCode, "invoice", SYSCompanies.TenantID, SYSCompanies.CompanyNumber, SOPInvoiceCredits.PaymentCloudPaymentID)
Free text invoicesIf you're using Opayo, copy and paste the following text in the expression editor for the CreatePayNowButtonWithAddress function.
CreatePayNowButtonWithAddress(SAL_FREE_TXT_INV_AFD_5031.PX_PAYMENTVENDOR_NAME,SAL_FREE_TXT_INV_AFD_5031.PX_ACCOUNT_NUMBER, SAL_FREE_TXT_INV_AFD_5031.PX_ADDRESS_LINE_1, SAL_FREE_TXT_INV_AFD_5031.PX_ADDRESS_LINE_2, SAL_FREE_TXT_INV_AFD_5031.PX_ADDRESS_CITY, SAL_FREE_TXT_INV_AFD_5031.PX_ADDRESS_COUNTY, SAL_FREE_TXT_INV_AFD_5031.PX_POST_CODE, "", SAL_FREE_TXT_INV_AFD_5031.PX_INVOICE_NUMBER, SAL_FREE_TXT_INV_AFD_5031.PX_OUTSTANDING_VALUE, SAL_FREE_TXT_INV_AFD_5031.PX_INVOICE_DATE, SAL_FREE_TXT_INV_AFD_5031.PX_CURRENCY_ISO_CODE , "invoice", SAL_FREE_TXT_INV_AFD_5031.PX_TENANT_ID, SAL_FREE_TXT_INV_AFD_5031.PX_COMPANY_NUMBER, SAL_FREE_TXT_INV_AFD_5031.PX_PAYMENTCLOUDPAYMENTID);
Invoices created from Project AccountingIf you're using Opayo, copy and paste the following text in the expression editor for the CreatePayNowButtonWithAddress function.
CreatePayNowButtonWithAddress(SYSCompanies.PaymentVendorName,SLCustomerAccounts.CustomerAccountNumber,INVBillingAddress.AddressLine1, INVBillingAddress.AddressLine2, INVBillingAddress.City, INVBillingAddress.County, INVBillingAddress.PostCode, "",INVInvoiceCredits.DocumentNo, INVInvoiceCredits.InvoicedGrossValue ,INVInvoiceCredits.DocumentDate , SLCustomerAccounts.CurrencyISOCode, "invoice", SYSCompanies.TenantID, SYSCompanies.CompanyNumber, INVInvoiceCredits.PaymentCloudPaymentID)
-
-
Once you've entered the expression, click OK.
-
Save the layout.
- If you want to use the layout for all companies, make sure you save it in the Custom > Layouts folder.
- If the layout is for a specific company (if you have more than one on your site), save it in the Company > Layouts folder.
Note: If this a new layout, don't forget to assign set it as a default layout, or assign it to the relevant customer accounts.