Use custom layouts
Watch a video
How to
Create a custom document layout
You can customise the layouts used for sales orders, invoices, credit notes, despatch notes, quotations, pro formas, statements, debtor letters, purchase orders and labels.
Sage 200 has a set of defaults layouts that you can use 'out of the box'. We recommend that if you want to use customised layouts, that you make changes to these default layouts.
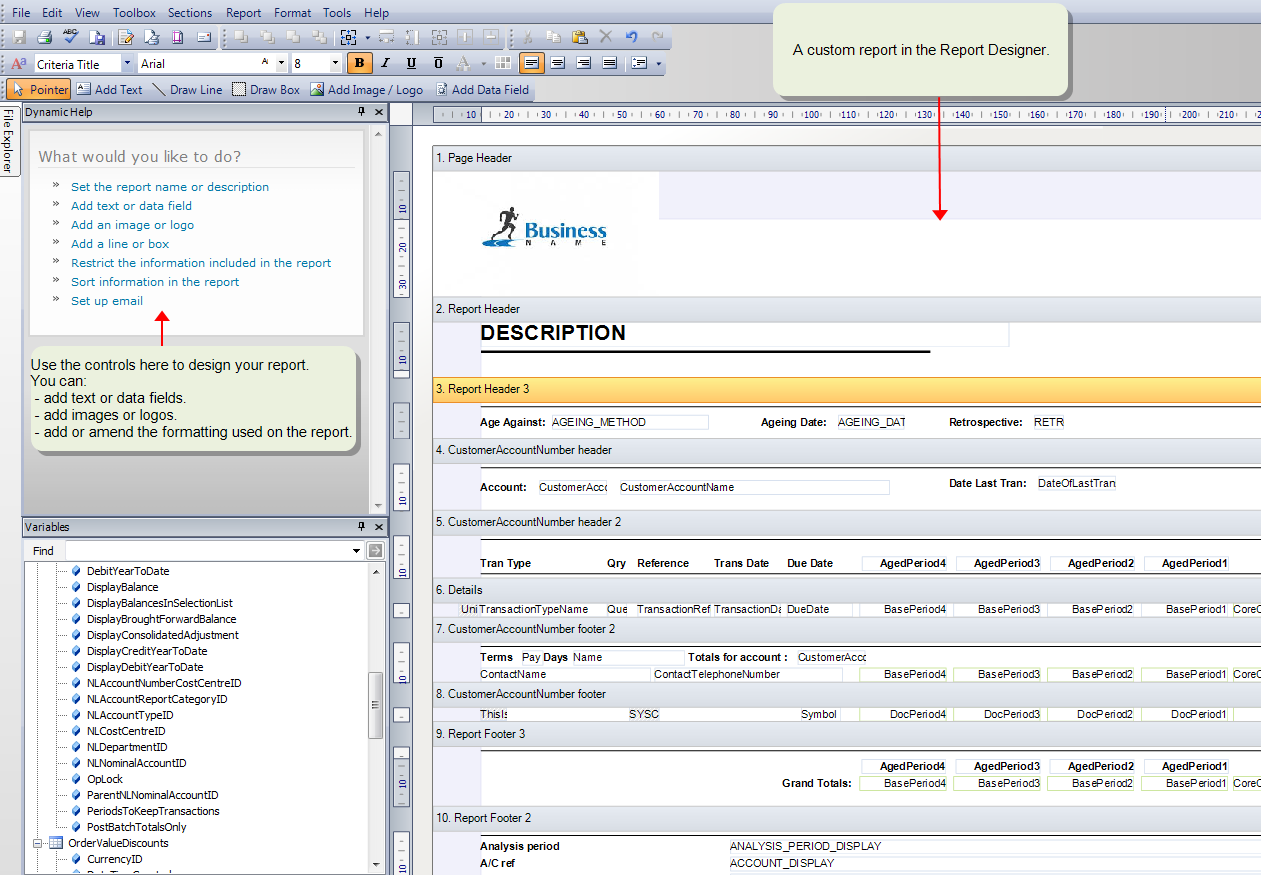
Open: ![]() Tools > Run Sage Report Designer.
Tools > Run Sage Report Designer.
-
Enter your Sage 200 email address to log in.
Report Designer opens.
-
Go to the File Explorer, browse to the Layouts folder, then double-click on the document layout you want to customise.
-
Make your changes to the layout.
Tip: For help working with reports, watch our reports videos and use the help supplied with Report Designer.
-
When you have finished, go to the File menu and select Save As.
-
Choose where to save the layout:
-
If you want to use the new layout for all companies, save it in the custom > layouts folder.
Tip: If you use the same filename as the default, your custom layout will be used automatically.
-
If the layout is specific for a single company, save it in the company > layouts folder.
-
-
Close Report Designer.
Use email layouts for invoices and credit notes
Before you can email your invoices or credit notes, you need to choose the layout you want to use. This layout must have the correct email settings applied.
Sage 200 has a some default layouts that you can use 'out of the box' with email setting already applied.
We recommend that if you want to use customised layouts, that you make changes to these default layouts.
-
SOP Invoice (Email Plain Paper), SOP Credit Note (Email Plain Paper): With borders to define the sections.
-
SOP Invoice (Email), SOP Credit Note (Email): Without borders to define the sections.
-
SOP Invoice Payment Service Provider (Email Plain Paper), SOP Invoice Payment Service Provider (Email): Designed for use with both Sage Invoice Payments and Opayo (formerly Sage Pay). A Pay Now button is added to each type of invoice layout.

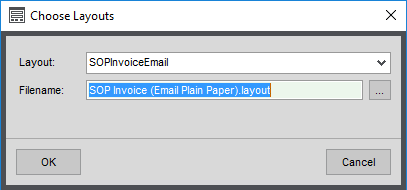
Choose an email layout
-
Choose one of the following from the Layout list:
-
SOPInvoiceEmail
-
SOPCreditNoteEmail
-
-
Click the browse ... button next to Filename and choose the layout you want to use.
-
Default standard layouts can be found in default > layouts
-
Customised layouts can be found in custom > layouts
-
Use a single custom layout for all customers
For your printed invoices and credit notes, if you have customised the default layout and saved it with the same name, e.g. SOP Invoice (Single), your new layout will be used automatically.
If you've saved your layout with a different name, you'll need to add it to Sage 200. To do this:
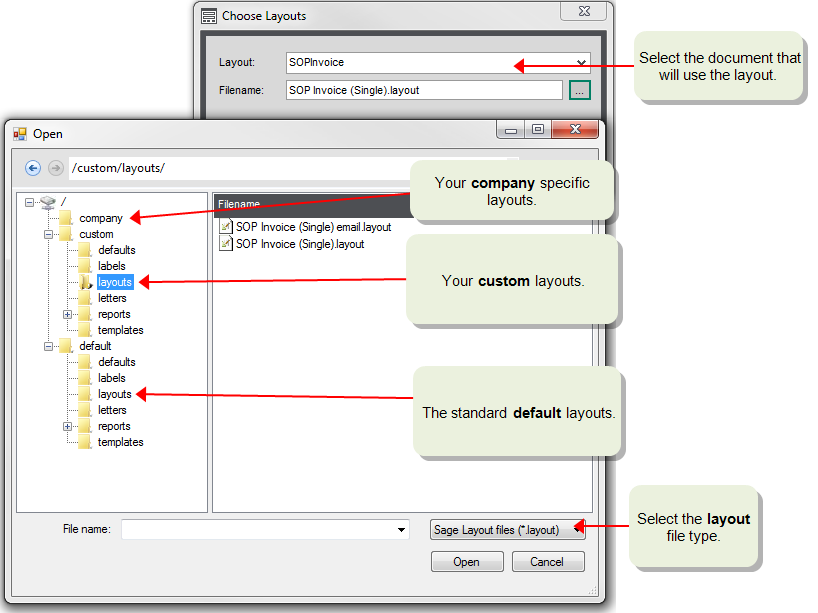
Open: ![]() Tools > Choose Layouts.
Tools > Choose Layouts.
-
From the Layout list select the document that is to use your custom template.
-
Click the browse ... button next to the Filename.
-
Browse through the navigation tree to the folder that contains your template.
The file list only shows files of a particular type, such as layouts, letters, labels, or templates. To change this, select the file type to the right of the File name.
-
Select the required layout and click Open.
-
When you have assigned all your document templates to layouts, click OK.
Use multiple invoice and credit note layouts
You can use more than one layout for your printed invoices and credit notes. Once you've created the layouts you want to use, you add them to Sage 200. To do this:
Open: Settings > Invoices and Orders > Maintain Invoice Layouts or Maintain Credit Note Layouts.
-
Click Add and select the invoice or credit note layout file from the relevant layouts folder.
Note: This will be Custom > layouts or company > layouts.
-
To make the new layout the default, click Default.
Note: You can only use Edit to choose a new layout file if there is more than one layout. If there is only one layout, use Choose layouts to select a different layout file. See Choose an email layout.
Set a customer to use a specific layout
Choose the layout to use for each customer account. You must have added them to Sage 200 first, as above.
Open: Customer List > Amend Account | Documents.
-
Select the sales invoice layout to associate with the customer account from the Sales invoice layout drop-down.
-
Select the sales credit note layout to associate with the customer account from the Sales credit note layout drop-down.
Useful info
About Report Designer
You use Report Designer to make custom versions of your standard letters, layouts and reports. Report Designer works with your Sage 200 data to analyse your business information. It includes a comprehensive set of tools that can be used to produce your own complex or specialised reports and layouts.
Open: ![]() Tools > Run Sage Report Designer.
Tools > Run Sage Report Designer.
About using layouts in Sage 200
Layouts are used to create the documents that you send to your customers. Each layout is built up in sections and contains information from your Sage 200 database such as your customer's name and address and your company name and address. The exact information included on each layout varies according to the type of layout.
We have provided a set of layouts for your and these are ready for you to use without any additional configuration. However, you can choose to use a different layout and also make amendments to these layouts such as:
-
Change the text appearance, font and size.
-
Change margin, borders, columns.
-
Add or remove data fields.
-
Add images such as your company logo.
The easiest way to create your own custom layouts is to amend the layouts that we have provided.
The following table shows the names of the layouts and what they're used for.
Note: A number of layouts have (single) and (continuous) versions. The (single) version is always used by default. The (continuous) version is for dot matrix printers.
| Layout type | Corresponding layouts | Used for | Is default |
|---|---|---|---|
| NominalCheque | Nominal Ledger Cheque | Cheques from nominal payments | Yes |
| POPOrder | POP Purchase Order | Purchase orders | Yes |
| POP Return | Purchase returns | Yes | |
| ChequeOnly | Purchase Ledger Cheque | Suppliers using the Cheque Only payment group | Yes |
| RemittanceWithCheque | Purchase Ledger Cheque and Remittance | Suppliers using the Remittance and Cheque payment group | Yes |
| RemittanceOnly |
Purchase Ledger Remittance Advice |
Suppliers using the Remittance Only payment group |
Yes |
| RemittanceOnlyEmail |
Purchase Ledger Remittance Advice (Email) |
Suppliers using the Epayment Remittance only payment group |
Yes |
| StatementPrimary |
Sales Ledger Statement |
Customers using paper statements |
Yes |
|
Sales Ledger Statement with Advice |
Customer paper statement with a remittance advice | ||
| StatementPrimaryEmail |
Sales Ledger Statement (Email) |
Customers using email statements |
Yes |
|
Sales Ledger Statement Payment Service Provider (Email) |
Customer email statements with a Pay Now button. |
||
| SOPCreditNote | SOP Credit Note | Sales credit notes (Invoicing and sales orders | Yes |
|
SOP Credit Note (Single Plain paper) |
For plain A4 paper | ||
|
SOP Credit Note (Email Plain Paper) |
With email options | ||
| SOP Credit Note Payment Service Provider Pay (Email) | With email options and a Pay Now button | ||
| SOPDespatchNote | SOP Despatch Note | When goods are recorded as despatched. | Yes |
| SOPInvoice |
SOP Invoice |
Sales invoices (Invoicing and Sales Orders) |
Yes |
|
SOP Invoice (Single Plain paper) |
For plain A4 paper | ||
|
SOP Invoice (Email Plain Paper) |
With email options | ||
| SOP Invoice Payment Service Provider (Email) | With email options and a Pay Now button | ||
| SOP VAT Invoice | VAT only invoice | ||
| SOP VAT Credit Note | VAT only credit note | ||
| SOPProForma |
SOP Pro Forma |
Pro forma invoice |
Yes |
|
SOP Pro Forma Payment Service Provider (Email) |
Pro forma invoice with a email settings and a Pay Now button |
||
| SOPQuotation | SOP Quotation | Quote | Yes |
| SOPSalesOrder | SOP Sales Order | Sales order | Yes |
| DebtorLetterPeriod1 | Sales Ledger Debtors Letter 1 | Chase letter for due date period 1 | Yes |
| Sales Ledger Debtors Letter 1 Payment Service Provider (E-Mail) | Chase letter with Pay Now button and email options for due date period 1 | ||
| DebtorLetterPeriod2 | Sales Ledger Debtors Letter 2 | Chase letter for due date period 2 | Yes |
| Sales Ledger Debtors Letter 2 Payment Service Provider (E-Mail) | Chase letter with Pay Now button and email options for due date period 2 | ||
| DebtorLetterPeriod3 | Sales Ledger Debtors Letter 3 | Chase letter for due date period 3 | Yes |
| Sales Ledger Debtors Letter 3 Payment Service Provider (E-Mail) | Chase letter with Pay Now button and email options for due date period 3 | ||
| DebtorLetterPeriod4 | Sales Ledger Debtors Letter 4 | Chase letter for due date period 4 | Yes |
| Sales Ledger Debtors Letter 4 Payment Service Provider (E-Mail) | Chase letter with Pay Now button and email options for due date period 4 |
Why file names and locations are important
Your reports and document templates are stored in three levels:
-
Company/Company name: Reports and templates specific to a particular company. You should only use this if you have more than one company for your site.
Note: You'll need to create the company name folder. This must exactly match the name of your company in Sage 200.
- Custom: Reports and templates that you have created, and want to use for all companies on your site.
- Default: Standard reports and document templates that we have provided with Sage 200.
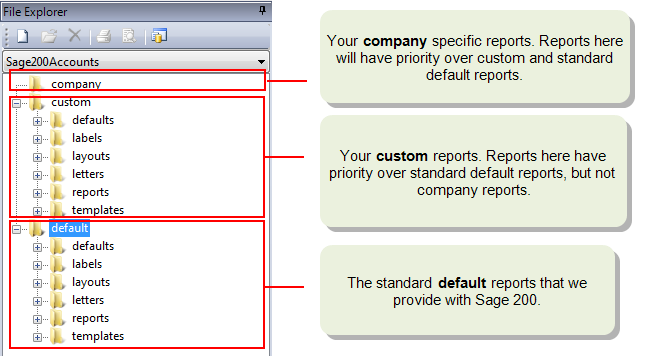
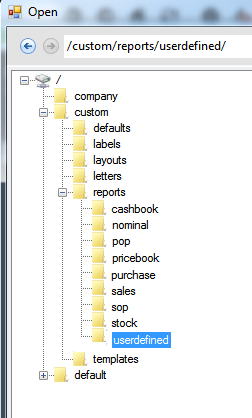
If you have uploaded a report using the Custom Report Manager, these reports will appear in the UserDefined folder within Custom > Reports.
When you generate a report or document , Sage 200 first looks for a company version, and then a custom version. If it does not find either of these, it uses the default standard version.
For example, when you run the Aged Debtors (Detailed) report, Sage 200 looks for the report in the following locations:
-
Sage 200 checks the company folder first.
company/<your company name>/reports/sales/Sales Ledger Aged Debtors Report (Detailed).report
-
If it does not find the report in the company folder, it checks the custom folder.
custom/reports/sales/Sales Ledger Aged Debtors Report (Detailed).report
-
If it does not find the report in the custom folder, it uses the default report:
default/reports/sales/Sales Ledger Aged Debtors Report (Detailed).report
So when creating a custom document or report template:
- Keep your custom file name the same as the default file name.
- Save your template to the same folder in the custom area as the default standard template.
For reports, the above information is critical and must be followed. For layouts, you can use a different file name for custom layouts, and select them by using Choose Layouts.
Fix it
I made my changes but cannot save layout
You cannot save changes made directly to a standard layout. You will notice the Save options are greyed out.
You must use Save As to save your amended layout in the custom folder.
I tried to print my layout but my custom version was not produced
When you run a report, Sage 200 looks for that report / layout / letter in the custom folder. If you find that your custom report is not being generated, it means that Sage 200 cannot find your new report or layout and has reverted to the default version of the report.
Check:
-
The file name of your custom report is exactly the same as the name of the standard report on which it was based.
-
If you've used a different name for the layout, check that you've added it to Sage 200, using the Choose Layouts option.
-
If it's an invoice or credit note layout, make sure that you've added it using the Maintain Invoice Layouts or Maintain Credit Note Layouts.
-
If it's a layout for a specific customer, make sure you've added it to the customer's account.
See Why file names and locations are important.
What happens when
I save a layout?
When you save, it is available for use, but it may not yet be generated.
It will depend on whether your layout uses the same name as the standard layout it is based on, and where you saved your custom template:
-
If you used the same file name, and saved your template into the folder with the same name as the original, then your document or report will be generated.
-
If you used a different file name, or saved you template into a folder other than the letter folder, then you must link your debtor letter template to the appropriate Due Date period.
Print or reprint invoices and credit notes (from Invoicing)
Email invoices and credit notes (from Invoicing)
Print or reprint invoices and credit notes (from Sales Orders)
Email invoices (from sales orders)
How to run reports and find information