Create or amend supplier accounts
Find this screen
Open: Suppliers > Create & Amend Accounts > Create Supplier
Open: Suppliers > Create & Amend Accounts > Amend Supplier Details
Watch a video
How to
Create or amend a supplier account
Enter your
|
Company |
The The account Code can be up to eight characters long, and use letters, numbers or both. |
|
Contacts |
Add contact details for different people for this See Supplier contacts. |
|
Bank |
Enter details of your supplier's bank account. This is optional unless you're using the Sage e-Banking A service provided by Sage and your bank to allow you to pay suppliers, pay your VAT and automatically reconcile your bank account. service to pay this supplier. The Bank tab will only be available if your user account has access to this feature. See Control access to supplier bank details. |
|
Trading |
Your |
|
Payment |
The settlement discount details payment terms You can also upload the customer details to the Invoice Payments service. |
|
Credit |
The credit reference information about the |
|
Communications |
Record communications with your |
|
Attachments |
Files and documents about the The file name can't have more than 150 characters. If a file extension is more than 150 characters, the file can't be saved. |
|
Memo |
Comments about the |
|
Alerts |
Set up alerts to show messages when you deal with a |
You must enter a code and name before you can save a new account.
Make changes to supplier accounts
Any changes you make to an account will only affect transactions that you enter after you've made the changes. For example, if you change the settlement discount details, this doesn't affect the discount details already entered on transactions.
- You can't change the account Code once the account has been saved. If you've entered a code incorrectly and haven't entered any transactions for it, delete the account and recreate it.
Once transactions have been entered for an account:
- You can't change the currency.
- You can't delete the account.
Duplicate a supplier account
You can create a new
Duplicating an account can be useful if your
Note: Transactions associated with the original account are not copied to the new account.
Tip: To check if an account was created as a duplicate, use
Open: Suppliers > Create & Amend Accounts > Create Supplier
- Enter a Code for the new account you want to create.
- Click Duplicate.
-
Select the
-
To check the account you've selected, select View Detail.
-
If you can't see an account, you might have set its Active Status to Hidden.
-
-
Select which information should be copied to the new
- Make a euro duplicate will set the new account's currency to use the euro.
- You can choose to duplicate memos, attachments, credit information, contact information, and alerts.
- Click OK to create the new account.
- Edit the new account if required.
Import, export and update accounts
If you need to add or update a large number of
You can also export accounts to a file in the same format used for an import. This means you can export information and make changes to it using an external tool (such as Excel), and then import your updated information back into Sage 200.
See Import and export supplier accounts.
Delete an account
If you've entered an account in error, you can delete it as long as transactions have not been posted to the account.
To delete an account:
Open: Suppliers > Create & Amend Accounts > Amend Supplier Details
- Select the account.
- Click Delete.
If you have posted transactions to the account, the Delete button will not be available, but you can hide the account instead.
Hide an account
Hiding an account will remove the account from the
Open: Suppliers > Payment Control > Amend Supplier Status
-
To hide an account, select the account and set the Active Status to Hidden.
Useful info
Analysis codes
Analysis codes are extra pieces of information that you can use as custom fields, to improve your reporting and to compare different areas of your business.
You can have 20 analysis codes for each area.
An analysis code has two parts:
-
Code or Name - this a label and represents how you want to group your data.
-
Value - this can be a set of predefined values or free text. This is how you want to break down the data for each group.
You create the analysis codes and their associated values on the Analysis Codes screen.
On each
For example, if you want to group accounts by location, for a
-
Select the Trading tab. You'll see the codes listed in the Analysis Code section.
If you have set a default value, this will already be selected.
-
For each code, select the required value from the drop-down list in the Value column.
If you don't want to use an analysis code for a particular customer, leave the value blank.
- To add a new value:
- Click New Value from the drop-down list.
Enter the name of the new value and click OK.
You can only do this if you have chosen to Add New on Entry when setting up your analysis codes.
-
To enter a one-off free text value, enter the required text in the Value column.
You can only do this, if you have chosen to Enter Free Text values when setting up your analysis codes.
Order priority
You only need this if you're using Sales Orders. This sets a ranking for your customers when manually allocating stock to outstanding orders.
The order priority code is used to display orders in order of priority, so you can see which are the most urgent. A is the highest priority and Z is the lowest.
Setting the default nominal account
This is the default
If this is selected here, this account nominal account will already be entered in the Nominal Analysis section, when entering transactions.
This account is usually a
You have suppliers in the UK and in Europe. On your profit and loss, you want to show your UK sales separately to your European sales. To achieve this you have Sales UK and Sales Europe nominal accounts.
As most of your suppliers are based in the UK, you set the Sales UK as your default Sales account on the Default Nominal Accounts screen.
For your European suppliers, you change this on each supplier account to the Sales Europe nominal account.
When transactions are entered for your European suppliers, the correct nominal account is always selected, by default.
If you are using cost centres departments with your nominal accounts, you can select a nominal account with a CC or CC / Dept combination as the default account here. For example, a
Once you have set this, Sage 200 uses CC / Dept combination when posting transactions automatically. When Sage 200 posts a transaction to a Profit and Loss nominal account, it posts to the account code associated with the default nominal account and the CC/ Dept associated with the
Settlement discounts
This is where you enter the settlement discount details for this supplier. The percentage and the number of days is taken from your supplier defaults. You can change or keep these.
The discount details set here are then automatically applied when you create an invoice for this supplier. This helps to reduce errors when entering transactions.
If you don't want to set default settlement discount details, leave these options blank.
-
Enter the invoice. Include the settlement discount details on the invoice. The full invoice value is posted to the
-
Enter the
The discount is added to the amount
The amount
For example, for an invoice of £119 with a £5 settlement discount, enter the payment amount as £114 and discount amount as £5.
You offer a settlement discount of 5%:
- You record the details of an invoice for £100. VAT is calculated at £20. You enter the discount percentage and amount which is £5.
- You pay the invoice within the specified period, so you owe £114. This is the gross amount (£120) minus the net discount (£5) and the discounted VAT (5% x 20 = £1).
- You record the payment and enter the cheque value as £114 and add the discount value as £5. This creates a transaction value of £119.
- You allocate the invoice (£120) to the payment (£119). The VAT discount (£1) remains outstanding.
- You record a credit note for the VAT amount of £1.
- You allocate the credit note to the remaining balance on the invoice.
| Transaction | Nominal Account | Debit | Credit |
|---|---|---|---|
| Invoice | Creditors Control | 120 | |
| Net | 100 | ||
| VAT | 20 | ||
| Payment | Discounts Taken | 5 | |
| Bank Account | 114 | ||
| Creditors Control Account | 119 | ||
| Credit Note | Creditors Control Account | 1 | |
| VAT | 1 |
Payment and credit terms
You can record the payment and credit terms that you have agreed with your
Recording payment terms
You record the payment terms that you have agreed with your
You enter the number of days credit that each
Invoices are due the specified number of days after the invoice date.
For example, if the Number of days is set to 15 and you enter an invoice with an invoice date of 03/10, the due date for the invoice will be 18/10.
Invoices are due the specified number of days after the start of the month in which an invoice is dated.
For example. if the Number of days is set to 30 and you enter an invoice with an invoice date of 03/10, the due date for the invoice will be 31/10.
Invoices are due the specified number of days after the end of the month in which the invoice was dated.
For example, if the Number of days is set to 15, and you enter an invoice with an invoice date of 03/10, the due date for the invoice will be 15/11.
Invoices are due on the same day the following month. The Number of days is automatically set to 0.
For example, if you enter an invoice with an invoice date of 03/10, the due date will be 03/11.
Due date calculations are only made for invoice transactions. Credit notes always retain the same due date as the entered transaction date.
To confirm that you have agreed these terms with your
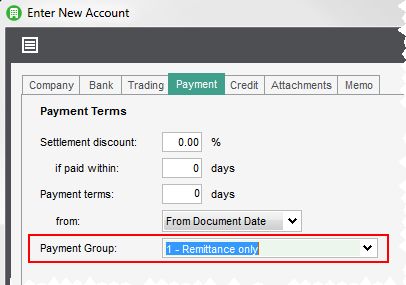
Payment Groups
Sage 200 has a process for automatically creating payments for your suppliers. This calculates the total value of invoices due to be paid and then creates a single payment for each supplier. This saves you having to work out how much you owe each supplier.
Payment groups tell Sage 200 how to process these payments for each supplier, such as whether to print a cheque and/or remittance advice, pay via e-banking, or pay via Supplier Payments.
How to set up payment groups and add them to supplier accounts
- Set up payment groups
- Enter a maximum payment value (on the Details tab) if you want to set an upper limit for the amount you pay a single supplier in one go.
-
Decide how you want to pay the supplier by assigning a payment group to the supplier's account.
|
Remittance and cheque |
Prints a remittance and cheque. |
|
Remittance only |
Prints a remittance only. |
|
Cheque only |
Prints a cheque only. |
|
Email Remittance |
Emails the remittance. |
|
Epayment |
Pays the supplier via e-Banking A service provided by Sage and your bank to allow you to pay suppliers, pay your VAT and automatically reconcile your bank account.. |
|
Epayment Remittance |
Pays the supplier via e-Banking and prints a remittance. |
|
Epayment Email Remittance |
Pays the supplier via e-Banking and emails the remittance. |
|
Supplier Payments |
Pays the supplier using a Supplier Payments account. |
| Supplier Payments and Remittance | Pays the supplier using a Supplier Payments account. |
Factor Houses
Factor houses are third party companies employed by suppliers to collect payments from their customers.
If any of your suppliers use factor houses to collect payments from you, you can create records for them and link to the appropriate supplier account.
Once you've linked a supplier account to a factor house, any remittances and/or cheques are printed using the factor house details. This is to make sure that these are sent to the correct organisation.
Remittances and cheques are only printed when you use automatically generate payments for your suppliers using Payment Processing.
You create the factor house record on the Factor house screen.
You link the supplier record to the Factor House on the Payment tab.
Attachments
- If the attachment is a file, a copy of the file is stored with the account/record on the server.
-
If the attachment is a link or a folder, only the location of the file or folder is stored; e.g. it might be a file or folder on your network.
Note:
The file is tested by antivirus software before it is attached.
.quarantine - waiting to be tested by antivirus software.
.blocked - found to be potentially unsafe. The file has been deleted and a dummy file with the .blocked extension is listed so you can see that there's a problem.
Tip: You can drag-and-drop files from Windows Explorer to add files to the attachments list.
You can also see the files from workspaces and enquiry screens.
If you're a web user, you can't see files which are links, as your browser can't access these.
Alerts
You can set up alerts on a
When you set up an alert on the
You can choose to show alerts when entering purchase orders and returns, and generating purchase orders.
Alerts are displayed for these activities in both the Sage 200 desktop and Web Portal (where available).
Alerts are specific to an individual
See Supplier alerts.
Audit log
You can use the audit log to check any changes that have been made to the Bank details of a supplier account.
- The Parent Ref and Name show the supplier account code and name.
-
For any changes to bank details, the event Action will show Amend, and the Old value and New value are recorded. This includes:
- Sort code, Account number, Account name, Bank payment reference.
- IBAN, BICS / Swift Number, Roll Number, BACS Reference, Additional Reference, NON UK Sort Code, and country specific clearing code (if appropriate).
- If any details are deleted, the event Action will show Amend, and details are recorded in the Old Value.
Open: Settings > Organisational and Financial > Audit Log > View Audit Log.
See Audit log.
Control access to supplier bank details
You can control who can view and amend supplier bank details by setting access to the feature Bank Details. This feature allows you to show or hide the Bank tab for all supplier accounts.
Open: Settings > Organisational and Financial > User Access.
- Select the user.
- Enable or disable the feature Purchase Ledger > Advanced > Bank Details.
- By default, this feature is not enabled for all users, and it is only enabled for users with Administrator access or the Purchase Clerk role. You will need to enable this feature for any users that require access to add or amend supplier bank details.
- User accounts that were created before this update will have access to this feature by default.
Supplier bank details email notifications
To use this feature, you'll need to use Microsoft Power Automate with a Microsoft 365 subscription.
You can send email notifications for changes to supplier bank details by using the supplier bank details flow.
The supplier bank details flow automatically sends emails to people to notify them of any changes to the bank details for supplier accounts. The emails are sent to everyone that has user access to the Audit Log, so that they can check the changes in the log.
This flow will run at 15 minute intervals each day, but you can configure the flow to change this frequency and timing.
Note: If you use multiple companies, the flow must be set up for each company.
Set up email notifications
-
To receive notifications, you must set up the supplier bank details flow for email notifications.
To set up the flow for email notifications, see Set up Microsoft Power Automate with Sage 200.
-
Once you've set up the flow, enable notifications for each user:
Open: Settings > Organisational and Financial > User Access.
-
Select the user from the Users list.
-
Select the API tab.
-
Enable Allow notifications.
-
Enter the user's email address to be used for email notifications.
-
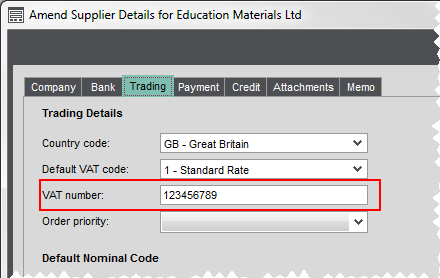
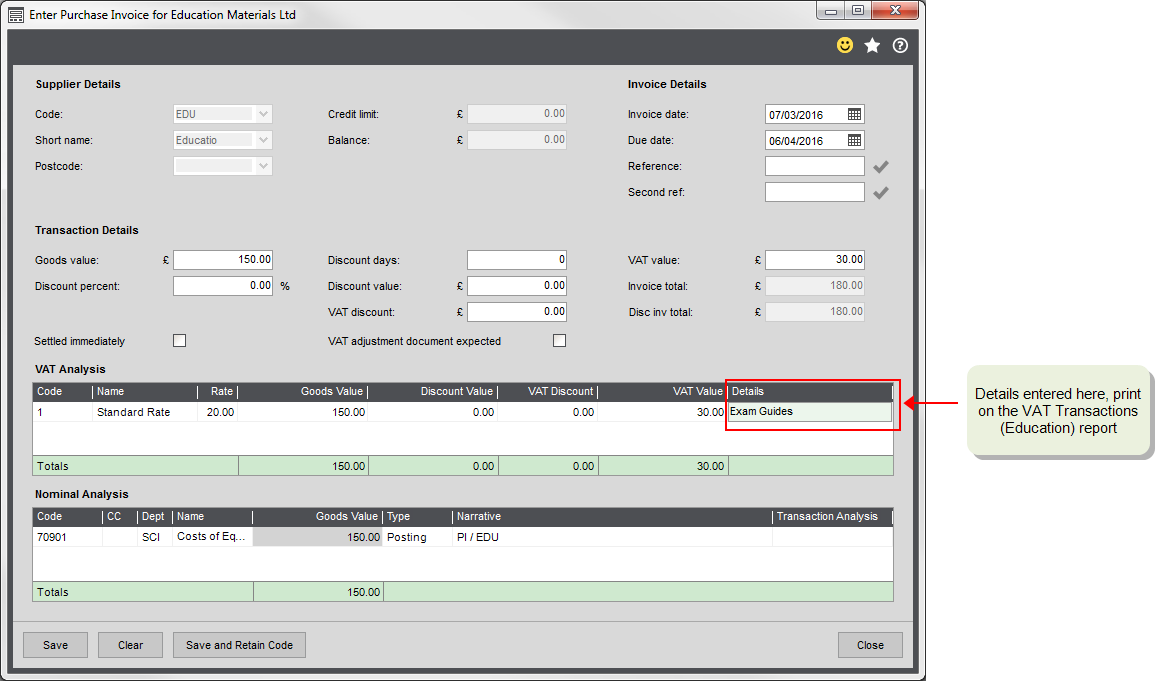
Recording VAT on your purchases
As the VAT126 needs to contain the VAT registration number of the supplier and the details of what you've sold and returned, you need to make sure that you enter these details on your transactions in Sage 200.
-
Before you enter purchase orders and invoices, enter the VAT number (VAT registration number) on the supplier's account. This will make sure that it's included on the report for all items bought from each supplier.
- Open Suppliers > Create & Amend Accounts > Amend Supplier Details.
-
Select the Trading tab and enter the VAT number.
-
When you enter purchase transactions, either via a purchase order or directly against the supplier's account, you use the same Purchase invoice screen. On this screen, enter the Details of the item purchased, alongside the VAT rate.
Sage is providing this article for organisations to use for general guidance. Sage works hard to ensure the information is correct at the time of publication and strives to keep all supplied information up-to-date and accurate, but makes no representations or warranties of any kind—express or implied—about the ongoing accuracy, reliability, suitability, or completeness of the information provided.
The information contained within this article is not intended to be a substitute for professional advice. Sage assumes no responsibility for any action taken on the basis of the article. Any reliance you place on the information contained within the article is at your own risk. In using the article, you agree that Sage is not liable for any loss or damage whatsoever, including without limitation, any direct, indirect, consequential or incidental loss or damage, arising out of, or in connection with, the use of this information.