Set up access to the Self Service web app
How to
Add or increase the number of web users assigned to your site
You will have specified the number of web users you require as part of your initial subscription.
If you want to increase this, contact your Sage Account Manager and they can do this for you. This may affect the cost of your subscription.
Once this has been completed, you can set up additional web users on your site.
Set up new users
Create a new user in Sage Provisioning Portal.
- Open Sage Provisioning Portal (opens in a new tab) and log in.
- Select Organisations > Users.
- Click Add User.
-
The Organization is pre-filled automatically with the information provided when subscription was set up and you can't change this.
-
Select the user's Role.
- If you want to this user to have full Administrator access to all companies, select Customer Operations Agent (Operator).
- If the user will just be accessing the Web Portal or Self Service web app, then the Customer user (User) role will be sufficient.
The new user will initially be Inactive until they have registered a Sage account, so you can't yet assign them to a site. The user will receive an email that invites them to register a Sage account. Once the user has registered a Sage account, their status will change to Active, and you can then assign them to a site.
Assign the user to a site
- Open Sage Provisioning Portal (opens in a new tab) and log in.
- Click the site Name.
- Click Assign user.
-
Select the User name.
Note: You can only assign a user who has registered and is Active.
-
If the user has more than one role, select the user's Role for the company access. For example, Customer Operations Agent (Operator) or Customer User (User).
Note: A Customer Administrator (Administrator) cannot be assigned to a company, or assign other users to companies.
- Click Save.
Assign access to a company
If the user's role in Sage Provisioning Portal is Customer User, then you need to assign the user to a company in the Sage 200 desktop app.
Open: Settings > Organisation and Financial > Company Management.
- Highlight the required company and select the user from the list.
See Assign users to a company.
Assign access to the Self Service web app
Open: Settings > Organisation and Financial > User Access.
You can check how many of your web user licences have been allocated by checking the Assigned web user licences at the bottom of the Users list.
- Select the user from the Users list.
- Select the Web User check box.
- Click Save.
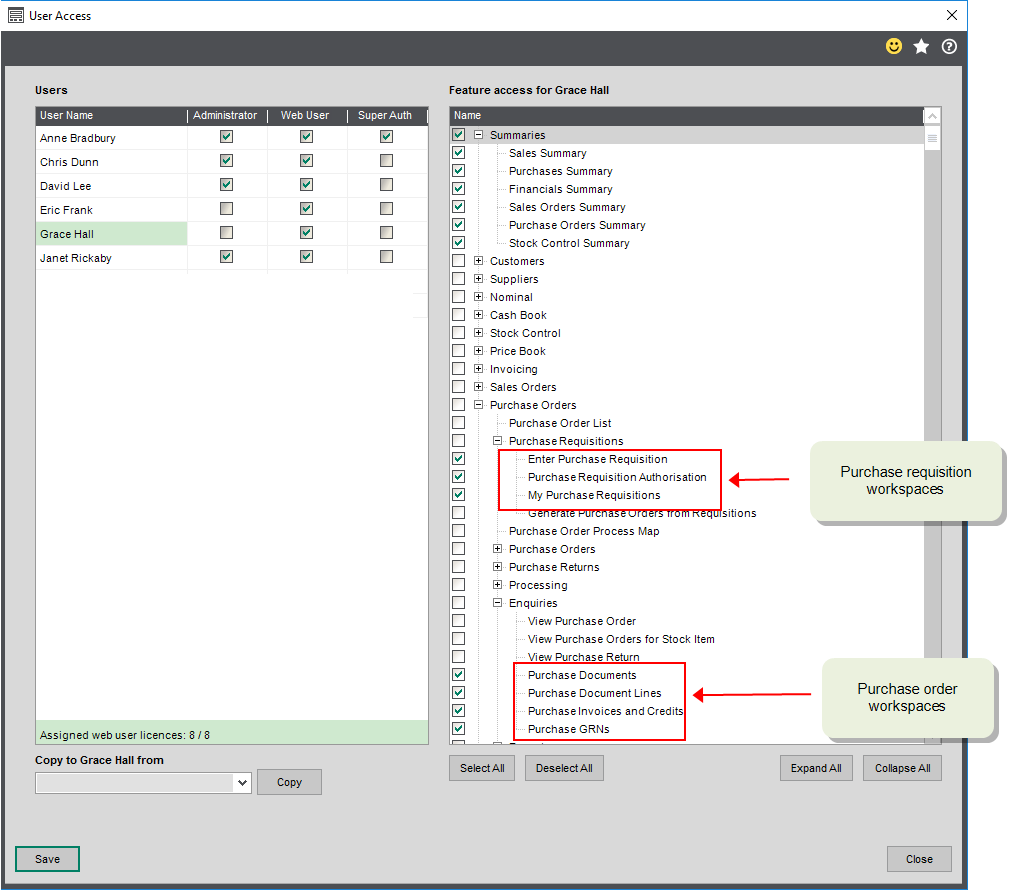
Assign access to the workspaces and Excel reports
If the new users role in Sage Provisioning Portal is Customer User, then you need to choose which workspaces and Excel reports each user is allowed to see. Customer Operations Agents (Operator) are set up as Administrators and automatically have access to everything. This is controlled from the User access form in the same way as the desktop app.
-
For workspaces:
You must set access per workspace. The workspaces can generally be found in the Enquiries section for each module.
-
For Excel reports:
You can only give access to all Excel reports or none, so you might want to restrict this as these reports show your key financial information.
Open: Settings > Organisation and Financial > User Access.
- Highlight the user from the Users list.
-
Select the required features:
- Workspaces are generally in the Workspaces section.
- The Summaries workspace features are at the top in the Summaries section.
- For Excel reports, select Excel Reporting.
-
For purchase requisitions, see Set user access to purchase requisition features.
- Click Save.
Open the Self Service web app
-
Open the Self Service web app from a browser:
https://app.sage200.co.uk/Sage200SelfService/ (opens in a new tab)
-
Open the Self Service web app from the Sage 200 desktop:
Open:
 Tools > Show Workspaces in Browser.
Once you have opened the Self Service web app:
-
Log in to the Self Service web app using your Sage account. These are same details you use for the Sage 200 desktop app.
Note: To use the Self Service web app, you must be assigned as a Web User in User Access. See Assign feature access to users.
- If you have access to more than one company, select the company to open.
Share the Self Service web app link
Make a note of the Sage 200 Web Client link and send it to your users. They can open this link from their device, and don't have to have the Sage 200 desktop app installed.
For example, your users could make a desktop shortcut or bookmark to the URL:
https://app.sage200.co.uk/Sage200SelfService/ (opens in a new tab)
Useful info
About web users
Web users are users who can access parts of Sage 200 via web browser, such as the Self Service web app. You are charged per web user as part of your subscription, but a web user costs less than a full app user.
You can have up to 100 web users per site. You specify the number of Web Users you require on your site. This is the total number of users that can be assigned web access. Unlike the desktop app, this isn't related to whether these users are signed into a web app or not.
Note: You don't need to be set as a Web User to access the Web Portal. The Web Portal can be used by any user that has access to your company.
It's useful to assign web access to users who don't need to use the Sage 200 desktop app. These might be:
- Budget holders or heads of department so they can check their spend against budget.
- Staff who need to complete requestions for purchases.
- Staff who need to authorise purchase requestions or purchase orders.
- Finance managers so they can see the current financial position of your organisation.
- Sales people so they can see details of customer accounts and enter orders whilst away from the office.
About the Self Service web app
You can access data in the Self Service web app using workspaces and Excel reports. The workspaces are arranged in menu structure per module, whilst all Excel reports are accessed from the Excel reports section.
Workspaces
Use these to find and analyse information stored in Sage 200. Information is stored on a number of linked panels. Sometimes this can be as a chart or graph and sometimes as a list of items such as customers, suppliers, nominal accounts, invoices or orders.
For information stored as list, you can usually select an item and see more information about that item from a linked panel, such transactions for a customer account.
These workspaces only allow you to view information. You can't enter data or complete other tasks.
Purchase requisitions and purchase orders
These are specialised workspaces that do allow you enter some data and complete certain tasks. You can:
- Enter purchase requestions. See Enter a purchase requisition
- Authorise purchase requestions. See Authorise purchase requisitions and generate orders
- Authorise purchase orders. See Authorise purchase orders
Excel reports
These are special workbooks configured with data extracted from Sage 200. The reports are opened in Excel so you can just view the data or use the Excel functions to manipulate the data as you wish.
Each workbook has a set of worksheets and filters that sort and filter the data in different ways.
To use the Excel reports:
Open: Excel reporting > Excel reports.
- To update the report with latest data from Sage 200, select the report and click Update.
- To open the report in Excel, select the report and click View.
See Excel reports.
Fix it
Can't assign a web user?
If you can't assign a new web user, you may have already reached the maximum number of web users that's allowed by your subscription. To check how many of your web user licences have been allocated, look at the number of Assigned web user licences at the bottom of the Users list.
If you've reached your maximum number of web users, you can remove web user access from a user, so that you can assign it to someone else instead.
If you need to increase the number of web users in your licence, you can do this is done using Sage Provisioning Portal. This may affect the cost of your subscription, so you'll need to contact our customer services team first.
Can't see a user in the list
- To assign a user to a site in Sage Provisioning Portal, the user must first register and be Active.
- To assign a user to a company, you must first assign the user to your site in Sage Provisioning Portal.
User can't log in?
If you've assigned a user to your site but they still can't log in, make sure you've assigned the user to the company.
Open: Settings > Organisation and Financial > Company Management.
See Assign users to a company.
The user can't see some workspaces in the browser?
Make sure you've selected the feature for that workspace in the User Access screen.
The user must log out of Sage 200 and log back in again to see any changes.