Nominal Ledger settings
Find this screen
Open: Settings > Cash Book / Nominal Ledger > Nominal Ledger Settings
How to
Turn on cheque printing by default
When you enter a nominal payment, you can choose to print a cheque for each payment, when it's saved.
If you always want to print a cheque, you can choose to make this option selected by default on the Nominal Payment screens.
- Go to the Options tab.
- Click Edit.
- Select Print cheques with nominal payments to set this.
Restrict account selection to existing and active accounts
You can control how nominal accounts can be selected in Sage 200.
- Go to the Options tab.
- Click Edit.
- Use Restrict account selection to existing and active accounts to control how you can select accounts.
-
If you choose to restrict account selection, you will only be able to select nominal accounts that have a valid nominal account code, cost centre, and department. You will not be able to enter invalid or blank nominal codes. This means that wherever you can select a nominal account list, you must select an account before you can continue.
This setting is not enabled by default.
Note: This setting must be enabled if you want to hide nominal accounts (by setting their Active Status to Hidden).
Note: This changes the way in which you select nominal accounts. See I have difficulty selecting nominal accounts.
-
If you choose not to restrict account selection, you will be able to enter invalid or blank nominal account codes (this is only allowed in some screens).
Note: You cannot disable this setting if you have already set any nominal accounts to be Hidden. You can find which nominal accounts are hidden by using the Accounts Not Active report. To stop a nominal account from being hidden, change its Active Status to Active.
Note: This setting only applies to the Sage 200 desktop app. In the Web Portal app, you can only select nominal accounts that have a valid nominal account code, cost centre, and department.
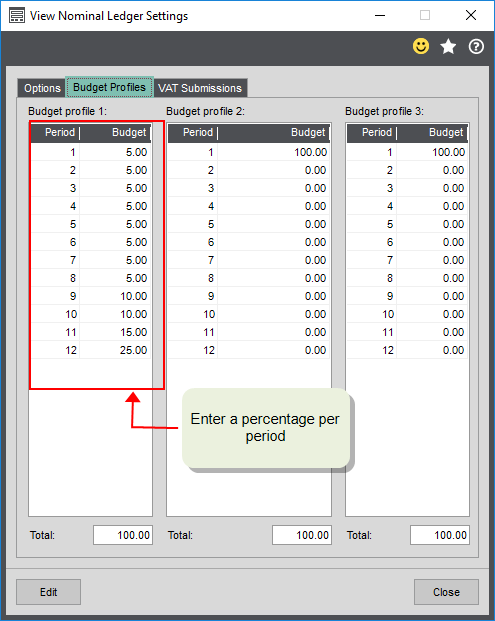
Set budget profiles
You choose a percentage to apply to each period. The total of all the periods must add up to 100. For each profile, enter a percentage for each period.
When you enter the budget for a nominal account, choose the profile and enter an annual total. The budget per period is set using the percentages entered on the profile.
Note: You can only use profiles for current year budgets.
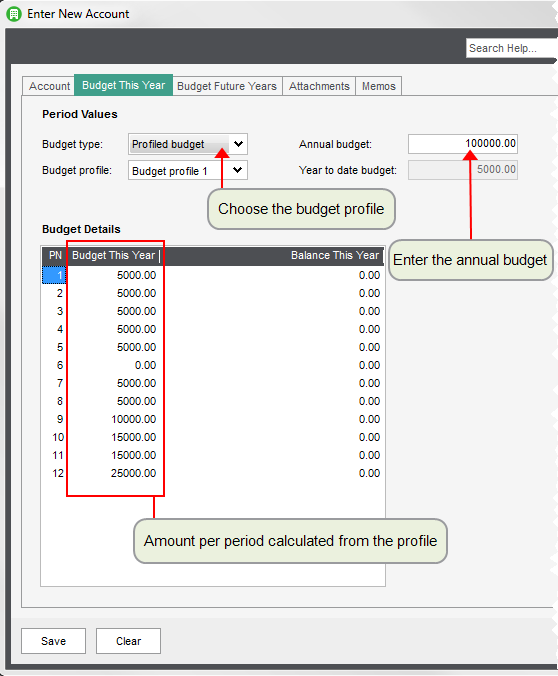
To use budget profiles:
- Go to the Budget Profiles tab.
- On the required nominal account (Budget This Year tab), choose Profiled Budget as the Budget Type.
- Choose the profile you want to use; 1, 2 or 3.
-
Enter the Annual budget amount.
The annual budget is divided up using the percentages set on the budget profiles.
Set up online VAT submissions
If you want to submit your VAT Return directly to the HMRC or Revenue Commissioners from Sage 200:
- Go to the VAT Submissions tab.
-
Enable VAT submissions:
-
To make VAT submissions to the HMRC gateway for Making Tax Digital, select Enable VAT submissions as digital record as part of Making Tax Digital.
Note - warningMaking Tax Digital will become mandatory for all VAT registered businesses from April 2022. XML VAT submissions will no longer be accepted. If you previously used the XML VAT submission feature, you can either move over to MTD for VAT, or opt to use the HMRC portal to submit VAT returns manually.
-
To make VAT submissions to the Irish Revenue, select Enable online VAT submissions.
-
- Enter your VAT Contact Details. You must enter a valid email address or the submission will fail.
Set up online VAT payments (HMRC only)
In the UK, if you have submitted your VAT Return online, you must also pay your VAT online. You can do this directly from Sage 200 using either:
- The Sage e-Banking service.
- A Supplier Payments account.
- The HMRC website.
- Select Enable online VAT payments (UK only).
- The bank details for the HMRC are entered automatically. Do not change these unless you have received notification from HMRC.
-
Select the bank account to pay the VAT from. The VAT payment defaults to this bank account.
- Choose a nominal account to post the VAT payment to.
- Select Enable online VAT payments (UK only).
-
Select Enable Supplier Payments.
Note: When you enable Supplier Payments for the HMRC, a payee account for HM Revenue and Customs will be submitted for approval. Once this payee has been approved by your Supplier Payments account approver, you can make payments to the HMRC. The Status indicates the progress in the approval process.
- The bank details for the HMRC are entered automatically. Do not change these unless you have received notification from HMRC.
-
Your account will automatically be set to your Supplier Payments Cash Book account.
- Choose a nominal account to post the VAT payment to.
Set up consolidation
Use consolidation if this is a subsidiary
-
Go to the Consolidations tab.
Note: You'll only see the Consolidations tab if you've set a parent on the Company Management screen.
- Click Edit.
- Select Enable consolidation to turn consolidation on for this
For more information, see Set up consolidation.
Useful info
Nominal account budgets
A budget can be assigned to any nominal account. Use the budget to track your projected expenditure against your actual expenditure. The results can be displayed or printed using various budget reports.
Budget amounts can be both positive and negative. Negative budgets apply to accounts whose balances are normally a credit, such as your sales nominal accounts.
When you create a nominal account, you choose the type of budget you want to use.
-
No budget
No budget figures can be entered on the account. The account will not appear in any comparison with budget reports.
-
Annual budget
You have one amount that represents the total budget for the year. This amount is then automatically divided across your accounting periods. Any odd pennies are added to the last period's budget figures.
-
Monthly budget
You enter a separate budget amount for each of your accounting periods. You can also leave out months if required.
For accounts that have occasional monthly irregularities, you may find it convenient to enter an annual budget and then change the individual monthly figures.
-
Profiled budget
You enter a single annual budget amount that is divided according to the percentage for each period set on the budget profile. Choose one of three possible budget profiles that you have entered in the Nominal Ledger Settings.
UK Online VAT submissions
The VAT Return is submitted from Sage 200 to the HMRC via the HMRC gateway for Making Tax Digital. You must enter your HMRC user ID and password when you submit the return.
- To make VAT submissions to the HMRC gateway for Making Tax Digital, select Enable VAT submissions as digital record as part of Making Tax Digital.
To submit the VAT Return to HMRC from Sage 200, you must make sure that:
-
You've entered the UK VAT registration number for your company, in Company Details.
-
You've set your Country code to GB - Great Britain, in Company Details.
-
Your base currency is set to Pound Sterling, in Currencies and Exchange Rates.
Once you've checked your VAT Return and made any necessary adjustments, you create the final VAT Return. You then enter your HMRC user ID and password and follow the steps in the Sage Internet Submissions wizard to submit the VAT Return.
Irish Online VAT submissions
A VAT 3 file is created by Sage 200. This file is saved to your PC and you submit it to the Irish Revenue via your ROS (Revenue On-line Service) account.
- To make VAT submissions to the Irish Revenue, select Enable online VAT submissions.
To create a VAT 3 file, you must also make sure that:
- You've entered your ROS registration number for your company.
- You've set your country code to IE.
- You've set your base currency to Euro.
When you create your VAT Return, you choose where you want to save the file on your PC. You then send it to the Irish Revenue using your ROS account.
If you need to, you can make manual adjustments to the values on the return before submitting it.
About consolidated reporting
You can use the consolidation option in Sage 200 to produce management reports if your organisation is made up of several subsidiary companies.
If you're a multi academy trust, you can use consolidation in Sage 200 to create a single SOFA report that includes the required financial information for all the schools within the trust.
How it works
- The consolidation is run from each subsidiary
- Each nominal account (Code, CC and Dept) in the subsidiary
- The balance of all nominal accounts, at the end of a selected period, is transferred from each subsidiary to the parent
- The balance of each nominal account in the subsidiary is posted to the linked nominal account in the parent
- The value of the consolidation transaction is the difference between the actual trial balance in the subsidiary, at the end of the selected period, and the trial balance the last time the consolidation was run.
About linking your nominal accounts
It's important to have your subsidiary nominal accounts linked correctly, because if the same nominal account doesn't exist in the parent, the transaction will be posted to the suspense account.
The key to successfully consolidating your subsidiary
The parent
The easiest way to do this is to make sure all your subsidiaries and you parent company have the same chart of accounts.
This means all each subsidiary and parent will need to have the same:
|
Report categories |
Must |
This makes sure your balances are reported on the same sections on financial statements such as the |
| Code (for nominal account) | Recommended |
This makes it easier for you link your accounts. You may have some subsidiary |
| Cost centre | Must |
This makes sure balances are reported for the correct The majority of your income and expense nominal accounts will have a cost centre (fund) associated with them. This cost centre will also have a fund type. If each subsidiary nominal account with a cost centre is linked to one with the same cost centre in the parent, then this will ensure that your |
| Department | Recommended |
You can use the Dept section of the nominal account to report income and expenditure by department within each If you use departments, then the departments for your subsidiary |
Using the 'Set consolidated accounts' option
This is a quick way to link your nominal accounts to the parent
- Your parent
- If any of the linked accounts don't exist in your parent
You can also link your nominal accounts using:
- Amend Report and Consolidation Settings.
- Amend Nominal Account.
Fix it
The Consolidations tab is missing
You'll only see this once you've set a parent on the Company Management screen. You'll need to log out of Sage 200 and log back in before the tab is displayed.
What happens when
Online VAT submissions is set up (UK only)
When you Produce your VAT Return, you're automatically taken to the online submissions wizard where you send your VAT Return directly to the HMRC.
Consolidation is turned on
- Extra columns are added to the Amend Report categories and Consolidations Settings screen.
- The Consolidated Account is enabled on the Create New Nominal Account and Amend Account Details screens.
- You can access the Consolidations screen.
Sage is providing this article for organisations to use for general guidance. Sage works hard to ensure the information is correct at the time of publication and strives to keep all supplied information up-to-date and accurate, but makes no representations or warranties of any kind—express or implied—about the ongoing accuracy, reliability, suitability, or completeness of the information provided.
The information contained within this article is not intended to be a substitute for professional advice. Sage assumes no responsibility for any action taken on the basis of the article. Any reliance you place on the information contained within the article is at your own risk. In using the article, you agree that Sage is not liable for any loss or damage whatsoever, including without limitation, any direct, indirect, consequential or incidental loss or damage, arising out of, or in connection with, the use of this information.