Stock Setup (Configuration Assistant)
Find this screen
Open: Configuration Assistant > Stock Setup.
How to
Create warehouses for your stock locations
- Click Add or click in the grid to create a new line.
- Enter the a Name for the warehouse, up to 20 characters.
- Enter a Description (optional).
-
If required, select a VAT Country Code from the list.
The VAT Country Code is used for Intrastat declarations if you are shipping from a warehouse in a different country to a third country.
A HOME warehouse is created for by default. If you don't need to record separate locations for your stock items, use the this for all stock items.
Create unit of measure
- Click Add or click in the grid to create a new line.
- Enter the Name of the unit up to 20 characters.
A default unit of Each is created for you. If you don't want to record the stocked unit for your stock items, then just use this for all items. You can add additional stocked units at any time. You can also change this on a stock item at any time.
Create product groups
- Click Add or click in the grid to create a new line.
- Enter the details for the product group.
- Click Edit to change any information already stored.
- Click Delete to remove the product group.
Useful info
Stock locations
In Sage 200 you can have two levels of location for your stock:
- Warehouse - a single whole location, such as a building.
- Bin - an area within a particular warehouse, such as a shelf or an aisle.
Note: The terms Warehouse and Bin can be customised, so they might have different names in your Sage 200 company. You can customise these by setting Configurable names in Stock Control Settings.
Before you set up your warehouses and bins, consider how your warehouse staff collect stock to despatch.
Picking lists are used to assemble customer orders ready for despatch. The picking list shows the location (warehouse and bin) that a stock item is stored and can be used by your staff to collect stock for despatch.
If you want to make sure that the picking lists produced by Sage 200 represent the way your staff collect stock for despatch, then you need to make sure that the warehouses and bins you create will reflect this.
| Scenario | Solution |
|---|---|
|
You have one physical warehouse building and stock stored in various aisles and shelves. |
Create the aisles as warehouses and the shelves as bins. This will give you a separate picking list for each aisle. |
| Stock is stored in different areas of a single building and collected by different staff. For example, you have an ambient area and a cold store area. | Create each area as a separate warehouse. This will give a you a separate picking list for each one. |
| You have several buildings, all with the same postal address. Stock is stored in separate buildings but not in further aisles, shelves or bins within the building. |
Create a single warehouse and a bin for each building. |
| Your stock is usually despatched from the nearest bin. You want to make sure that this is reflected on the picking list. | When you create your bins, set a higher priority on the bins you want to pick from first. Make sure Bin priority is set as the fulfilment methods for these stock items. |
Bins
Every warehouse has a single bin created by default called Unspecified. If you don't want to use bins with your warehouses, all items are stored in the Unspecified bin.
If your stock items are stored in more than one place in a warehouse, then you add the required bins on the stock record. You can rename the Unspecified bin to something more meaningful for your company.
Product groups
You can set up additional product group or amend the ones you have created here, once you have completed the Configuration Assistant. We recommend that you plan these carefully as it is hard to change them once you have started creating your stock items.
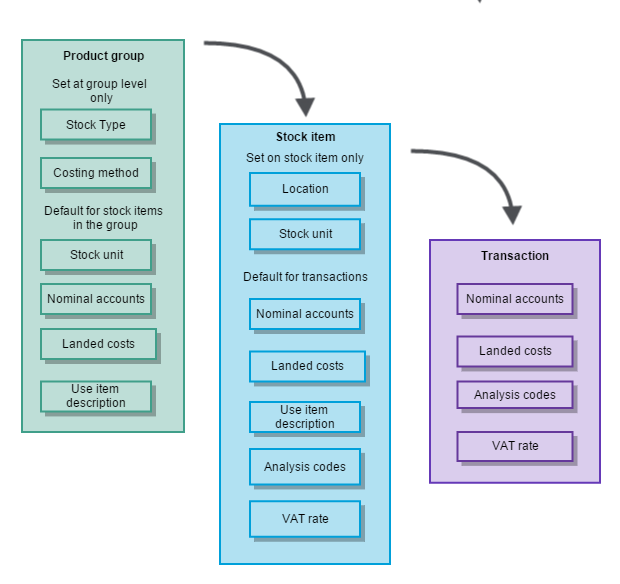
Product groups are used to categorise your stock items. Every stock item must belong to a product group. The options you choose when setting up your product groups are inherited by the stock item. Some of these can be changed on individual stock items and some are set at product group level only.
Product groups have the following rules:
- Every stock item must belong to a product group.
- All items in a product must be of the same type.
- All items in a product group must use the same costing method.
You can have three types of stock item in Sage 200:
-
Stock
This is for physical items of stock that you want to count.
These items are included on the stock valuation reports and stocktake sheets.
You can buy and sell them using sales and purchase orders, and the value is posted to your Stock asset nominal account.
-
Service/Labour
This is for non physical items that you can't count such as time, labour and service.
They are not included on stock valuation reports or stocktake sheets.
You can buy and sell them using sales and purchase orders, and the value is posted to your nominal accounts. We recommend that your set up a separate nominal account for these items so their value is not posted to your Stock asset nominal account.
-
Miscellaneous
This is for physical items of stock that you don't want to count. These would usually be small items such as screws or bolts.
They are not included on stock valuations reports or stocktake sheets.
You can buy and sell them using sales and purchase orders, and the value is posted to your nominal accounts.
The costing method tells Sage 200 how to calculate the cost price of your stock items. This cost price is used to work out:
- The value of the stock you currently hold.
- The value of transactions that are posted to stock asset nominal account when the stock is bought.
- The profit made on a sales order when stock is sold.
Choose from the following costing methods:
-
FIFO (First In First Out)
This uses the oldest price paid for the stock item until all the stock bought at that price is used. Then the next cost price is used. The price is updated when a purchase order for item is recorded as received or a return is recorded as despatched.
-
Standard
This uses the cost price stated on the stock record. The price is only updated when the cost price is changed on the stock item.
Standard costing is useful if you want to value your stock consistently, disregarding the variability of the price you actually pay for it. It can also be used if you need to account for additional costs associated with an item. For example, stock items that are bought in and have some type of processing done to them before they are sold.
-
Average
This uses the average price paid for the item currently in stock. This is calculated from the total price paid for the items in stock divided by the number of goods in stock.
It's calculated in the following way:
((Current Total Qty in Stock * Current Average Buying Price) + (Quantity Brought In * Price Brought In) )/ (Current Total Qty in Stock + Quantity Brought In).
The price is updated when a purchase order for item is recorded as received or a return is recorded as despatched. It is not updated when goods are sold.
You set the default nominal accounts that you want to use for stock items in this product group here. When you create a stock item, these nominal accounts are entered by default. This can be overridden on the stock item but entering a default nominal account here helps to make sure that transactions are posted correctly.
You specify two default nominal accounts:
-
Stock
Used to record the value of the stock you have bought. By default, Sage 200 uses the Stock account on the Balance Sheet, specified in the Default Nominal Accounts.
-
Revenue
Used to record the value of stock sold. By default, Sage 200 used the Sales account specified in the Default Nominal Accounts. This would normally be an Income account on the Profit and Loss.
Stock take every
This sets the default for how often a stocktake is required for item in this product group. You can change this on individual items if required.
To see when a stocktake is due for each item, you run the Stocktake required report. There isn't an automatic prompt.
Use item description on orders and invoices
You can choose to choose an alternative description for your stock items on your orders and invoices. This can be useful f if the code and description you want to use for stock items internally is different to the description you use for customers and /or suppliers.
Choosing this is here just selects this by default when stock items are created for this product group. You can change this for individual items as required.
Use reverse charge VAT rules
Select this if any items in then product group are liable for reverse charge VAT rules.
Choosing this is here just selects this by default when stock items are created for this product group. You can change this for individual items as required.
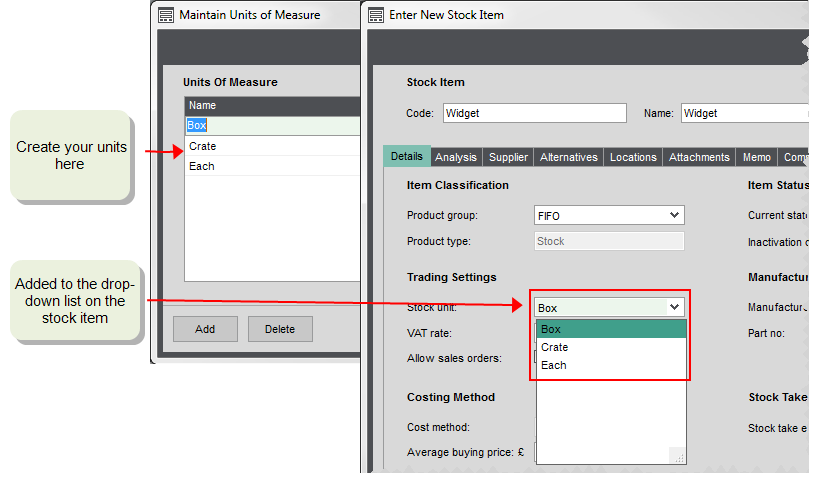
Stock unit
This sets the default stocked unit for items in the product group. This is useful for your warehouse staff as this unit is shown on picking lists and stocktake sheets.
A default unit of Each is created for you. If you want to use other stocked units such as crate, box, bottle etc you must set them up first.
Choosing this is here just selects this by default when stock items are created for this product group. You can change this for individual items as required.
Unit of measure
These allow you specify the units that your stock items are stocked in. For example, a box, a crate or each for individual items. Once you have set up a list of the units you want to use, you can choose the relevant unit for a product group or per stock item. This is useful for your warehouse staff as this unit is shown on picking lists and stocktake sheets.
What happens when
What happens when I save and mark this panel as complete?
- When you finish adding information and click Save and Mark as Complete, the panel is marked with a tick
 to indicate that you have completed this step.
 - While you remain on the Configuration Assistant, you can return to this panel to add or amend any of the details you have entered.
-
Once you have finished the Configuration Assistant, you can:
-
Amend the product groups you have created, and create new ones.
Note - warningYou can't change the stock type, once the stock items have been assigned to the group.
- Amend the warehouse details and add new ones. You can also add address details for the warehouse. This address is printed on your purchase order as the delivery address.
- Amend the stocked units and add new ones.
-