Nominal Accounts (Configuration Assistant)
Find this screen
Open: Configuration Assistant > Nominal Accounts.
How to
Use our Chart of Accounts
Sets up a Chart of Accounts typical to most businesses. A quick way to create nominal accounts is to use these and edit them to suit your business.
- Click Use a set of nominal accounts provided by us. The nominal accounts are shown in the list.
- You can change the Name, CC, Dept or Report Category.
This gives you a sample of a Chart of Accounts that you can use to get you started. You add more accounts now once you've completed the configuration assistant.
- Check you selected Academy on the Company Details panel.
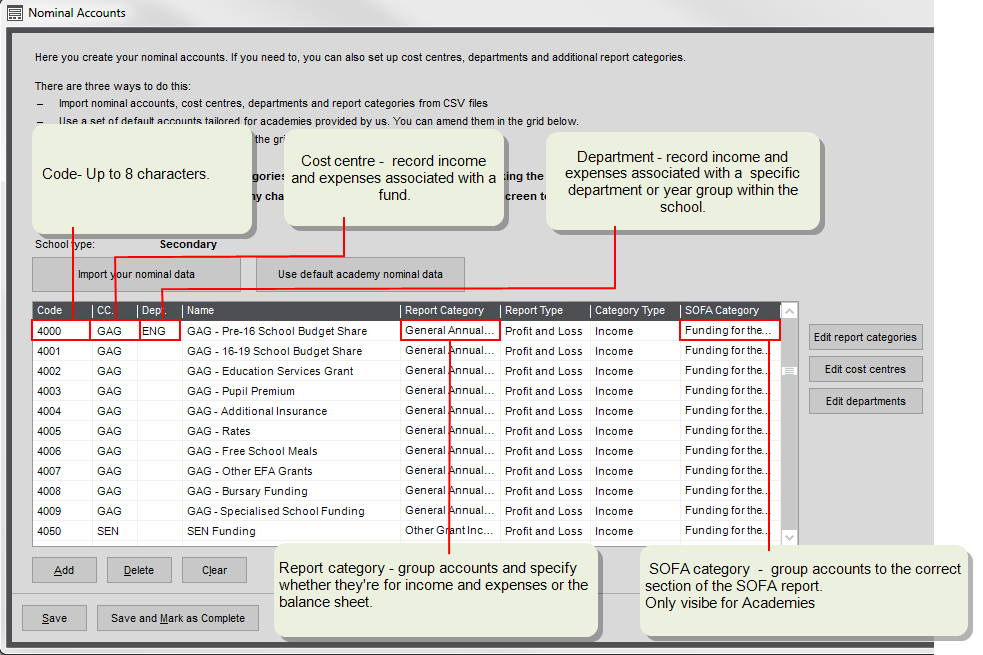
- Click Use a set of nominal accounts provided by us. The accounts are displayed in the list. You can make changes as required or import additional accounts. You can change the Name, CC, Dept or Report Category or SOFA category.
If your LEA has provided us with the Chart of Accounts that you're required to use, this option will appear: Use a set of nominal accounts provided by your LEA.
This will populate the list with accounts. You change these or add new accounts as required.
Create individual nominal accounts
You can add individual nominal accounts to the list.
If you're using different Report Categories, Cost Centres or Departments, click the Edit buttons to add these first.
- Click Add to add a new line to the grid.
Import your nominal data
You can import your nominal accounts into Sage 200 via CSV file, using Excel or a suitable tool. Every account in the CSV file must have Code and Report Category.
If you're using your own report categories, cost centres or departments; then you must import these too.
You can import your nominal accounts into Sage 200 via CSV file, using Excel or a suitable tool. Every account must have a Code and Report Category. Your income and expense accounts will also need and SOFA Category (if you're an Academy), Cost Centre (fund) and Department.
If you're not using the predefined report categories, cost centres or departments, then you must import these too.
Prepare the import files
You must first prepare your data ready for import. Use the links in the Import wizard to get example import files (CSV files), and details about the import file format (Excel XSL files).
- Click Import your nominal data and follow the steps in the wizard.
Add report categories
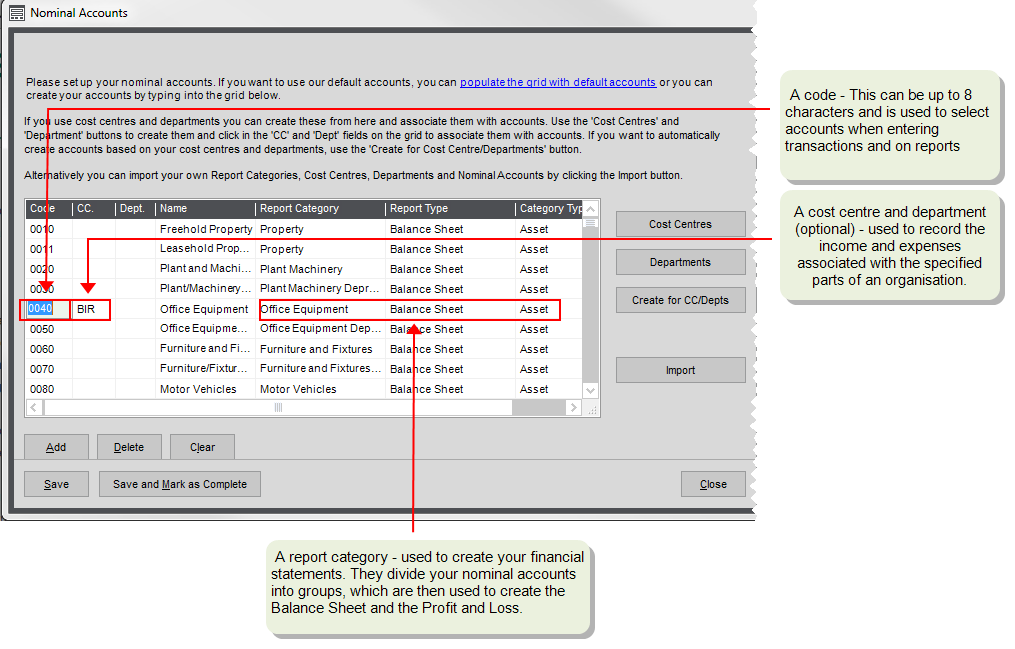
Report categories are used to create your financial statements. They divide your nominal accounts into groups, which are then used to create your financial statements.
Every nominal account must be linked to a report category.
We provide a predefined set of report categories for you. You can create additional report categories as required.
If you're a maintained school, your report categories represent your CFR codes. We provide these for your based on the latest guidance from the Education Funding Authority.
If you're an Academy, we provide a set of predefined report categories common to most schools.
If you find that you need additional categories, you can create them as required.
To add a new report category:
- Click Edit report categories.
Add SOFA categories
You only need these if you're an Academy. SOFA categories are used to group your nominal accounts together to report the income and expenditure of your funds on the SOFA report.
The predefined set of SOFA categories is taken from SORP 2015. You'll only need to add your own if these requirements have changed.
To add a new sofa category:
- Click Edit report categories.
Add cost centres
This is an additional code for your nominal accounts, so you can report on individual areas of your business. Add a cost centre to all P & L accounts, and you can run a P & L per cost centre.
Only set these up if you want to use them.
If you're not sure, you can create nominal accounts now without them, and then add them later. We strongly advise you to create all your nominal accounts before processing any transactions.
Additional code added to nominal accounts to represent your funds.
We provide a predefined set of cost centres represents the majority of funds used in schools, but you can add your own to these.
As most transactions will be related to a fund, you'll need to set create accounts with each cost centre for the majority of your income and expense ( P & L) accounts.
- Click Edit cost centres.
Add departments
This is an additional code for your nominal accounts, so you can report on individual areas of your business. Add a cost centre to all P & L accounts, and you can run a P & L per cost centre.
Only set these up if you want to use them.
If you're not sure, you can create nominal accounts now without them, and then add them later. We strongly advise you to create all your nominal accounts before processing any transactions.
Additional code added to nominal accounts to represent your school depts. Allows you to report on income and expenditure by dept.
We have provided predefined set of depts for you, based on your school type, but you can add your own to these.
- Click Edit departments.
Create nominal accounts linked to cost centres and departments
If you want to use cost centres and departments with your nominal accounts, Sage 200 can do this for you automatically. It creates a set of nominal accounts that have the same Code but different cost centres and department, for all nominal accounts with Profit and Loss Report Category.
John's company is comprised of three branches. He wants to produce a P & L for each branch, as well as his the company as a whole, so he creates three cost centres to represent this. These are:
- London - LON
- Manchester - MAN
- Birmingham - BIR
He wants to link each of his profit and loss nominal accounts with each cost centre. To make sure he creates all the nominal accounts he needs, he:
-
Creates a set of profit and loss nominal accounts for his business without cost centres, such as:
Nominal Account Code Name 4000 Default Sales 5000 Default Purchases 6000 Cost of Sales 7000 Overheads -
Creates a cost centres for each branch, such as:
Cost Centre Code Name LON London BIR Birmingham MAN Manchester -
Selects Create for CC/Dept. The following additional nominal accounts are created:
Code Cost Centre 4000 LON 4000 BIR 4000 MAN 5000 LON 5000 BIR 5000 MAN 6000 LON 6000 BIR 6000 MAN 7000 LON 7000 BIR 7000 MAN
- Create your cost centres and departments.
- Enter the details of your nominal accounts in the table.
-
Click Create for Cost Centre/Departments.
New accounts with a CC and Dept are for all Profit and Loss accounts.
Useful info
About the Chart of Accounts
Nominal accounts are fundamental to the successful management of your finances. The value of every transaction entered into Sage 200 is posted to a nominal account. and this is where the revenue and expenditure of your
Each nominal account has the following elements:
What accounts do I need as a minimum?
We recommend that you set up all the accounts that Sage 200 uses by default. This makes it easier to set up other areas of Sage 200, and makes sure that your transaction post correctly.
You can't exit the configuration assistant until you've set default accounts for Suspense Account, Accumulated Profit
You can set up additional nominal accounts at any time.
We recommend that your set the following accounts as a minimum for Sage 200 to work correctly:
| Name | Type | Description |
|---|---|---|
|
Suspense Account * |
P&L |
Mandatory. Used for all transactions without a valid nominal account. |
|
Exchange Differences |
P&L | Only required for foreign currency transactions. |
| Discounts Allowed | P&L | Only required if you're using settlement discounts. |
| Discounts Taken | P&L | Only required if you're using settlement discounts. |
| Bad Debt Write Off | P&L | Writing off small outstanding amounts on customer and supplier accounts. |
| Bad Debt Expense | P&L | Writing off bad debts and reclaiming the VAT. |
|
Debtors Control |
BS | Gross values of all customer transactions. |
|
Creditor Control |
BS | Gross value of all supplier transactions. |
| Unauthorised Purchases | BS | Used with purchase invoice authorisation, where unauthorised supplier invoices are posted. |
|
VAT input |
BS | VAT on all purchases. |
|
VAT output |
BS | VAT on all sales. |
| Bad Debt Provision | BS | Writing off bad debts and reclaiming the VAT. |
|
Accumulated Profit * |
BS |
Mandatory. The total of your profit and loss nominal accounts at the year end. |
| Accumulated Profit Fund * | BS |
Mandatory. The remaining balance of your funds at the end of the year. |
What happens when I
Click Save and mark this panel as complete
- The nominal accounts, report categories, cost centres and departments are created. This may take some time to complete depending on the number of accounts you've added.
- You can now set your default nominal accounts.
- When you finish adding information and click Save and Mark as Complete, the panel is marked with a tick
 to indicate that you have completed this step.
 - While you remain on the Configuration Assistant, you can return to this panel to add or amend any of the details you have entered.
Click Save
- The nominal accounts, report categories, cost centres and departments are created. This may take some time to complete depending on the number of accounts you've added.
- You won't be able to set your default nominal accounts as this panel is not marked as complete.
- You can still come back and change your nominal accounts if you need to.
Click Clear
- All the accounts in the list are removed. This allows you to start creating your accounts again if you need to.
- If you only want to remove one account, click Delete.
Click Delete
- The selected nominal account in the list is removed.
Sage is providing this article for organisations to use for general guidance. Sage works hard to ensure the information is correct at the time of publication and strives to keep all supplied information up-to-date and accurate, but makes no representations or warranties of any kind—express or implied—about the ongoing accuracy, reliability, suitability, or completeness of the information provided.
The information contained within this article is not intended to be a substitute for professional advice. Sage assumes no responsibility for any action taken on the basis of the article. Any reliance you place on the information contained within the article is at your own risk. In using the article, you agree that Sage is not liable for any loss or damage whatsoever, including without limitation, any direct, indirect, consequential or incidental loss or damage, arising out of, or in connection with, the use of this information.