Using cost centres and departments with nominal accounts
You can use cost centres A segment of an organisation for which costs are required to be collected and formally reported on separately; e.g. a company division such as sales or production. to segment parts of the organisation so that you can monitor individual areas in your company. They are used to collect the costs / revenues associated with the specified parts of the organisation.
Departments are subdivisions of a cost centre where costs / revenue are required to be collected and reported on separately. For example, a cost centre could be a sales area such as North East or South West, and different departments could be sections such as Administration or Training.
If you are consolidating Nominal Ledgers, we strongly recommend you set aside a cost centre for each subsidiary company, thereby segregating each company.
Using cost centres and departments with Profit and Loss nominal accounts
Once you have set up your cost centres and departments, you can produce a Profit and Loss per cost centre and/or department combination.
To produce a Profit and Loss for individual cost centres and departments you must:
- Create the appropriate nominal accounts.
- Apply the appropriate nominal codes when posting transactions.
Applying cost centres and departments to transactions
Once set up, you need to make sure that transactions are posted to nominal account with the correct cost centre (and department, if you're using them). When you post transactions directly to your nominal accounts, you can select the nominal account with the correct cost centre and/or department combination.
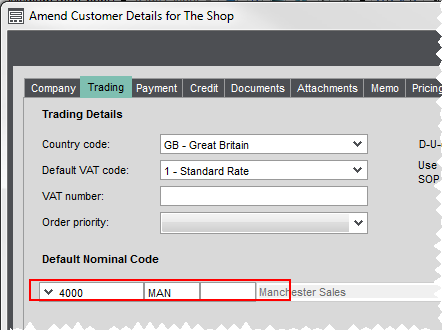
For sales and purchase transactions, you can specify a default nominal account for a customer or supplier on their account. When you enter transactions, this nominal code is automatically selected. To make sure sales and purchases are assigned to the correct cost centre or department, you make sure this default nominal account has the correct cost centre and/or department combination. For example, a customer of your Manchester office, might have their default nominal account as 4000 MAN.
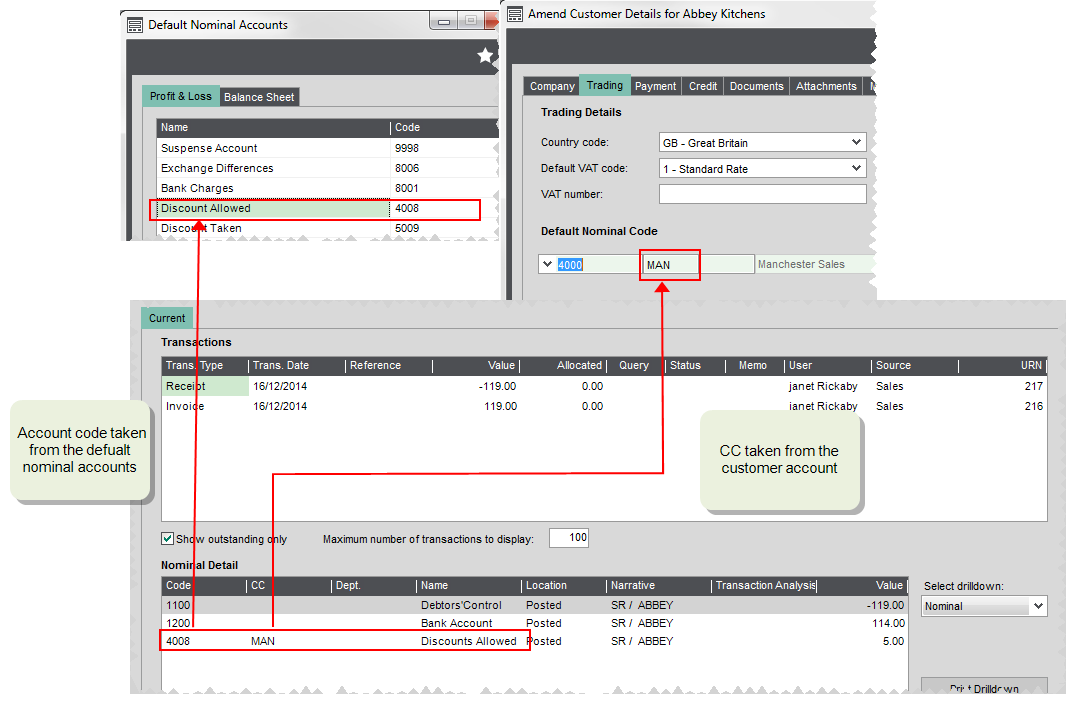
When transactions are automatically posted by Sage 200 to different accounts as part of a process, the transaction is posted to the account code set as the Default for the process, and the CC/ Dept associated with the customer or supplier account. For example, a settlement discount for a customer with a default nominal account of 4000 MAN, would post to a Discounts Allowed nominal account code of 4008 MAN.
Cost centres and department with stock items
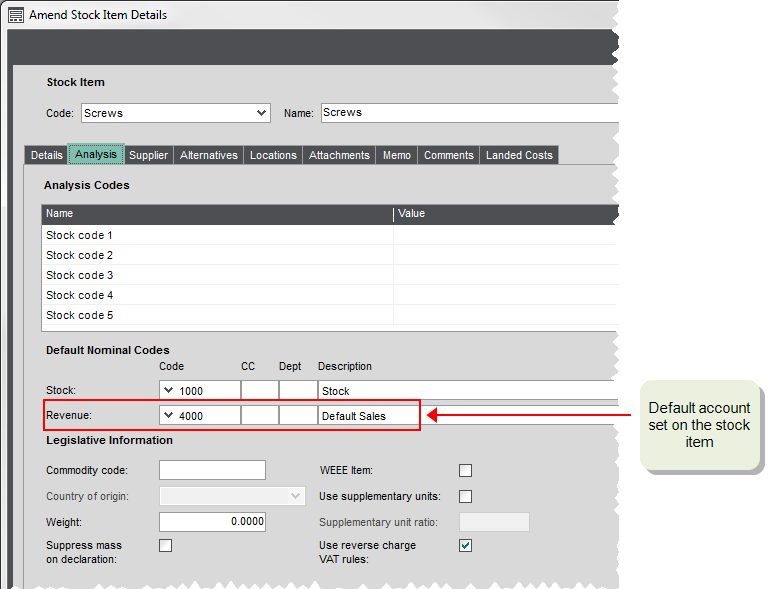
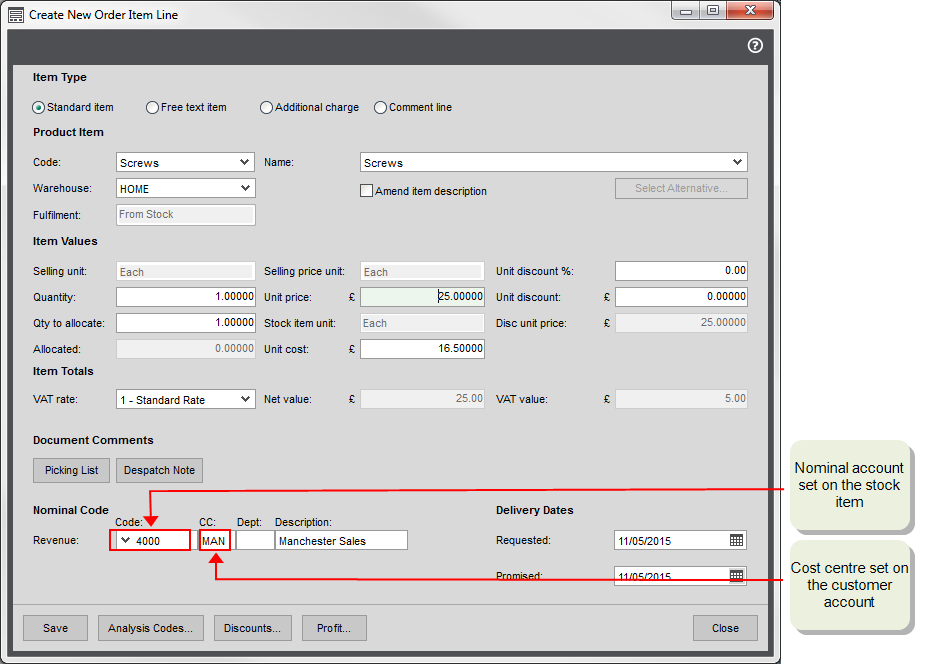
When choosing the nominal account to use by default on invoice and order lines, Sage 200 looks at the default nominal account assigned to the stock item and the cost centre and/ or department (if used) set on the customer or supplier account. For example, if you've set a default nominal account of 4000 MAN on a customer account and a default nominal account of 4001 of a stock item, then 4001 MAN is automatically entered on invoice and order lines (sales and purchase), by default.
John's has business that sells some goods and some services. He wants to make sure that he records these sales separately in his nominal accounts. Ho also uses cost centres with his nominal accounts to record sales for each of his branch offices. To do this, he has a default Sales nominal account of 4000 and a nominal account for services 4001. He then sets up additional nominal accounts for Sales and Services for each cost centre London LON, Birmingham BIR, and Manchester MAN.
To make sure his sales are recorded correctly for each branch, each customer account is set to the default sales nominal account with their branch cost centre. So a customer of the Manchester office would have a default nominal account 4000 MAN.
To make sure his products and services sales are recorded correctly, his product groups use different default Revenue accounts depending one whether they are Stock(4000) or Service (4001) type groups. These default nominal accounts are then inherited by stock items in the group. As John doesn't want to use further separate nominal accounts, he keeps these defaults for his stock items.
When he enters an order for a stock item for a customer in the Manchester office, the nominal account used on the order line defaults to a combination of the nominal account from the item and the cost centre from the customer in this case 4000 MAN. In the same way an order line for a service item defaults to the 4001 MAN nominal account.
In this example, if John hasn't created the 4000 MAN or 4001 MAN nominal accounts, the order line value will post to the suspense account.
Note: The same rules apply to purchases. A purchase order line will post by default to the Stock nominal account set on the item with the cost centre and/or department set on the supplier account.
Using cost centres and departments with Balance Sheet Nominal accounts
If addition, you can also choose to produce a balance sheet by cost centre and /or department.
IF you choose to do this, Sage 200 posts transactions to balance sheet nominal accounts that have the same cost centre and/or department combination as your costumer and supplier accounts. Therefore transactions for customers or supplier accounts with default nominal accounts that have a cost centre and/or departments will post to different Debtors, Creditors and VAT Control accounts.
You must make sure that you have created balance sheet nominal accounts with all the same CC and Dept combinations as your customer and supplier accounts, otherwise your transactions may post to the suspense account.
To produce a balance sheet for individual cost centres and departments:
- Turn this on in the System Settings.
Open: Accounting System Manager > Settings > System Settings | Operational settings.
- Select Split postings between cost centres for Balance Sheet accounts.
- Make sure you have created balance sheet nominal accounts with the required cost centre and department combinations.
- Specify the default nominal account with the correct cost centre and department on the customer, supplier and bank account records.
See Cost centre breakdown examples.
If you use the Split postings between cost centres for balance sheet accounts setting, make sure that your default nominal accounts for Creditors Control and Debtors Control are not set to use a specified account with a cost centre. To check this:
Open: Nominal Ledger > Utilities > Ledger Set Up > Default Nominal Accounts.
- Select the Balance Sheet tab.
- Make sure the Use Specified setting is set to No for both the Creditors Control and Debtors Control accounts.
Setting up cost centres and departments
Open: Nominal Ledger > Utilities > Ledger Set Up > Cost Centre Names.
- Click Add, and enter a Code of up to three (3) characters.
- Enter a Name for the cost centre A segment of an organisation for which costs are required to be collected and formally reported on separately; e.g. a company division such as sales or production. of up to 60 characters.
- Enter contact details, if required.
- Add as many cost centres as you require, and then click OK.
Note: Alphabetic characters should be in upper case. If you enter in lower case, Sage 200 converts and displays these as upper case.
Alternatively, you can create your codes in CSV file and import them into Sage 200.
Open: Nominal Ledger > Utilities > Ledger Set Up > Department Names.
- Click Add, and enter a Code of up to three (3) characters.
- Enter a Name of up to 60 characters.
- Enter contact details, if required.
- Add as many departments as you require, and then click OK.
Note: Alphabetic characters should be in upper case. If you enter in lower case, Sage 200 converts and displays these as upper case.
Alternatively, you can create your codes in CSV file and import them into Sage 200.
Each nominal account Code, CC and Dept combination is a separate nominal account. There are four ways you create new nominal accounts using a new CC or Dept.
-
Import your accounts. This is quickest way to create new nominal accounts. As long as you have created your cost centres and department codes, you can import account using a CSV file.
Open: Nominal Ledger > Utilities > Import > Import Ledger File.
-
Create a new single nominal account using the Dept. Use this method if you just want to create a small number of new accounts.
Open: Nominal Ledger > Nominal Accounts > Enter New Account.
-
Create accounts with the new CC or Dept for an existing account code. Use this when you already have a nominal accounts using a particular code and you want to add the CC and/or Dept. For example, you already have an account code of 6000, and want to add CC codes A, B and C and Dept codes of X. Y and Z. This will create all the accounts with the required combinations.
Open: Nominal Ledger > Nominal Accounts > Generate New Accounts.
-
Create a range of nominal accounts and a new CC or Dept. Use this when you want to duplicate an existing range of accounts for a new CC and/or Dept. This also creates a code. For example, you have a range of existing nominal accounts using LON (CC) ADM (Dept) and you want to duplicate this for MAN SAL.
Open: Nominal Ledger > Utilities > Ledger Set Up > Create Accounts for Cost Centre and Department.


