Import, export and update information
To help you set up and create your records, you can:
- Use an import file to create or update account records and transactions Sage 200.
- Export accounts to a file, so you can update them in an external tool such as Excel, and then reimport back to Sage 200.
Using an import file is useful when you want to create or update a large number of records in one go, as it's much quicker than entering the records manually in Sage 200.
What can I import, export and update?
|
Area |
Import |
Export |
Update |
More information |
|---|---|---|---|---|
|
Nominal |
|
|
|
|
|
Nominal accounts |
Yes |
Yes |
Yes |
|
|
Nominal transactions |
Yes |
No |
No |
|
|
Nominal budget values |
Yes |
No |
No |
|
|
Cost centres (funds) |
Yes |
No |
No |
|
|
Departments |
Yes |
No |
No |
|
|
Nominal report categories |
Yes |
No |
No |
|
|
Fixed assets |
Yes |
No |
No |
|
|
Customers |
|
|
|
|
|
Customer accounts |
Yes |
Yes |
Yes |
|
|
Customer transactions |
Yes |
No |
No |
|
|
Customer delivery addresses |
Yes |
No |
No |
|
|
Suppliers |
|
|
|
|
|
Supplier accounts |
Yes |
Yes |
Yes |
|
|
Supplier transactions |
Yes |
No |
No |
|
|
Stock and Prices |
|
|
|
|
|
Stock items |
Yes |
Yes |
Yes |
|
|
Product groups |
Yes |
No |
No |
|
|
Stock opening balances |
Yes |
No |
No |
|
|
Stock item locations |
Yes |
Yes |
Yes |
Export stock item locations (warehouses) Import stock item locations (warehouses) |
|
Stock item suppliers |
Yes |
Yes |
Yes |
|
|
Cross-selling stock items |
Yes |
No |
No |
|
|
Alternative stock items |
Yes |
No |
No |
|
|
Stock item selling prices |
Yes |
Yes |
Yes |
|
|
Stock item supplier prices |
Yes |
No |
No |
|
|
Bill of Materials |
|
|
|
|
|
Bill of Materials components |
Yes |
No |
No |
Importing information
All information is imported using either CSV or XML files. Example import files are provided for each type of import.
- CSV files can be used to import most information, and these files can easily be created and edited in a text editor or Microsoft Excel.
- XML files can be used to import some types of information, as an alternative to using CSV.
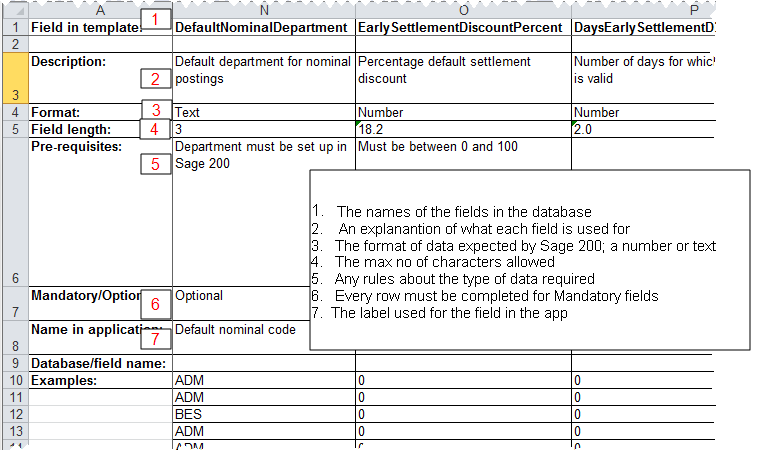
- An import format spreadsheet (XLS/XSLX file) is provided with details about each import format. Read this before you create your import file, to help you create the file in the correct format.
You can open and amend CSV files in a text editor or Microsoft Excel.
We recommend that you open CSV files using Excel's Text Import Wizard, and do not open a CSV file directly in Excel. If you open a CSV file directly in Excel, it will automatically format and convert your data, which may result in data corruption. For more information, see How to edit CSV import files in Excel.
This is an example CSV file opened in Microsoft Excel.
The first line (or row) of the CSV must include the file header, which specifies the fields (identifiers) in the import file. This will be included in the example CSV files.
For example, the first line of the import file should be the same as the example CSV:
Stock item code,Stock item name,Product group,Tax code,Stock item description,Manufacturer's name,Manufacturer's part number, ...
Then each new record must start on a new line and each value must be separated from the next by a comma.
Whilst not all fields in the import file are mandatory, you must not change the order of the fields. If a fields contains no data then it can be left blank, but do not remove the comma too as that will affect the order of the fields.
For example, this record has some fields with information, and some fields that are blank (where there is nothing between the commas):
AA01,Beech Base Single Cabinet H58cm,CABINETS,1,,,,94034010, ...
You can view the XML files in a web browser, and open and amend the XML files in a text editor.
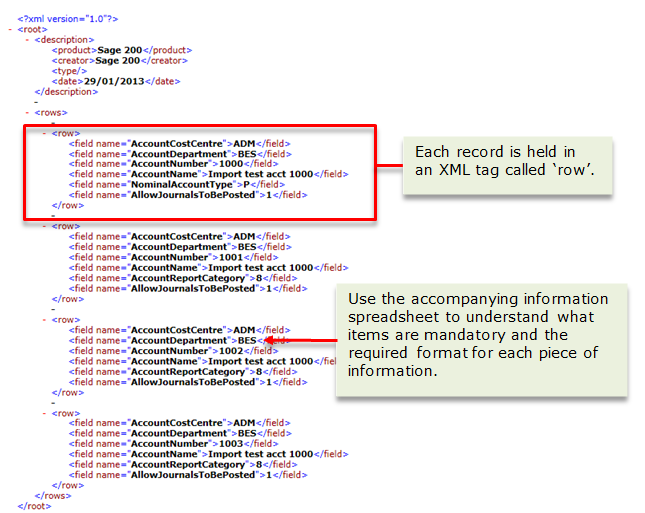
This is an example XML file displayed in a web browser.
Each value must be separated from the next using tags <FIELD NAME> to define and start the identifier and </FIELD> to define and close the identifier, with the import entry defined between.
For example:
<FIELD NAME="AccountNumber"></FIELD>
or
<FIELD NAME="STOCK ITEM CODE">1</FIELD>
or
<row> <field name="WorksNumber">001</field> ... </row>
Each record must be allocated its own line using <row> to start the record and </row> to close the record.
To download import files, see What can I import, export and update?
When to import
You can import data at any time.
- If you're just starting with Sage 200, then you can import nominal accounts data as part of the initial configuration.
-
If you're migrating data from another product, you can use the Import wizard to help you through the import process.
You can find the import wizard from the menu: Import records > Import wizard.
- If you're importing other records, you can use the appropriate import screen located in the Import Records section of the menu.
Import rules
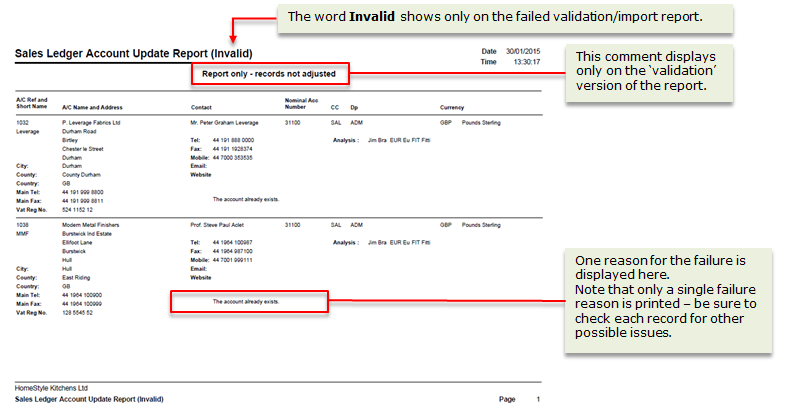
- Data can only be imported once. If you try to import the same records again, the records will show as Invalid on the report.
- The data must be in the correct format as outlined in the file structure.
- Some imports have mandatory fields. These fields must be complete for all records.
- Some imports rely on other records already existing in Sage 200. For example, if you're using cost centres and departments, these must be set up in Sage 200 before you can import nominal accounts. In the same way, product groups must exist before you can import stock records.
- Valid records are imported even if the a file contains some invalid records.
- Invalid records are shown on the invalid import report. You can then make the required changes and import again.
Not all fields need to be included in the import file. You only need to include the mandatory fields.
- If you do not want to include a field for a particular record, just leave that field blank.
- If you do not want to include a field for any of the records in your import file, then you can remove the field altogether (including the heading).
- You should not use a percent % character in an import file. The % character is used as a wildcard, so it may cause unexpected results.
The correct order to import records
When importing records you need to make sure that you import in a specific order due to the dependencies between some of the records. You must import account and records before importing transactions, for example.
For example, say you are importing nominal accounts and departments. You must import your departments first. If not, when you import your nominal accounts there will be references within those nominal account records to departments that do not exist. Sage 200 will not validate or import nominal account records with invalid departments.
The import order is:
- Departments, Cost Centres and Report Categories.
- Nominal Accounts.
- Nominal transactions and Budgets.
- Product groups
- Stock Items
- Opening balances
- Supplier price lists
Validation reports
It's good idea when importing records to make sure all the records in your import file meet the rules. To do this you can choose to Validate your records before importing them. This checks the records in the files and produces two reports:
- The Update Report details the records successfully validated or imported.
- The Update Report (Invalid) details the records that failed and were not imported. For each failure a single failure reason is displayed.
Use them to identify and correct any records that were not imported.
Exporting and updating information
Some information can be exported to a CSV file, which can make updating the information easier if you need to make a lot of changes.
The information is exported to a CSV file in the same format used for an import. This means you can export information and make changes to it using an external tool (such as Excel), and then import your updated information back into Sage 200.
For details of which records you can export and update, see What can I import, export and update?
Updating information
-
An import file can include information for both new records and existing records that you want to update. You can choose whether or not to update existing records when you import.
-
Check the import format spreadsheet (XLS/XSLX file) for details about each import format.
-
Not all fields need to be included in the import file. You only need to include the mandatory fields.
- If you do not want to include a field for a particular record, just leave that field blank.
- If you do not want to include a field for any of the records in your import file, then you can remove the field altogether (including the heading).


