How to set up e-Banking
Install e-Banking
The Sage e-Banking component and the component for your bank's e-Banking service must be installed.
You need to install the required components on all PCs that will be using the service.
Install the Sage e-Banking component
To install the component from the Sage 200 desktop:
- Select
 Tools > Installers > Install eBanking components.
 - Click Install.
Note: Alternatively, you can install the e-Banking component from the installers folder on your server, by running C:\Sage\Installers\Sage 200 EBanking\Setup.exe.
Install the e-Banking service for your bank
-
Visit this page to check which banks are compatible with e-Banking:
- Find your bank and the e-Banking service you use. Click Download plug-in.
- You'll need to close and re-open the Sage 200 desktop app to see your e-Banking Service in the list.
Set up bank accounts to use e-Banking
Open: Cash Book > Bank Account List > New Account
Open: Cash Book > Bank Account List > Amend Account
-
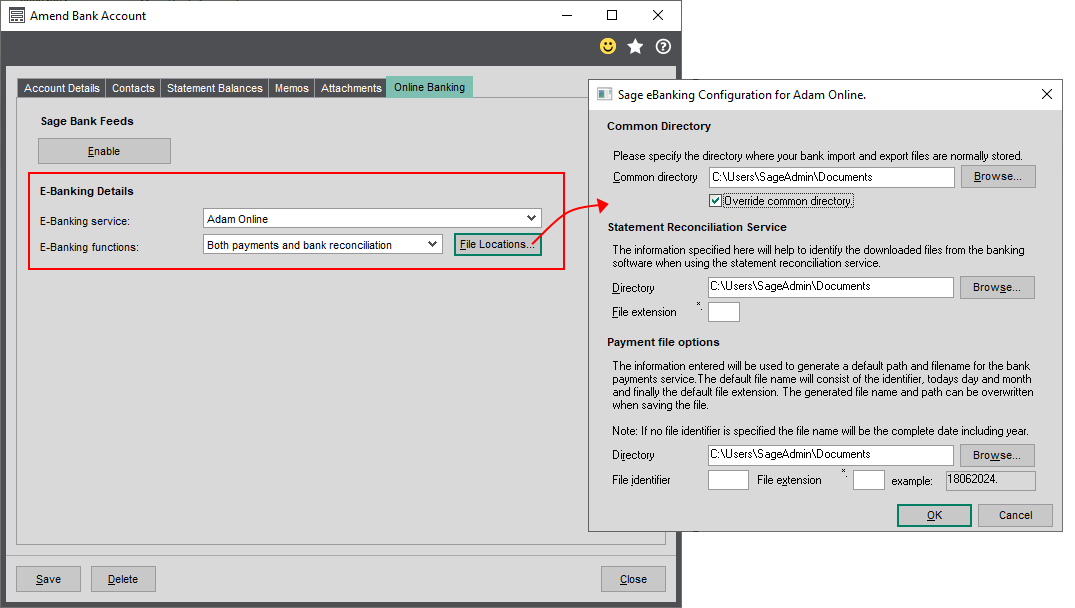
Move to the Online Banking tab (previously E-Banking) for the bank account.
-
Select the E-Banking service you will be using.
Note: You will only see your bank listed here if you have downloaded and installed the plug-in for your bank.
-
Choose the tasks you will be using with e-Banking from the E-Banking functions list.
-
Payments if you want to pay your suppliers via e-Banking.
-
Bank reconciliation only.
-
Both payments and bank reconciliation if you want to make the most of it and do both.
Note: Not all banks support all functions. If you can't see a function in the list, it's not supported by your bank.
-
-
Files for e-Banking are saved to your user Documents folder by default. To change this, click File Locations.
Set e-Banking file locations-
Click File Locations.
-
To choose the folder for your e-Banking files, select your Common directory.
-
To specify separate locations for statement reconciliation (that come from your bank) and payment files (that you will send to your bank), select Override Common Directory.
-
In the Statement Reconciliation Service section, click Browse to select the folder where Sage 200 will look for statement files for reconciliation.
If your incoming bank statement files will have a specific file extension, enter it in the File extension field.
-
In the Payment file options section, click Browse to select the folder where Sage 200 will save the payment files for you to send to your bank.
Output payment files are named according to the date they are produced. You can add a prefix to the file name by entering a File identifier field. You can add a file extension in the File extension field. The example field shows what the file name will look like.
-
Set up supplier accounts to use e-Banking
If you want to pay your suppliers via e -banking, each supplier account must belong to a payment group that uses an Electronic payment method, and your must use the Generate payments feature to pay your suppliers.
You can create a single payment group for all suppliers that you pay via e-Banking or you can use separate groups. You might want separate groups if you do your payment runs at different times, or want to use a mixture of printed or emailed remittances.
Note: You cannot pay foreign suppliers through e-Banking.
Open: Purchase Ledger > Purchase Accounts > Amend Account Details
-
Select the supplier.
-
Move to the Payment tab.
-
Choose a Payment group that uses an Electronic payment method, either:
- Electronic Payment
- Electronic Payment Remittance (Paper)
- Electronic Payment Remittance (Email)
Tip: You can change the labels for the payment groups to make them more meaningful for your business in the Supplier settings.
Set up your VAT return to pay HMRC via e-Banking (UK only)
Open: Nominal Ledger > Utilities > Ledger Set Up > Nominal Ledger Settings | VAT submissions
-
Select Enable online VAT payments (UK only).
The bank details for the HMRC are entered automatically. Do not change these unless you have received notification from HMRC.
- Select the bank account to pay the VAT from. The VAT payment defaults to this bank account.
- Choose a nominal account to post the VAT payment to.
Sage is providing this article for organisations to use for general guidance. Sage works hard to ensure the information is correct at the time of publication and strives to keep all supplied information up-to-date and accurate, but makes no representations or warranties of any kind—express or implied—about the ongoing accuracy, reliability, suitability, or completeness of the information provided.
The information contained within this article is not intended to be a substitute for professional advice. Sage assumes no responsibility for any action taken on the basis of the article. Any reliance you place on the information contained within the article is at your own risk. In using the article, you agree that Sage is not liable for any loss or damage whatsoever, including without limitation, any direct, indirect, consequential or incidental loss or damage, arising out of, or in connection with, the use of this information.

