Note: This topic describes financial statements for Report Designer. If you want to produce financial statements for Excel Reporting, see How to design layouts for financial data reports (Excel Reporting).
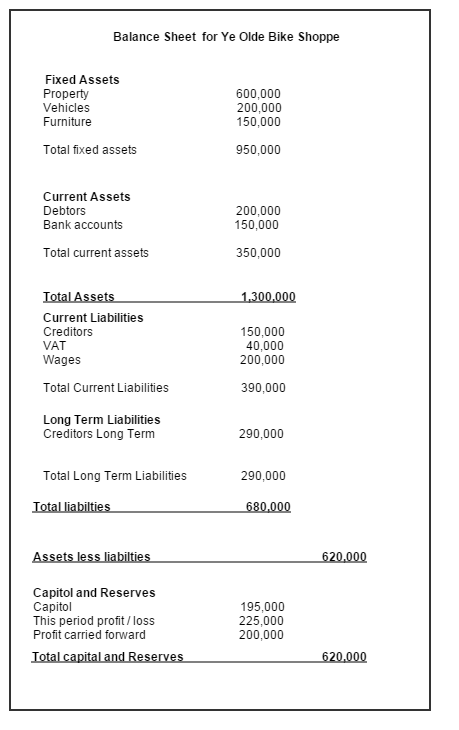
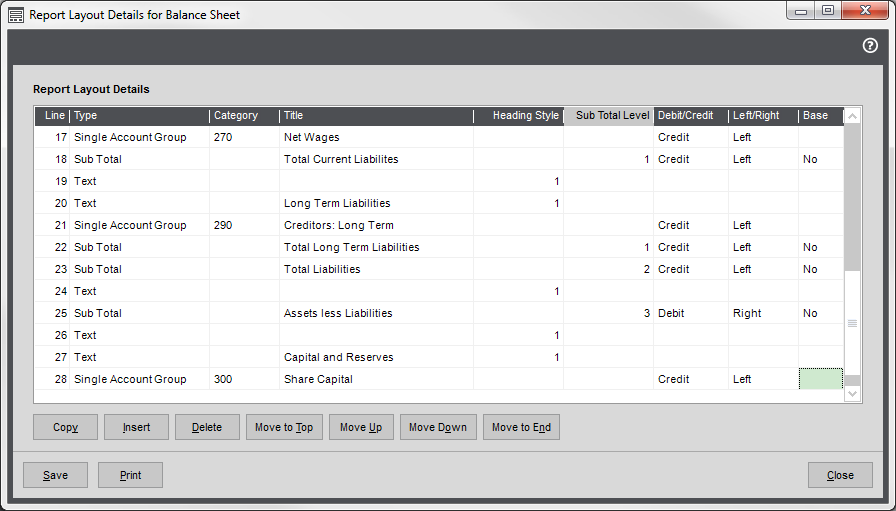
This example show you how to create a layout which produces a report with the basic elements below:
Create a new layout
Open: Settings > Cash Book / Nominal Ledger > Financial Statement Layouts.
- Select Balance sheet.
- Click New.
- Enter a name for the balance sheet layout.
- Click Edit.
Add your fixed assets
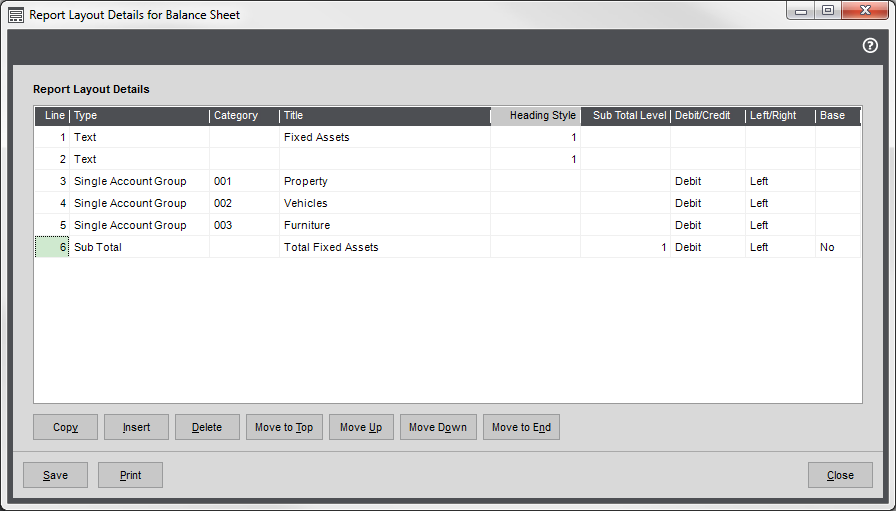
- Create a text line for your first section.
- Choose Text from the Type drop-down list.
- Enter the heading text in the Title column, e.g. Fixed Assets.
- Choose a heading style: 1 - 9.
- Enter a blank line.
- Enter the report categories to include in your first section. This would usually be for your Asset type report categories.
- Choose Single Account Group from the Type drop-down list.
- Choose the report category code from the drop-down list; e.g. 001 for Property.
- Change the Title if required.
- Choose Debit from the Debit/Credit drop-down list.
- Choose Left from the Left/Right drop-down list.
Repeat for all your fixed asset report categories.
In this example you would add Vehicles and Furniture.
Tip: Make sure you've included all your assets otherwise the balance sheet won't balance.
- Create a total for the section.
- Choose Subtotal from the Type drop-down list.
- Enter some text in the Title column, such Total Fixed Assets. The text is bold by default.
- Choose 1 in the subtotal level, as this adds up all rows not included in a subtotal. This totals up your fixed assets.
- Choose Left from the Left/Right drop-down list. This prints the total to the left of the column in line with total of the report categories.
If you want to separate your assets into further sections, repeat for each section. Make sure you use 1 as the subtotal level.
Add blank text lines or dashes to break up the report.
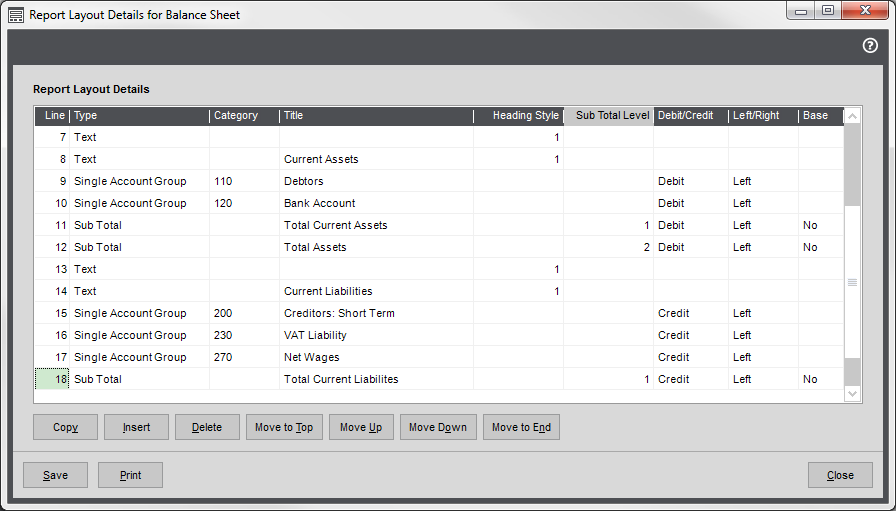
Add your current assets
- Create a text line for the section.
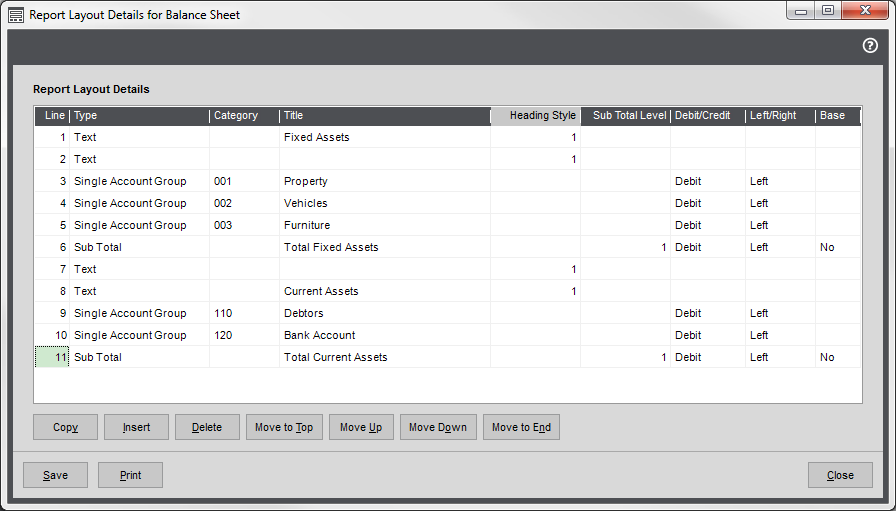
- Choose Text from the Type drop-down list.
- Enter the heading text in the Title column, e.g. Current Assets.
- Choose a heading style: 1 - 9.
- Enter a blank line.
- Enter the report categories to include in this section. These should also be Asset type report categories.
- Choose Single Account Group from the Type drop-down list.
- Choose the report category code from the drop-down list; e.g. 110 for Debtors.
- Change the Title if required.
- Choose Debit from the Debit/Credit drop-down list.
- Choose Left from the Left/Right drop-down list.
-
Repeat for all other current asset report categories.
In this example you would add only 120 - Bank Accounts.
- Create a total for the section.
- Choose Subtotal from the Type drop-down list.
- Enter some text in the Title column, such Total Current Assets. The text is bold by default.
- Choose 1 in the subtotal level, as this adds up all rows above not included a subtotal. As your fixed assets are already included in a subtotal above, this adds up your current assets only.
- Choose Debit from the Debit/Credit drop-down list.
- Choose Left from the Left/Right drop-down list. This prints the total to the left of the column to distinguish it from the value of the individual rows.
Calculate the total assets
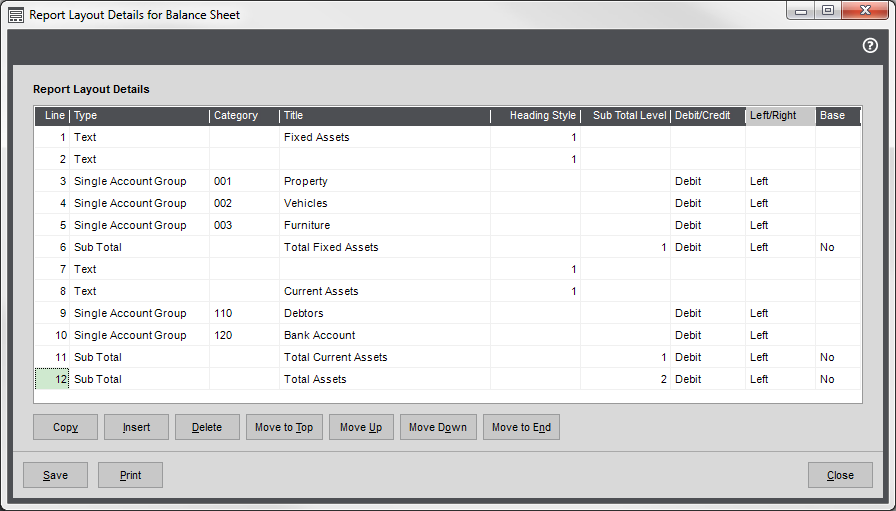
- Choose Subtotal from the Type drop-down list.
- Enter some text in the Title column, such as Total Assets.
-
Choose 2 in the subtotal level, as this adds all the rows above not included in a level 2 subtotal.
As your current and fixed assets are only included in a level 1 subtotal, they are added together here.
- Choose Debit from the Debit/Credit drop-down list.
-
Choose Right from the Left/Right drop-down list. This prints the total to the right of the column to distinguish it from the totals above.
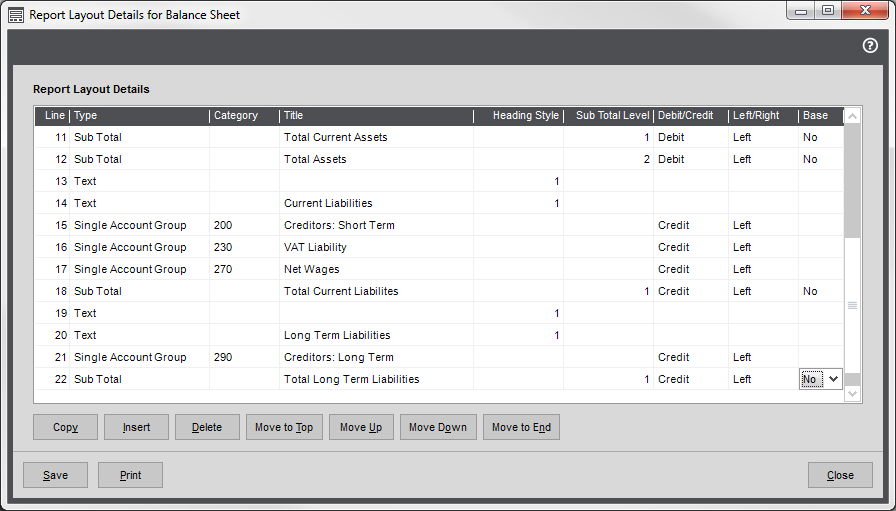
Add your current liabilities
- Create a text line for the section.
- Choose Text from the Type drop-down list.
- Enter the heading text in the Title column, e.g. Current Liabilities.
- Choose a heading style: 1 - 9.
- Enter a blank line.
- Enter the report categories to include in this section. Add the relevant Liability report categories.
- Choose Single Account Group from the Type drop-down list.
- Choose the report category code from the drop-down list; e.g. 200 for Creditors.
- Change the Title if required.
- Choose Credit from the Debit/Credit drop-down list.
- Choose Left from the Left/Right drop-down list.
- Repeat for all current liability report categories.
In this example you would add rows for VAT and Wages.
- Create a total for the section.
- Choose Subtotal from the Type drop-down list.
- Enter some text in the Title column, such as Total Current Liabilities. The text is bold by default.
Choose 1 in the subtotal level, as this adds up all rows not included in a subtotal.
As your assets are included in the level 1 subtotals above, only the current liabilities are added together.
- Choose Credit from the Debit/Credit drop-down list.
- Choose Left from the Left/Right drop-down list.
Add your long term liabilities
- Create a text line for the section.
- Choose Text from the Type drop-down list.
- Enter the heading text in the Title column, e.g. Long term Liabilities.
- Choose a heading style: 1 - 9.
- Enter a blank line.
- Enter the report categories to include in this section. Add the relevant Liability report categories.
- Choose Single Account Group from the Type drop-down list.
- Choose the report category code from the drop-down list; e.g. 290 for Creditors Long Term.
- Change the Title if required.
- Choose Credit from the Debit/Credit drop-down list.
- Choose Left from the Left/Right drop-down list.
- Repeat for all current liability report categories.
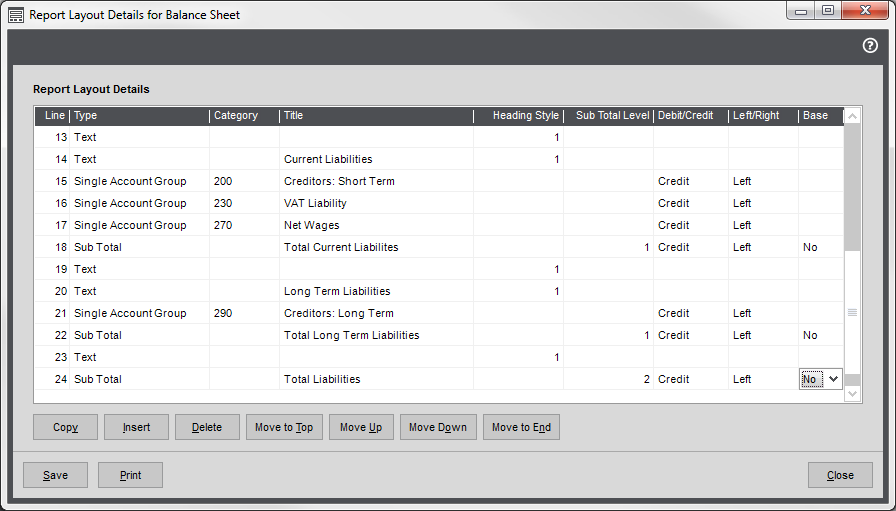
- Create a total for the section.
- Choose Subtotal from the Type drop-down list.
- Enter some text in the Title column, such as Long term Liabilities. The text is bold by default.
Choose 1 in the subtotal level, as this adds up all the rows in the section.
As your assets and current liabilities are included in subtotal rows above, only the long term liabilities are added together.
- Choose Credit from the Debit/Credit drop-down list.
- Choose Left from the Left/Right drop-down list.
Calculate the total liabilities
- Choose Subtotal from the Type drop-down list.
- Enter some text in the Title column, such as Total Liabilities.
-
Choose 2 in the subtotal level. This adds all the rows above not included in a level 2 subtotal.
As your assets are already included the level 2 total for Total assets, Only your current and long term liabilities are added together.
- Choose Credit from the Debit/Credit drop-down list.
-
Choose Left from the Left/Right drop-down list.
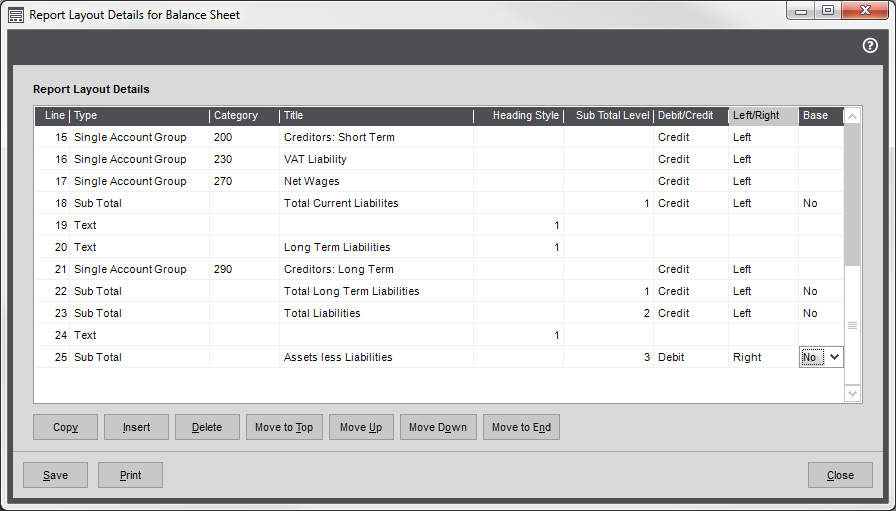
Calculate assets less liabilities
- Choose Subtotal from the Type drop-down list.
- Enter some text in the Title column, such as Assets Less Liabilities.
-
Choose 3 in the subtotal level. This adds all the rows above not included in a level 3 subtotal.
As your assets and liabilities rows are only included in level 1 or 2 subtotals above, they are all added together here. As assets are a debit value and liabilities a credit value, this has the effect of subtracting the liabilities from the assets.
- Choose Debit from the Debit/Credit drop-down list.
-
Choose Right from the Left/Right drop-down list. This prints the total to the right of the column to distinguish it from the totals above.
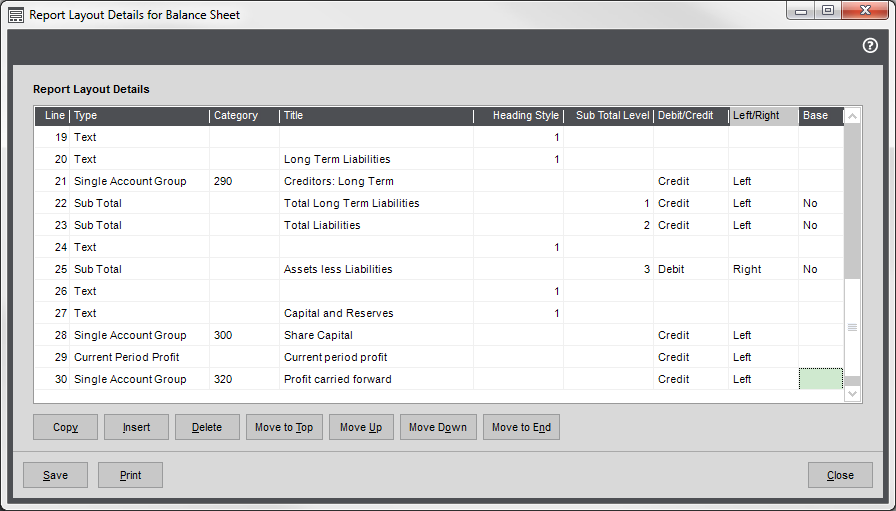
Add your capital and reserves
- Create a text line for the section.
- Choose Text from the Type drop-down list.
- Enter the heading text in the Title column, e.g. Capitol and Reserves.
- Choose a heading style: 1 - 9.
- Enter a blank line.
- Add the report categories for Share capital and Reserves.
- Choose Single Account Group from the Type drop-down list.
- Choose the report category code from the drop-down list; e.g. 300 for Share Capital.
- Change the Title if required.
- Choose Credit from the Debit/Credit drop-down list.
- Choose Left from the Left/Right drop-down list.
- Repeat for all other report categories for capital and reserves.
Add your current period and carried forward profit
This adds the profit calculated by Sage 200 for the period the report has been run for and the previous years profit carried forward.
- Choose Profit Carried forward from the Type drop-down list.
- Enter some text in the Title column, such Current period profit. The text is bold by default.
- Enter an asterisk * in the Category column.
- Choose Credit from the Debit/Credit drop-down list.
- Choose Left from the Left/Right drop-down list.
- On the next row, choose Single Account Group from the Type drop-down list.
- Choose the report category code for your accumulated profit from the drop-down list; e.g. 320 for P & L Account.
- Choose Credit from the Debit/Credit drop-down list.
- Choose Left from the Left/Right drop-down list.
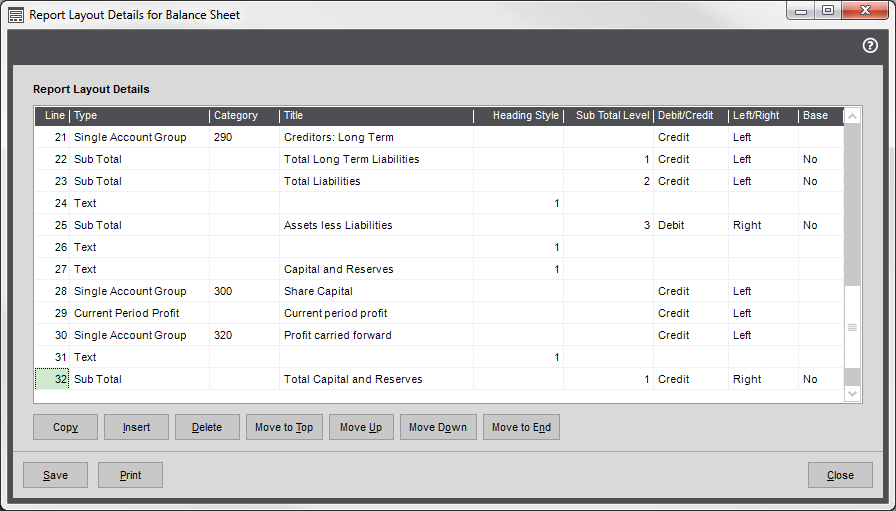
Calculate your total capital and reserves
- Choose Subtotal from the Type drop-down list.
- Enter some text in the Title column, such as Total Capital and Reserves.
-
Choose 1 in the subtotal level, as you only want to add up the rows in this section.
- Choose Credit from the Debit/Credit drop-down list.
-
Choose Right from the Left/Right drop-down list. This prints the total to the right of the column to show it's a credit.
Check your results
Once you've finished, save the layout and check your results. We recommend that your check the following:
-
That your Report Categories have been added once. Select the layout and click Validate.
This lists all the report categories that have been used more than once, or not at all.
-
Check the report format is correct - i.e. that all your lines, spaces and values are in the right place. Select the layout and click Preview.
This shows how the layout will look when run as a report. It doesn't display any values.
-
Check the balance sheet balances. The Total Assets less Liabilities value should be the same as the total Total Capital and Reserves value.
Print the balance sheet and check that it balances. If it doesn't balance, also check that your trial balance balances for the same period. If your trial balance balances and your balance sheet does not:
- Check that all relevant report categories and nominal accounts are included on the layout.
- Check that all rows are included in a subtotal.
- Check that all subtotals are the correct level.
Print your Balance Sheet
Open: Nominal > Nominal Reports > Financial Statements.
-
Choose the Profit and Loss report you want to print.
Available Balance Sheet reportsAll reports include figure for the current and previous financial year.
Report Description Balance Sheet (YTD) Shows the year to date up to the period selected.
Balance Sheet (MTD-YTD) Shows the period selected and the year to date. Balance Sheet Prior Year Shows previous year for the period selected and the year to date. -
Choose the required layout from the Report Name report criteria. If you've created additional layouts, choose the one you want to use here. This will default to the first layout in the list (sorted alphabetically).
Tip: If you want to make sure a certain layout is always used, change the layout name to make sure it's the first one listed.

