How to edit CSV import files in Excel
How to open CSV files
Avoiding data corruption when editing CSV files
We recommend that you open CSV files using Excel's Text Import Wizard, and do not open a CSV file directly in Excel; e.g. by double-clicking the file or using File > Open. If you open a CSV file directly in Excel, it will automatically format and convert your data, which may result in data corruption.
When you use the Text Import Wizard, you can control how the data in your file is formatted in Excel.
If you open a CSV file directly in Excel, it will automatically format and convert your data, but it may not convert it to the correct format. It will set the cells in the spreadsheet to the General data type, which formats the cells based on their content. For example, say you have an import file that contains a nominal account number "00010". Excel will format "00010" as a number and remove the leading zeros, so your nominal account code number would be converted to "10".
To avoid this problem, you can use the Text Import Wizard. This allows you to convert the data to the Text data type (instead of General), and means that your data will not be corrupted.
Open an CSV file using the Text Import Wizard
Note: Applies to: Excel for Microsoft 365, Excel 2019, Excel 2016, Excel 2013, Excel 2010, Excel 2007.
To open a CSV import file in Excel using the Text Import Wizard:
-
In Windows Explorer, rename the CSV file with a TXT file extension. For example, rename Import.csv to Import.txt.
This is required because Excel will not run the Text Import Wizard if the file has a CSV file extension.
-
in Excel, open the import file.
- Select File > Open, and browse to your file. If you can't see your file, make sure the filter is set to show Text Files.
-
The Text Import Wizard is displayed.
-
Make sure the data type is set to Delimited.
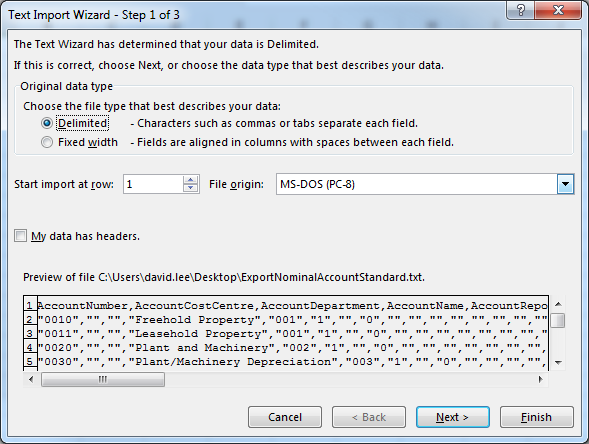
Click Next.
-
Set the delimiter to Comma (only), and deselect Tab.
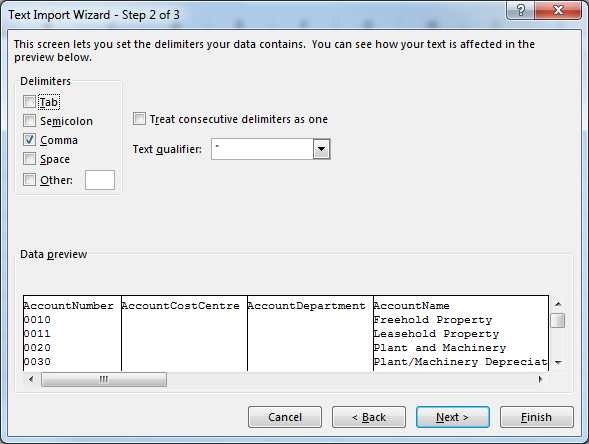
Click Next.
-
For each column, set the data format to Text, instead of General.
To do this quickly, you can select all the columns at once. Scroll to the last column and use Shift + click to select all the columns. Then set their data format to Text.
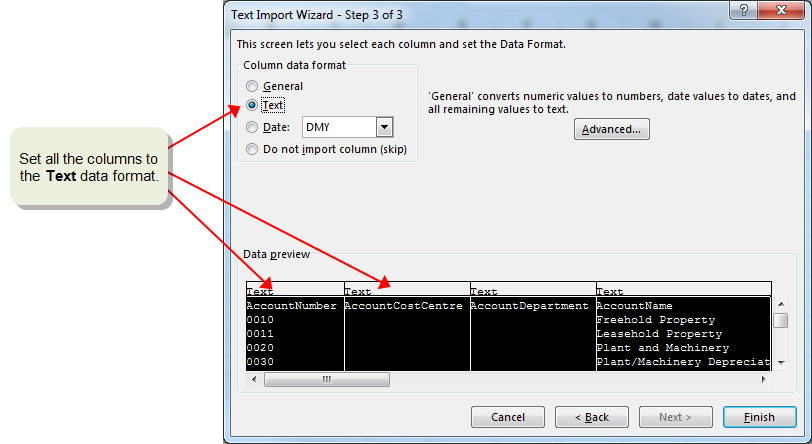
Click Finish.
-
-
Your file will be opened in Excel.
Once you have finished editing the file, you can save it as a CSV file, ready to be imported in Sage 200.
- Select File > Save As.
- Set the file type to CSV (Comma delimited) (*.csv).
- Choose your file name and location, then save the file.
Edit CSV import files in Excel
Tips for editing
When you're editing import files in Excel, use the following tips to make sure that the data will be saved to the CSV file in the correct format.
- Use the Text format for all cells, rather than General.
- Do not use an apostrophe to format a cell as text; e.g. do not use '001 to make Excel treat the cell as text (when the cell uses the General format). Instead, always use the Text format for the cell. The apostrophe will not be removed when you save the CSV file, so it will be included when you try to import the file in Sage 200.
- When you save the CSV file, use the file type CSV (Comma delimited) (*.csv).
Do I need to include all the fields?
Not all fields need to be included in the import file. You only need to include the mandatory fields.
- If you do not want to include a field for a particular record, just leave that field blank.
- If you do not want to include a field for any of the records in your import file, then you can remove the field altogether (including the heading).