Set up Microsoft 365 for connected apps, the Web Portal, Self Service web app, Power BI, Power Automate, or the API
You can connect Sage 200 and Microsoft 365 to use:
-
Sage 200 Web Portal.
-
Sage 200 API.
-
Sage 200 Self Service web app.
-
Microsoft Power BI.
-
Microsoft Power Automate (formerly called Microsoft Flow).
How to connect Sage 200 and Microsoft 365
Follow the steps below to set up Microsoft 365:
-
Activate your Microsoft 365 subscription.
-
Create user accounts in Sage Business Centre.
-
Connect Sage 200 to your Microsoft 365 account.
-
Set up user email addresses in Sage 200.
You only need to activate and connect Sage 200 to your Microsoft 365 account the first time you start to use connected apps. Once you've set this up, you can use the Sage Business Centre to create new users.
The Sage Contact app for Sage 200 has now been withdrawn.
Activate your Microsoft 365 account
First activate your Microsoft 365 account so that you can use Sage applications with Microsoft 365.
You will need to have an existing Microsoft 365 Business Standard (formerly Office 365 Business Premium) or Enterprise subscription, to integrate with Sage 200. You can't move this from your existing provider to Sage, but you can still integrate it with Sage 200.
-
Sage 200 can only be integrated with a Microsoft 365 Business Standard (formerly Office 365 Business Premium), Enterprise (E1, E3 or E5), or Office 365 Education (A1, A3, A5) subscription.
For details of compatible Microsoft 365 subscriptions, see Sage 200 – Which version of Microsoft 365 is compatible for use with the Sage 200 API and how to check before onboarding (opens in a new tab).
-
Your Microsoft 365 subscription must include Microsoft Entra ID P1 or P2 (formerly Azure Active Directory Premium P1 or P2).
-
The user agreement gives your Sage 200 software access to your Microsoft 365 subscription. It does not affect your Microsoft 365 subscription or any existing support contracts you may have. These remain with your existing provider.
-
You must first contact Business Partner Services at [email protected] (opens in a new tab) to register your Microsoft 365 subscription.
You will receive a form to complete the registration of your Microsoft 365 subscription. Once you have returned the form, it can take up to 48 hours to activate your subscription.
-
When you register to use Microsoft 365 with Sage 200, you will receive an email to get started.
Note: We recommend that you sign out of any Microsoft 365 software in your browser before you access the Sage Business Centre.
-
Select the link in the email to sign in to Sage Business Centre.
-
Sign in using your Microsoft 365 administrator email address and password. This is usually in the format admin@***.onmicrosoft.com.
Note - informationThe user must have the administrator role Admin center access in Microsoft 365 whilst you activate your account and set up
To view or change a user's role in the Microsoft 365 admin center, go to Users > Active Users, select the user, then select Manage roles. Note that you will not be allowed to change your own user role, so you must sign in using a different user account.
-
-
You will be asked by Microsoft to accept permissions for the Sage Business Centre application. Select Accept to continue.
-
You will be asked by Sage to accept permissions for apps to access your data. Select Accept to continue.
-
Once you've activated your account, you can access the Sage Business Centre at https://ceo365portal.na.sage.com (opens in a new tab).
Here you can create user accounts for people that will use Sage 200 apps.
.png "Sage Business Centre home page")
Create user accounts
Once you've activated your account, create user accounts for each person that will use Microsoft 365 with Sage 200 apps.
You can create user accounts in the Sage Business Centre and the Microsoft 365 Admin Center.
-
Sign in to the Sage Business Centre (https://ceo365portal.na.sage.com (opens in a new tab)).
-
Select the Manage Users tab.
.png "Manage Users page in the Sage Business Centre")
-
Select Add users in Microsoft 365.
This will open the Microsoft 365 Admin Center.
-
Add your users in the Microsoft 365 Admin Center.
-
Select the Add a user link on the Home page, or go to Users > Active Users and select Add a user.
.png "Microsoft 365 admin center - Active Users page")
-
Enter the Basics user account details.
.png "Microsoft 365 admin center - Add a user basic details")
-
Enter the user's name and display name.
-
Enter the Username that will be used for the user's email address. The person will use this email address to sign in.
Tip: Remember this email address, as you will need it later when setting up Sage 200.
-
If you select Send password in email on completion, the user will receive an email with their username and a temporary password.
Note: This will allow the user to sign in to Microsoft 365, but they will not be able to use Sage 200 apps yet until you finish setting things up.
-
-
Enter the Product licenses details.
.png "Microsoft 365 admin center - Add a user product licenses details")
-
Select the product licence for Azure Active Directory Premium P1.
-
Select the product licence for Microsoft 365 Business Standard.
-
-
Enter any of the Optional settings as required.
-
When you've entered all the user's details, move to the Finish page and select Finish adding.
Microsoft 365 admin center will confirm when the user is active.
-
-
Repeat these steps for each person that will use a Microsoft 365 account with Sage 200 apps.
Note: You must also set up the user email addresses in Sage 200. To do this, see Set up user email addresses in Sage 200.
Tip: If you need to add multiple users in Microsoft 365, see this Microsoft support article: Add users individually or in bulk to Office 365 - Admin Help (opens in a new tab)
Connect Sage 200 to your Microsoft 365 account
After you activate your Microsoft 365 subscription, connect your Sage 200 site to your Microsoft 365 account.
To do this, install the Microsoft Entra private network connector (formerly Microsoft Azure Active Directory Proxy Connector) on your Sage 200 server. This connects your Sage 200 server to Microsoft Entra ID (formerly Azure Active Directory).
Before you install the Microsoft Entra private network connector, you will need to set up your Sage 200 server as follows:
-
Set Microsoft Edge as the default browser.
-
Open Windows Settings, and browse to Apps > Default Apps.
-
Select Microsoft Edge, then select Set default.
-
-
Turn off Internet Explorer Enhanced Security Configuration (ESC).
-
Open the Windows Server Manager application.
-
Select Local Server.
-
In the Properties section, find the IE Enhanced Security Configuration property and select the current setting (On or Off) to open the property page.
-
Select Off for Administrators and select Off for Users.
For more information about ESC, see FAQ about Internet Explorer Enhanced Security Configuration (Microsoft) (opens in a new tab).
-
-
Download the installer.
-
Download the Microsoft Entra private network connector installer for Sage 200 Professional version 2025 R2 (opens in a new tab).
-
Download the Microsoft Entra private network connector installer for Sage 200 Professional version 2025 R1 (opens in a new tab).
-
Download the Microsoft Entra private network connector installer for Sage 200 Professional version 2024 R2 (opens in a new tab).
-
Download the Azure Application Proxy Installer for Sage 200 Professional version 2024 R1 (opens in a new tab).
-
Download the Azure Application Proxy Installer for Sage 200 Professional versions 2023 R2 or earlier (opens in a new tab).
-
-
On your Sage 200 server, extract the downloaded zip file, then run the installer application (AppProxyInstaller.exe).
-
Select Install and Configure.

-
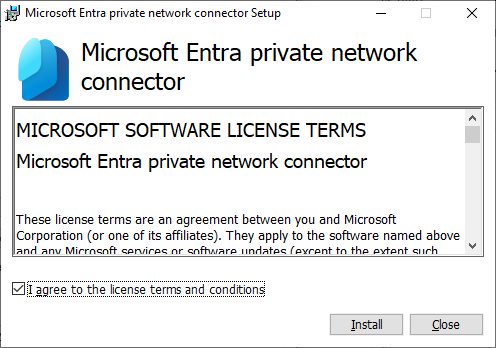
The Microsoft Entra private network connector setup will start.
Note: This was previously called the Microsoft Azure Active Directory Proxy Connector for Sage 200 Professional versions up to 2023 R2.
-
Select Install.
-
-
You will be asked to sign in to your Microsoft Azure account.
-
Sign in using your administrator user name and password.
This is the same account that you used to sign in to the Sage Business Centre, and the Microsoft 365 account you used to activate your subscription and link to Sage 200.
Note - informationThe user must have the administrator role Admin center access in Microsoft 365 whilst you activate your account and set up
To view or change a user's role in the Microsoft 365 admin center, go to Users > Active Users, select the user, then select Manage roles. Note that you will not be allowed to change your own user role, so you must sign in using a different user account.
Note: If you see an error message saying that content from this application is being blocked by Internet Explorer Enhanced Security Configuration (ESC), you will need to turn off ESC on your Sage 200 server.
-
-
Select Close when the setup is complete.
-
You may be asked to sign in to your Microsoft Azure account again.
Sign in using the same administrator user name and password as before, when you installed the Microsoft Entra private network connector.
-
Open the Microsoft Entra admin center (formerly Azure Active Directory admin center) and sign in.
-
Set up the applications that you want to use:
Set up the Web Portal-
Select Entra ID > Enterprise apps.
.png)
-
Select New application.
.png)
-
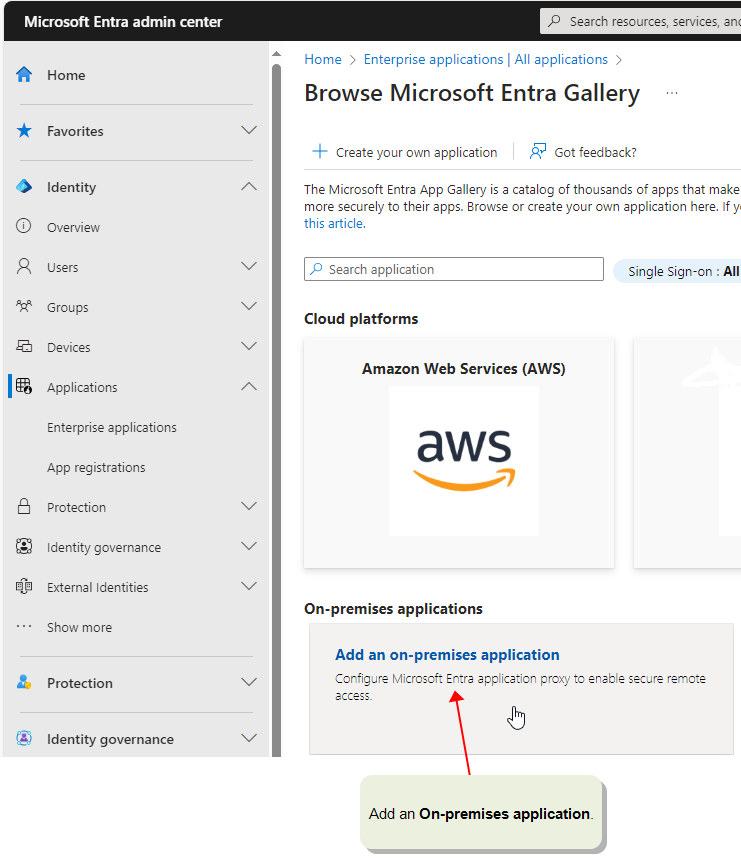
Select Add an on-premises application.
-
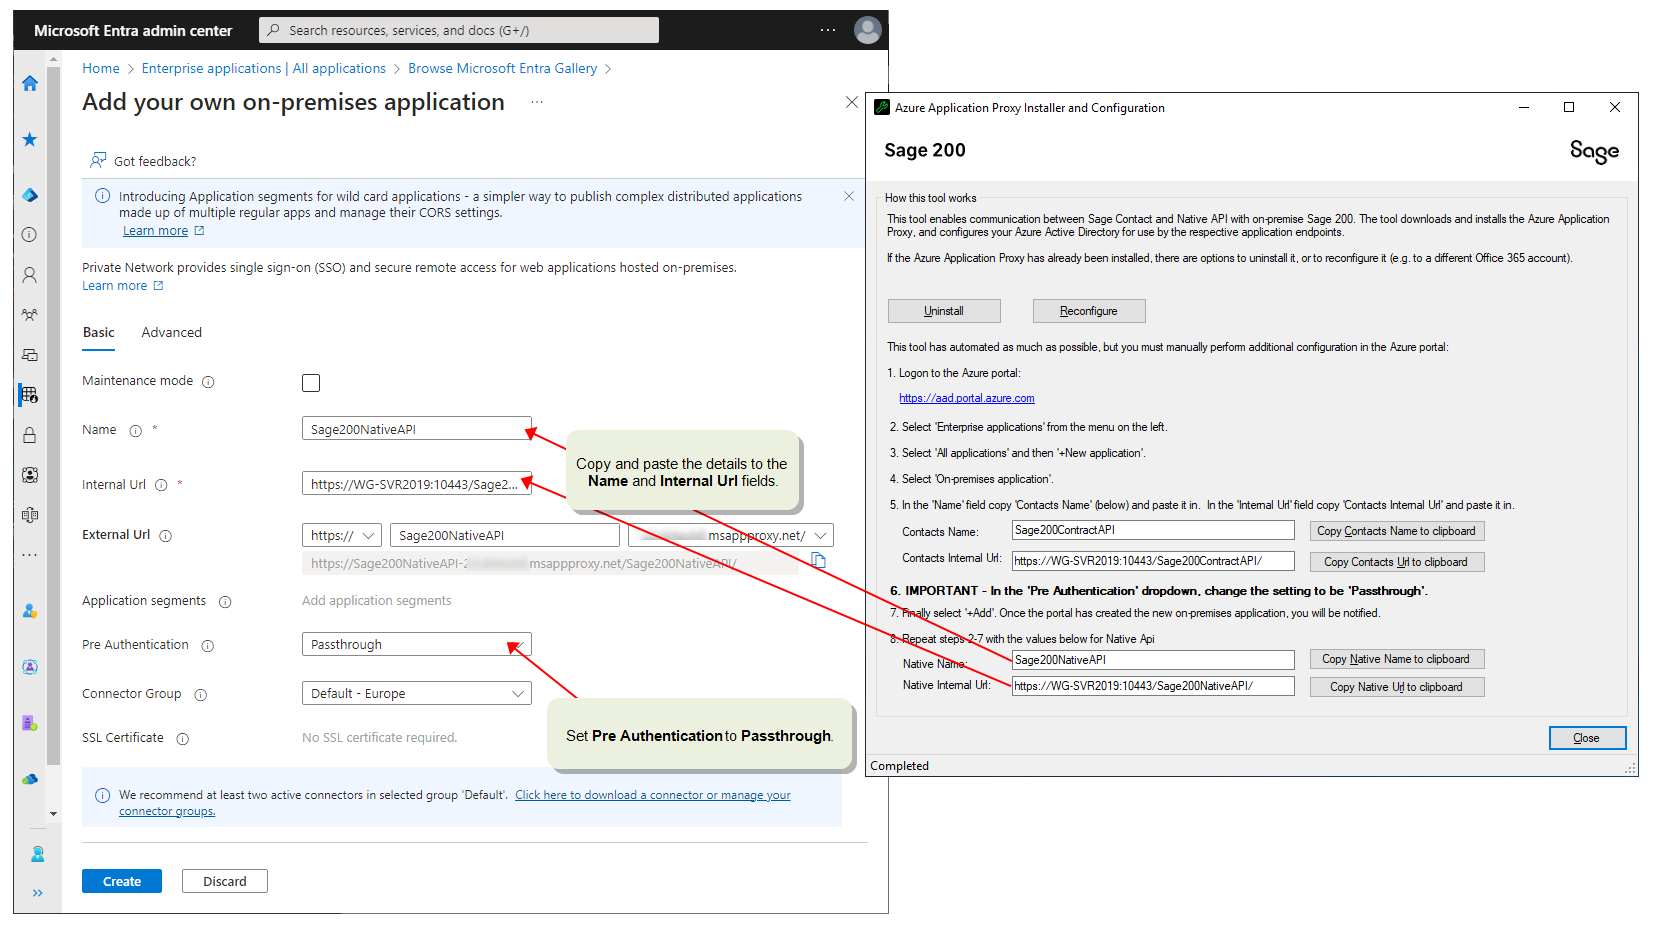
Enter the Name and Internal Url for the on-premises application.
-
Name: Copy and paste the Web Portal Name (Sage200WebPortal) from the installer.
-
Internal Url: Copy and paste the Web Portal Internal Url from the installer.
This should be in the format: https://<your-server-name>:10444/Sage200WebPortal/
Tip:-
Test the internal URL by entering it in a browser.
-
If you don't know your server's internal URL, you can find it by opening the Web Portal from the desktop app, using
 Tools > Show Web Portal in Browser.
-
-
Make a note of the External Url, as this is the URL that people will use to sign in to the Web Portal. This will probably be in the format:
https://sage200webportal-<account name>.msappproxy.net/Sage200WebPortal/

-
-
Set Pre Authentication to Passthrough.
-
Select Create to create the application.
You'll see a notification when this is complete.
.png)
-
Grant admin consent for your new application.
-
Select Entra ID > Enterprise apps.
-
Select the application you created from the list of All applications.
-
Select Permissions from the menu.
-
Select Grant admin consent for {account name}.
.png)
Note - informationTo continue setting up the Web Portal, see Set up access to the Web Portal.
-
Set up Power BI or Native API apps-
Select Entra ID > Enterprise apps.
-
Select New application.
-
Select Add an on-premises application.
-
Enter the Name and Internal Url for the on-premises application.
-
Name: Copy and paste the Native API Name (Sage200NativeAPI) from the installer.
-
Internal Url: Copy and paste the Native API Internal Url from the installer.
-
-
Set Pre Authentication to Passthrough.
-
Select Create to create the application.
You'll see a notification when this is complete.
-
Grant admin consent for your new application.
-
Select Entra ID > Enterprise apps.
-
Select the application you created from the list of All applications.
-
Select Permissions from the menu.
-
Select Grant admin consent for {account name}.
-
Set up the Self Service web app-
Select Entra ID > Enterprise apps.
-
Select New application.
-
Select Add an on-premises application.
-
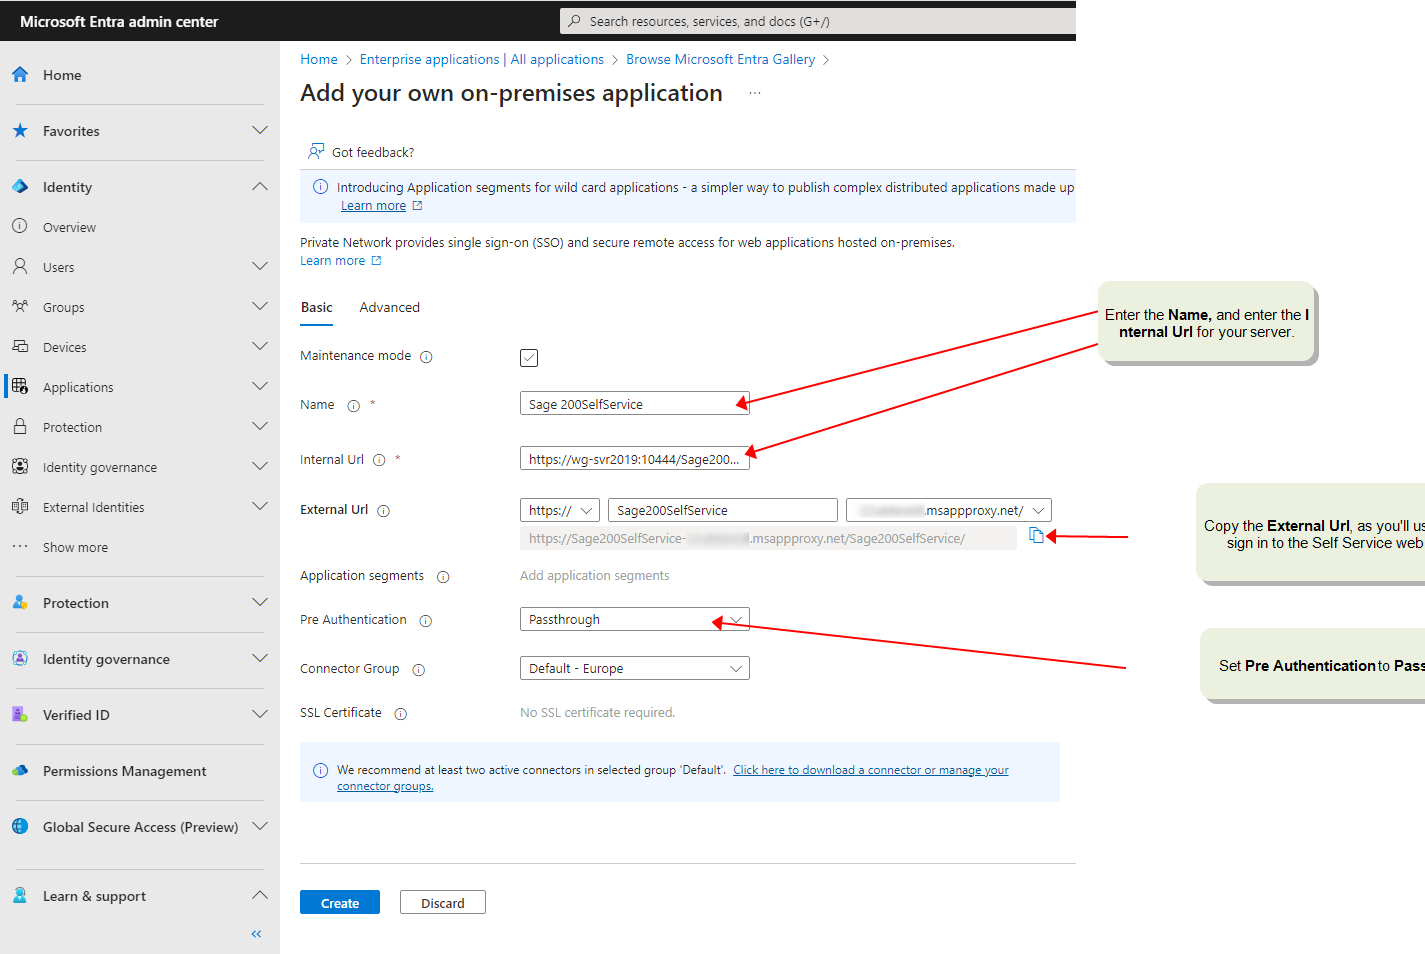
Enter the Name and Internal Url for the on-premises application.
-
Name: Copy and paste the Self Service Name (Sage200SelfService) from the installer.
-
Internal Url: Copy and paste the Self Service Internal Url from the installer.
This should be in the format: https://<your-server-name>:10444/Sage200SelfService/
Tip:-
Test the internal URL by entering it in a browser.
-
If you don't know your server's internal URL, you can find it by opening the workspaces from the desktop app, using
Tools > Show Workspaces in Browser.
-
-
Make a note of the External Url, as this is the URL that people will use to sign in to the Self Service web app. This will probably be in the format:
https://sage200selfservice-<account name>.msappproxy.net/Sage200SelfService/
-
-
Set Pre Authentication to Passthrough.
-
Select Create to create the application.
You'll see a notification when this is complete.
-
Grant admin consent for your new application.
-
Select Entra ID > Enterprise apps.
-
Select the application you created from the list of All applications.
-
Select Permissions from the menu.
-
Select Grant admin consent for {account name}.
Note - informationTo continue setting up the Self Service web app, see Set up the Self Service web app.
-
Note - informationThe Sage Contact app for Sage 200 has now been withdrawn.
-
If you need to set up the connection with a different administrator account, use Uninstall to remove the Microsoft Entra private network connector, then run Install and Configure again.
Note: You must also enter the Microsoft 365 email address for each user account in Sage 200. See Set up user email addresses in Sage 200.
Set up user email addresses in Sage 200
For each user, you need to enable Microsoft Entra ID (previously Azure AD) authentication and enter their Microsoft 365 email address.
-
This is required for users that will use Sage 200 connected apps, Power BI, Power Automate, or the API.
-
This is not required for users that will only use the Self Service web app.
Open: System Administration.
-
Select the Users list.
-
Right-click the user and select Properties.
-
Select the API tab.
-
Enable Microsoft Entra ID (previously Azure AD), and then enter the user's email address for their Microsoft 365 account.
Questions
If someone cannot access an app, check that the user's Microsoft 365 email address has been set up in Sage 200.
If you've already set up Sage 200 to access the API using Sage account authentication, but you want to change this to connect via a Microsoft 365 subscription with Microsoft Entra ID (formerly Azure AD) authentication instead, follow these steps:
- In System Administration, select API and disable the API.
-
Follow the steps above on this page to:
-
Activate your Microsoft 365 subscription.
-
Create user accounts in Sage Business Centre.
-
Connect Sage 200 to your Microsoft 365 account.
Note: If you will use third party apps, you'll need to follow the steps to add an application for the Native API.
-
-
In System Administration, check that each user has the correct Microsoft Entra ID (previously Azure AD) email address, rather than a Sage account email address.